background image

www.howdens.com

Page _ 12

LAMONA 

Appliances

Electrical connections   


IMPORTANT: Ensure that the electricity supply is switched off before connecting.

Your

When fitting in recirculation mode (with carbon filters) ensure the cable is shortened or securely held in place to prevent

the loose cable from falling back into the motor.

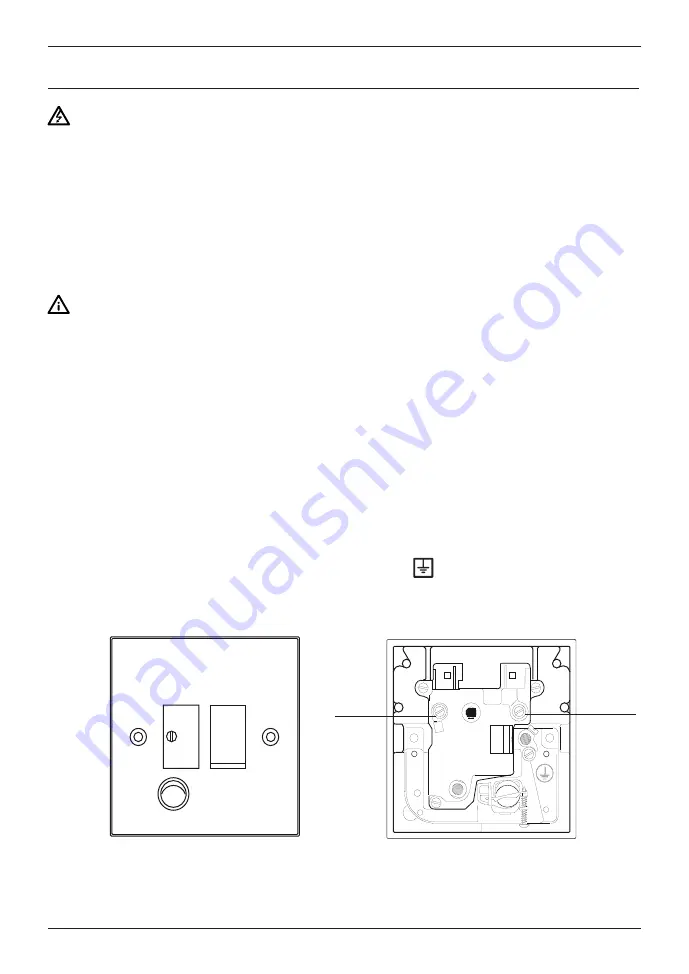
 appliance must be connected to fixed  wiring via the use of a double pole switched fused spur outlet 

with at least 3mm contact separation, The isolation switch must be accessible after installation. (See 

technical data for fuse rating).

We strongly recommend the appliance is connected by a suitably qualified person.

The product must be installed in accordance with all local regulations.

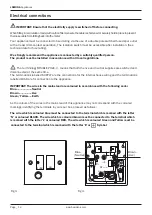
 The terminology DOUBLE POLE -/+ means that both the live and neutral supplies are switched and 

disconnected at the same time.

The terminations labelled SUPPLY are the connections for the internal house wiring and the terminations 

labelled LOAD are for connection to the appliance.

IMPORTANT: The wires in the mains lead are coloured in accordance with the following code:-

Blue.....................Neutral

Brown..................Live

Green/ Yellow.....Earth

As the colours of the wires in the mains lead of this appliance may not correspond with the coloured 

markings identifying the terminals in your spur box, proceed as follows;

The wire which is coloured blue must be connected to the terminal which is marked with the letter 

‘N’ or coloured BLACK. The wire which is coloured brown must be connected to the terminal which 

is marked with the letter ‘L’ or coloured RED. The wire which is coloured Green and Yellow must be 
connected to the terminal which is marked with the letter ‘E’ or 

Symbol

.

4


g

i

F

 .

3


g

i

F


N

L

L

N

LOAD

SUPPLY

LOAD

SUPPLY

DP

13A  250V~

FUSE

ON

Blue.

(Neutral)

Brown.

(Live)

Содержание LAM2412 Stainless Steel

Страница 1: ...Instructions and Installation LAM2412 Stainless Steel LAM2413 Black 90cm Chimney Extractor www howdens com appliance registration ...

Страница 2: ...See back page for product serial number ...

Страница 3: ... you doing your part to protect the environment By placing the marking on this product we declare on our own responsibility compliance to all of European safety health and environmental requirements stated in the legislation for this product Metal Surfaces of the Extractor and Condensation When cooking with pans using a large water content large quantities of vapour and steam can be produced very ...

Страница 4: ... a r t x E Control panel layout Care and maintenance General cleaning Grease filters Carbon filters Replacing the lamps Installation Methods of extraction Extraction via ducting Extraction via recirculation Parts indentification Hanging your extractor Decorative chimney fitting Electrical connections 04 04 04 04 04 05 05 05 06 06 06 07 07 08 08 08 08 09 10 11 12 13 13 14 Technical Specification Yo...

Страница 5: ... or drugs Product must be disconnected from the mains during installation maintenance cleaning and repair procedures Repair procedures must always be performed by service agents The manufacturer shall not be held responsible for damages arising from procedures carried out by unauthorised persons which may also void the guarantee DO NOT flambè under the extractor Keep all ventilation slots clear of...

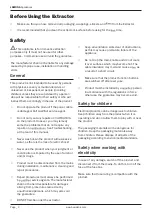
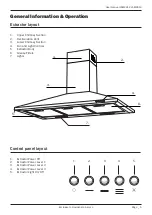
Страница 6: ...ecirculation Vent 3 Lower Chimney Section 4 Fan and Light Controls 5 Extractor Body 6 Grease Filters 7 Lights General Information Operation Extractor layout Control panel layout 1 Extractor Power Off 2 Extractor Power Level 1 3 Extractor Power Level 2 4 Extractor Power Level 3 5 Extractor Light On Off 1 2 3 4 5 ...

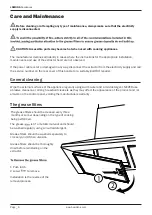
Страница 7: ...rer General cleaning Wipe the external surfaces of the appliance regularly using warm water and a mild detergent NEVER use abrasive cleaners or strong household cleaners as they may affect the appearance of the product and or artwork on the control panel voiding the manufacturers warranty Care and Maintenance The grease filters The grease The grease filters should be cleaned every three months or ...

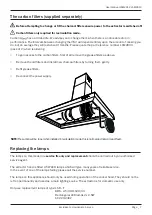
Страница 8: ...Thesuctionwillbe lowerwheninstalledinrecirculationmode thisisnormalandnotaproductfault Replacing the lamps The lamps on this model are service fix only and replacement should be carried out by an authorised service agent The extractor hood is fitted 2 5W LED lamps which will give many years of reliable service In the event of one of the lamps failing please call the service number The lamps on thi...

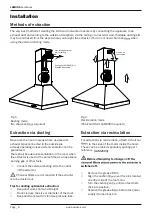
Страница 9: ... ventilation in the room when the extractor is used at the same time as an appliance burning gas or other fuels Connect the external ducting kit to the outlet of the extractor Charcoal filters are not required if the extractor is to be ducted out Tips for ducting optimal air extraction Keep duct work short and straight Do not reduce the size or diameter of the duct Keep ductwork taut to minimise p...

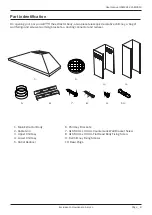
Страница 10: ...scopic decorative chimney a bag of wall and screws two brackets a ducting connector and reducer 1 3 2 4 5 6 7 8 9 10 1 Main Extractor Body 2 Cable Grid 3 Upper Chimney 4 Lower Chimney 5 Outlet Reducer 6 Chimney Brackets 7 8 4x ST4mm x 30mm Flat Head Body Fixing Screw 4x ST4mm x 40mm Countersunk Wall Bracket Screw 9 6x Chimney Fixing Screws 10 Rawl Plugs ...

Страница 11: ... discharged into a which is used for exhausting fumes from appliances supplied with energy other than electricity E g gas boilers Ensure the requirements of the local authorities are adhered to concerning the discharge of exhaust air Ensure adequate room ventilation is provided when the extractor is used in the same room as appliances supplied with energy other than electricity Never duct into a h...

Страница 12: ...g externally 4 Rest the chimney sections on the main extractor body and extend the upper section to the ceiling 5 Use the extended chimney sections to mark up the appropriate position of brackets 6 6 Remove the chimney sections drill and secure brackets with appropriate 7 Resit the chimney sections on to the extractor body hooking the lower section on to bracket 6 and secure to the upper wall brac...

Страница 13: ... are switched and disconnected at the same time The terminations labelled SUPPLY are the connections for the internal house wiring and the terminations labelled LOAD are for connection to the appliance IMPORTANT The wires in the mains lead are coloured in accordance with the following code Blue Neutral Brown Live Green Yellow Earth As the colours of the wires in the mains lead of this appliance ma...

Страница 14: ...ORMATION General Total power consumption 105W Fuse 3 A Voltage Frequency 220 240 V 50 Hz Cable type section 0 75mm 3 core or equivalent Cable length max 1 5m Lamps 2X 2 5W LED warm white 3000k TROUBLESHOOTING GUIDE Symptoms Possible Cause Solutions Lamps fail to operate Light functions but fan does not Lamps internal fault Power is cut extractor will not function Lamp has passed its usable life Mo...

Страница 15: ...turer s instructions and used for normal domestic purposes This guarantee does not cover accidental damage misuse or alterations which are likely to affect the product The guarantee is invalid if the product is tampered with or repaired by any unauthorised person The guarantee in no way affects your statutory or legal right What to do if you need to report a problem Please ensure you have ready Th...

Страница 16: ...Product serial number Place sticker here ISSUE v2 190219 ...

Отзывы: