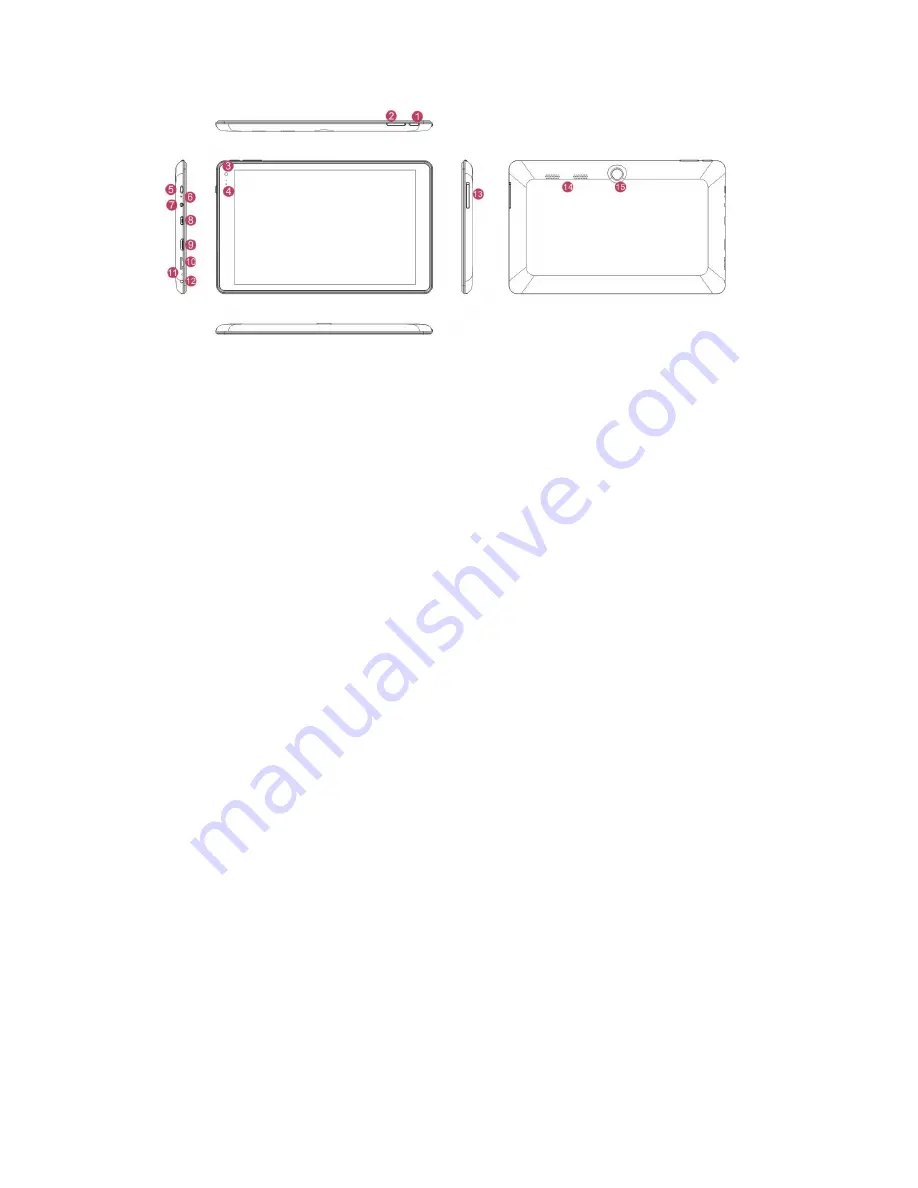
Lamina T-801BR.SE Скачать руководство пользователя страница 4

1  .Home key

According to the menu list 

2  Sound-/sound+: Lower/raise volume 
3  Front CCD camera: take photos, and record pictures 
4  CCD camera indicator: The CCD camera indicator will be on when the built-in CCD camera 

is used. 

5  Power button: Press it down to start or close the touch screen panel. You can also let the 

computer to enter dormancy through this button or wake from the dormancy mode. 

6  DC Indicator: Becomes brighter when charging. 
7  Socket for earphone and microphone: This socket can transmit the audio signals of Tablet PC 

to loudspeaker or earphone. 

8  Micro USB Interface: You can read the data through USB. 
9  Mini HDMI Interface: High-Definition Multimedia Interface 
10  Micro SD card slot: The built-in storage card reader slot supports MicroSD and MicroSDHC 

format. 

11  MIC

Microphone 

12  Power DC Interface: Recharge your Tablet PC through DC interface. 
14  Back CCD camera: take photos, and record pictures 
15  Loudspeaker: The built-in loudspeaker enables you to hear the sound without having to 

linking additional device. 

Содержание T-801BR.SE

Страница 1: ...Lamina T 801BR SE User Operating Manual Intel Windows 8 1 Tablet PC ...

Страница 2: ...s in figures and words Contents 03 04 05 06 I Precautions before Use II Key LayoutandDefinitions III Key Descriptions and Applications Ⅳ Introduction to Desktop V Pikopas Suomi VI Hurtigguide på Norsk Dansk VII Snabbstartsguide på Svenska 06 06 06 08 09 1 Windows8 1 Start Screen 2 Camera usage 3 Image Slide Application 4 apps Introduction 5 Charm Menu Column 6 Double Screen Application 11 Ⅴ Basic ...

Страница 3: ...C with any detergent containing chemical element or other liquid to avoid causing damage due to corrosion and becoming damp If cleaning is really necessary clean it with dry soft cloth tissue paper 7 Our company shall not bear any and all responsibilities for loss or deletion of material inside the machine caused due to abnormal software and hardware operation maintenance or any other accident 8 P...

Страница 4: ...es brighter when charging 7 Socket for earphone and microphone This socket can transmit the audio signals of Tablet PC to loudspeaker or earphone 8 Micro USB Interface You can read the data through USB 9 Mini HDMI Interface High Definition Multimedia Interface 10 Micro SD card slot The built in storage card reader slot supports MicroSD and MicroSDHC format 11 MIC Microphone 12 Power DC Interface R...

Страница 5: ...öpostit internet suosikit laitteisiisi 9 Tämän jälkeen laite asentaa ohjelmistot valmiiksi 10 Tarkista vaihda kieli a Pyyhkäise näytön oikeaa laitaa sivulta keskelle päin ja valitse Settings b Valitse PC Settings näytön alanurkassa c Valitse Time and language d Valitse Region and laguage e Valisemasi kielen kohdalla lukee Checking Windows Update Kun näytössä lukee Language pack available paina val...

Страница 6: ...ller juster språk a Sveip stryg inn fra høyre og velg settings b Velg PC Settings lengst nede på skjermen c Velg Time and language d Velg Region and language e Ved ditt valgte språk står det Checking Windows Update Når det står Langua ge pack avaiable trykk på det valgte språket og velg Options f Velg Download for å laste ned og vent til ditt valgte språk installeres g Sveip stryg inn fra høyre og...

Страница 7: ...annat på alla dina enheter 9 Plattan konfigureras och dina appar installeras 10 Kontrollera ändra språk a Svep in från höger och välj Settings b Välj PC Settings längst ned på skärmen c Välj Time and language d Välj Region and laguage e Vid ditt valda språk står det Checking Windows Update När det står Language pack available tryck på det valda språket och välj Options f Välj Download för att ladd...

Страница 8: ...rograms fixed in the image These application programs are displayed in the form of magnet As long as you click them you can easily visit them You need to log on your Microsoft account before the application program completely runs 2 Camera usage 1 In Windows menu tap this camera to Picture 2 ...

Страница 9: ...r button choose suitable time 5 Exposure button adjust the brightness when taking pictures look for the taken pictures 2 Image slide applications Slide to right Slide to left Slide to the left from the right side of the screen to start Charm menu column Slide to the right from the left side of the screen to start the application program in running ...

Страница 10: ...een slide from the top of the screen In start screen slide finger right and left to view all application programs to move the image Slide upward In the start screen slide upward from the bottom of the screen to visit all application program APPS interfaces 3 Introduction to app Interface Besides the application programs already fixed on the start screen you can also start other ...

Страница 11: ... lightly touch press and hold the application program magnet for about one second and then let go and select 2 to fix to the start screen Conversely if you want to cancel or delete a certain application in the start screen 1 lightly touch press and hold the application program magnet for about one second and then let it go and run and select 2 attribute column to cancel the programs such as fixati...

Страница 12: ...vice Setup Share and Search Program Can let you search the files and application programs in the Tablet PC Can let you share the program through social exchange website or e mail Can return to the start screen From the start screen you can also use this function to return the application program that is opened in the latest Can let you read write and share files connect external screen or printer ...

Страница 13: ...uter in Figure 1 slide it inward from the left side of the screen drag it and hold Let go when seeing double interfaces appear In Figure 2 press the partition button on the middle partition line and drag right and left to partition the display proportion of the double screens Figure 1 ...

Страница 14: ... Figure 2 Ⅴ Basic Operations 1 Dormancy restart and power off 2 Security Management User and password setup ...

Страница 15: ...m setup and select Change computer setup Select User on the left and click Create local account in Your account on the right side After inputting the password of Complete Windows Live Id Account input username password confirm password and password prompt ...

Страница 16: ...Supportinformation lamina captech se 46 31 89 89 00 ...

Отзывы: