Lakes SS120 Скачать руководство пользователя страница 8

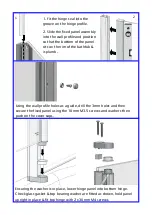
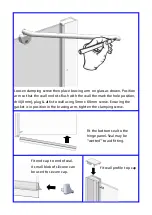
Fit the bottom seal to the 
hinge panel. Seal may be 
“wetted” to aid fitting. 

Fit end cap to end of seal. 
A small blob of silicone can 
be used to secure cap. 

Fit wall profile top cap 

Loosen clamping screw then place bracing arm on glass as shown. Position 
arm so that the wall end sits flush with the wall the mark the hole position, 
drill (8mm), plug & affix to wall using 5mm x 60mm screw. Ensuring the 
gasket is in position in the bracing arm, tighten the clamping screw. 

Содержание SS120

Страница 1: ...SS120 Hinged Panel Bathscreen Installation Maintenance instructions Rev 01 19...

Страница 2: ...soap detergent solutions to clean Rinse with water squeegee glass panels wipe frames dry with a soft cloth Under no circumstances should abrasive caustic or scouring products be used Non compliance w...

Страница 3: ...uding limescale buildup Damage or defects that result from repairs modifications undertaken by unauthorized persons This guarantee is in addition to statutory other legal rights What to do if somethin...

Страница 4: ...ge Seal 2x Hinge Handed pair 1x Top Plug 1x Bottom Plug 2x Glazing Gasket 2x Hinge Washer 1x Bottom Seal 2x Wall Profile Cap Handed Pair 2x Seal End Cap Handed Pair 3x Wall Plug 3x 60mm M5 Screw 3x 10...

Страница 5: ...wdriver Tape measure 3mm HSS drill bit Lakes fully reversible hinged panel bathscreen for fitting left or right handed to suitable bathtub Ensure bath rim is level that bath wall tile joints are seale...

Страница 6: ...x the wall profile using 3x 60mm M5 screws It is important to assess the fall of the bath rim and position the wall profile so that any water runs off into the bath and does not pool on the bath rim D...

Страница 7: ...eal into the groove on the hinge profile 2 Slide the fixed panel assembly into the wall profile and position so that the bottom of the panel sits on the rim of the bathtub is plumb 1 2 Ensuring the wa...

Страница 8: ...be used to secure cap Fit wall profile top cap Loosen clamping screw then place bracing arm on glass as shown Position arm so that the wall end sits flush with the wall the mark the hole position dril...

Страница 9: ...Use of good quality silicone sealant cleaning degreasing of all joint areas is recommended Apply continuous silicone sealant bead as indicated EXTERNALLY ONLY...

Страница 10: ...around the perimeter prevents pooling against the screen Should pooling be a problem it is likely due to incorrect screen rim positioning In the unlikely event of a screen leak water will be visible o...

Отзывы: