background image

https://www.lairdconnect.com/iot-devices/iot-sensors


© Copyright 2019 Laird. All Rights Reserved 

Americas: +1-800-492-2320 

Europe: +44-1628-858-940 

Hong Kong: +852 2923 0610 


This guide provides instructions on configuring a Sentrius RG1xx gateway and Sentrius RS1xx sensor using the Senet server 
and node-RED web-based user interface.  

Note

:  

Step-by-step instructions, screenshots, and pictures are based on the Sentrius RG191 and Sentrius RS191, but 
the same is applicable for the Sentrius RG186 and Sentrius RS186. Differences are noted. 

For more detailed information on how to use all Sentrius gateway and sensor features, please see the 

Sentrius RG1xx User 

Guide

, available from documentation tab at: 

https://connectivity.lairdtech.com/wireless-modules/lorawan-solutions/sentrius-rg1xx-

lora-enabled-gateway-wi-fi-bluetooth-ethernet

 and the 

Sentrius RS1xx User Guide

https://connectivity.lairdtech.com/wireless-

modules/lorawan-solutions/sentrius-rs1xx-lora-enabled-sensors

.


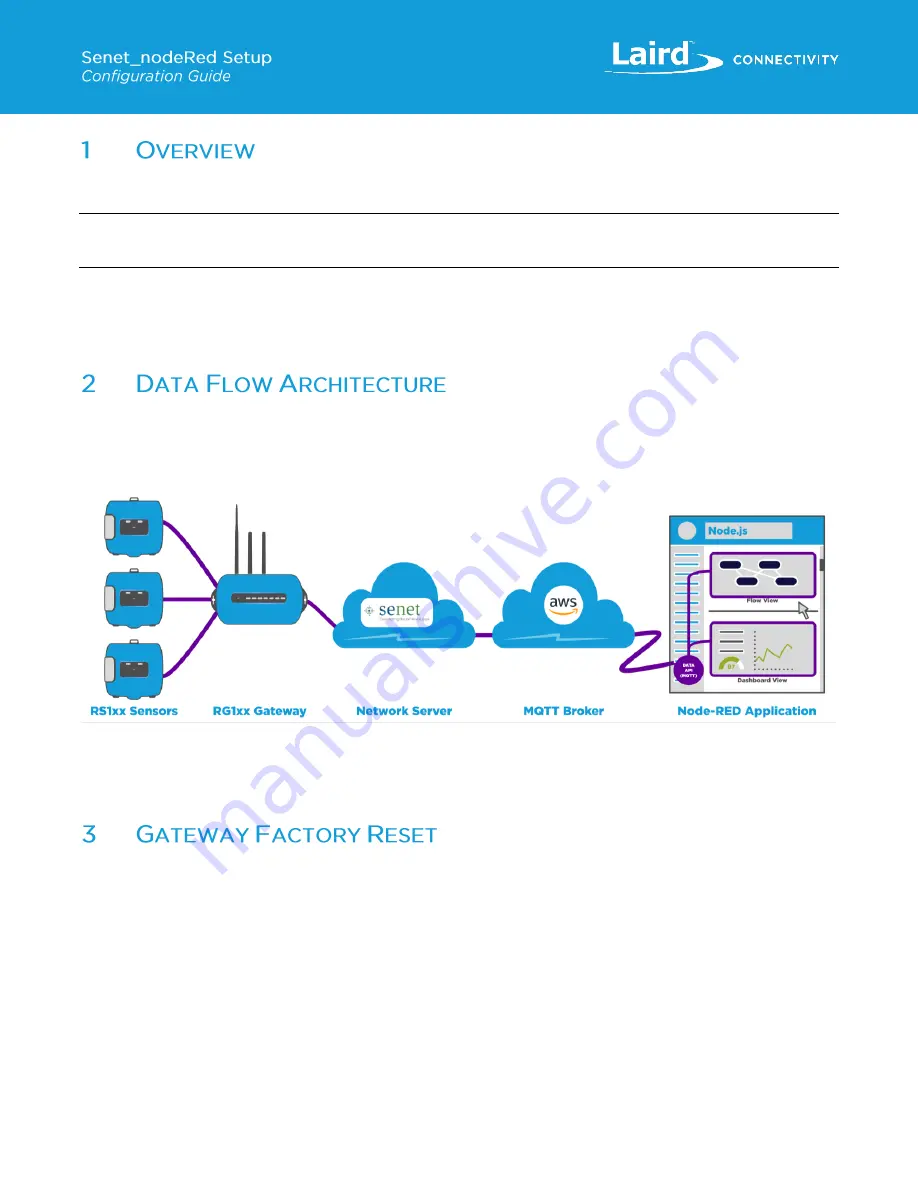
The following block diagram (

Figure 1

) displays the overall architecture described in this demo. This is a high-level 

representation of how the sensor

’s LoRaWAN data is transferred through the gateway (which plays a role of packet forwarder) 

to Senet server where the data packets are processed. They are then forwarded to the MQTT Broker. The node-RED 
application contains an MQTT client that receives sensor data and displays it on a browser-based user interface. 


Figure 1: Data flow architecture 

This guide shows a step-by-step approach to setting up a test LoRaWAN network. It starts on the left side of the block diagram 
with the Gateway configuration and progresses toward the UI application on the right. Sensor devices are added when 
configuring the Senet backend. 


If setting up a previously configured gateway, we recommend that you clear any prior settings by resetting the gateway to its 
factory default values. To do this, complete the steps described in the 

Factory Reset

 section of the RG1xx User Guide. You 

can access this guide on the 

RG1xx product page

 from the Documentation tab. 


LoRa 

Wi-Fi / 

Ethernet 

Cloud 

Cloud 

Содержание Sentrius RG1 Series

Страница 1: ...A Version 1 2...

Страница 2: ...Version Date Notes Contributor Approver 1 0 4 Apr 2018 Initial Release Seokwoo Yoon Jonathan Kaye 1 1 19 Dec 2018 Updated template logos and URLs Sue White Jonathan Kaye 1 2 3 Jan 2020 Updated picture...

Страница 3: ...RS1xx Configuration 11 8 Setting up MQTT Broker on Amazon AWS 13 8 1 Setting up AWS server 13 8 2 Installing MQTT Broker on AWS instance 15 9 MQTT Integration on Senet 16 10 node RED Setup 18 10 1 Ins...

Страница 4: ...ora enabled sensors The following block diagram Figure 1 displays the overall architecture described in this demo This is a high level representation of how the sensor s LoRaWAN data is transferred th...

Страница 5: ...ox and connect the three antennas Refer to Antenna Configuration for additional information Connect the power supply see 2 in Figure 2 Connect the gateway to your router 3 Figure 2 using the Ethernet...

Страница 6: ...mmend that you update the credentials as soon as possible to minimize a potential security risk Update these credentials on the Settings page Update the firmware by clicking Settings Update Firmware F...

Страница 7: ...e that port 1700 is open LoRaWAN traffic port as well as ports 1883 and 8883 Senet MQTT traffic port in your network UDP traffic is sent over port 1700 TCP and TCP TLS socket connections are made on p...

Страница 8: ...3 0610 Figure 7 Senet account setup Note It is important that you have access to the email address entered in the account setup since Senet requires you to validate your email before proceeding with t...

Страница 9: ...ard Select Register Gateway Figure 9 Figure 9 Senet gateway configuration page Follow the prompts When Select Device Type appears choose Laird Sentrius Figure 10 Figure 10 Semtech Packet Forwarder 3 O...

Страница 10: ...he prompts and click Register to complete setup Senet sends an approval email for gateway registration click button on Devices Gateways in Dashboard Select Register Device Figure 13 Figure 13 Device r...

Страница 11: ...e Bluetooth icon on the RS1xx face panel This causes the sensor to start advertising with SS_T H as its device name Start the Sentrius app and then it scans for RS1xx via BLE If the latest firmware is...

Страница 12: ...d All Rights Reserved Americas 1 800 492 2320 Europe 44 1628 858 940 Hong Kong 852 2923 0610 Figure 16 LoRa Configuration page Note AppKey is a write only value while DevEUI and AppEUI are read write...

Страница 13: ...aph The AWS Free Tier enables you to use a certain number of instances depending on your region for free for 12 months The information on how many instances can be used for free is accessible in your...

Страница 14: ...ew page click Edit security groups Optional Security group name and Description can be changed to be specific for your purpose Port 22 is enabled by default for SSH Click Add Rule and add the ports sh...

Страница 15: ...blic IP Once logged in to ensure APT package manager has the latest sources type sudo apt get update To retrieve and install the broker and clients type sudo apt get install mosquitto mosquitto client...

Страница 16: ...et to a LoRa device after it has joined activated The notification target should be set to be the MQTT broker created in section 8 Setting up MQTT Broker on Amazon AWS Power cycle the RS1xx by taking...

Страница 17: ...guration Figure 25 a If your MQTT broker is set up with SSL support and you want to use it check the box for SSL b Client ID any name that preferably describes your device c Broker Address web address...

Страница 18: ...ll the node js package manager NPM and node js locally on your PC by going to the node js website https nodejs org en Both node js and the NPM are installed in the same install Figure 26 We recommend...

Страница 19: ...pdown menu and for changing from Celsius to Fahrenheit for the node RED user interface The sentrius rs1xx demo json is a template for a node RED flow which processes the MQTT data and sets up the user...

Страница 20: ...devices registered with Senet you must edit the rs1xx demo config json file This file is read by the node RED flow during the start up of the user web interface Note JSON is an object representation i...

Страница 21: ...vice versa depending on the what is desired False is the Default Setting When you re done editing save the file Figure 32 rs1xx demo config json in a text editor The dashboard module adds a set of nod...

Страница 22: ...or red disconnected symbol below them To establish an MQTT connection with the broker running on your AWS EC2 instance you must set the MQTT Broker configuration The Broker configuration is the infor...

Страница 23: ...r 8 Click the Security Tab Enter user name and password for the MQTT broker 9 Click Update to save parameters 10 Click Deploy to update the node RED application on the local node RED server Note Whene...

Страница 24: ...ter the URL http localhost 1880 ui Figure 38 node RED user interface Note To display the User Interface run the node RED flow example by entering node red sentrius rs1xx demo json on the command line...

Страница 25: ...Reserved Americas 1 800 492 2320 Europe 44 1628 858 940 Hong Kong 852 2923 0610 Figure 39 Device ID Drop Down Menu Note Please contact a Laird sales representative if you need help setting up your ap...

Страница 26: ...n sends network time to the sensor if it is running when the sensor joins the network If the node RED application is not running the RS1xx device joins the network activation but does not begin sendin...

Страница 27: ...Downlink should show a connected status These all use the same configuration node MQTT Broker Click the hamburger menu and navigate to Configuration Nodes MQTT Broker Figure 36 Make sure the username...

Отзывы: