background image

Quick Start Guide 

SDC-WB40NBT 

Americas: +1-800-492-2320 Option 3 
Europe: +44-1628-858-940


Hong Kong: +852-2268-6567 x026


www.lairdtech.com/wireless


SDC-WB40NBT_QSG_v1_0_201211 


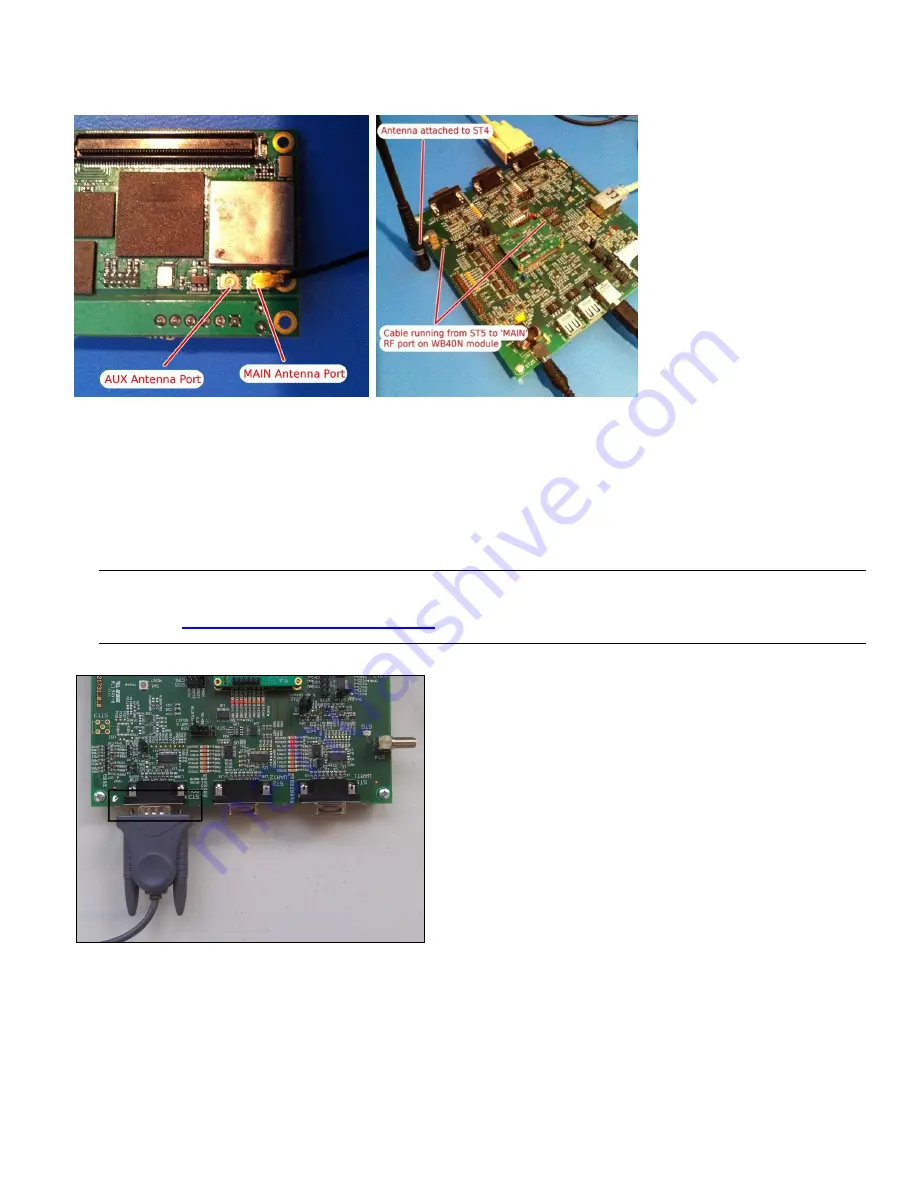
Figures 1 and 2: Antenna Cable Connections 

1.


Plug the SDC-WB40NBT module into ST19, the 120-pin high-density connector situated near the four mounting 
screws that were installed in step 1. 

2.


Connect an antenna with an SMA connector to the antenna port STA4. 

3.


Connect the USB-to-RS232 adapter to the position labeled 

ST3 DBU

 (RS232) on the Hoeft & Wessel breakout 

board. 

Note:    Do not plug the USB-to-RS232 cable into a host PC at this time. Its driver 

must first

 be installed onto the host PC. 

See 

Software Installation and Configuration

 for information on how to install the driver. 


Figure 3: RS232 Connection 

Содержание SDC-WB40NBT

Страница 1: ...Americas 1 800 492 2320 Option 3 Europe 44 1628 858 940 Hong Kong 852 2268 6567 x026 www lairdtech com wireless SDC WB40NBT Quick Start Guide Version 1 0 ...

Страница 2: ...DC WB40NBT Americas 1 800 492 2320 Option 3 Europe 44 1628 858 940 Hong Kong 852 2268 6567 x026 www lairdtech com wireless 2 SDC WB40NBT_QSG_v1_0_201211 REVISION HISTORY Revision Description 1 0 03 21 2012 Initial version ...

Страница 3: ...567 x026 www lairdtech com wireless 3 SDC WB40NBT_QSG_v1_0_201211 Contents Inventory of Equipment 4 Hardware Installation and Configuration 4 Software Installation and Configuration 6 Using Linux on the SDC WB40NBT 8 Common Terms 8 Scanning for Available Access Points 8 Establishing a Wireless Connection 8 ...

Страница 4: ...verse SMA Connector 3 Wi Fi Antenna with reverse TNC Connector 2 USB to RS 232 DB9 DB25 Adapter 1 Power Supply 9V 2 5A negative center with Wall US European adapter Cable HARDWARE INSTALLATION AND CONFIGURATION To connect the SDC WB40NBT to a computer follow these steps 1 If not already installed attach the four riser assembly mounting screws onto the breakout board These screws are installed from...

Страница 5: ...ector situated near the four mounting screws that were installed in step 1 2 Connect an antenna with an SMA connector to the antenna port STA4 3 Connect the USB to RS232 adapter to the position labeled ST3 DBU RS232 on the Hoeft Wessel breakout board Note Do not plug the USB to RS232 cable into a host PC at this time Its driver must first be installed onto the host PC See Software Installation and...

Страница 6: ...9 DB25 Adapter 1 Power supply 9V 2 5A negative center with wall US European adapter Cable To set up the SDC WB40NBT follow these steps 1 Load the driver for the USB to RS232 cable using the CD provided To load the driver follow these steps a Insert the CD labeled Driver and Utility CD in your computer s CD drive b From your CD drive navigate to D Prolific PL2303HXD c Click on PL2303_Prolific_Drive...

Страница 7: ...SB Comm Port Remember this COM port number h To adjust the serial port settings navigate to Setup Serial port Adjust the settings as needed according to the following Port The previously chosen port may not be set here Change to the correct COM port number if necessary Baud Rate 115200 Tera Term defaults to 9600 baud communications Data 8 bit Parity None Stop 1 bit Flow Control None i Press OK to ...

Страница 8: ... Then type the following wl scanresults Note If the wl scanrestults command indicates the device is not ready it may be still creating the list of available access points Wait a few seconds and type the wl scanresults command again Establishing a Wireless Connection The wireless bridge is pre configured with a script S45wireless that loads the device driver for the radio and attempts to make a con...

Отзывы: