background image

800-898-0759 • 845-339-9555 • 2000 Sterling Road • Mount Marion, NY 12456 • www.lairdtelemedia.com

- Page 4 -

LTM-CPDV

CapDiv

™ 

Portable

DV Disk Recorder

F

IGURE

1.0 / T

OP

P

ANEL

F

UNCTIONS

1

2

5

3

4

7

6

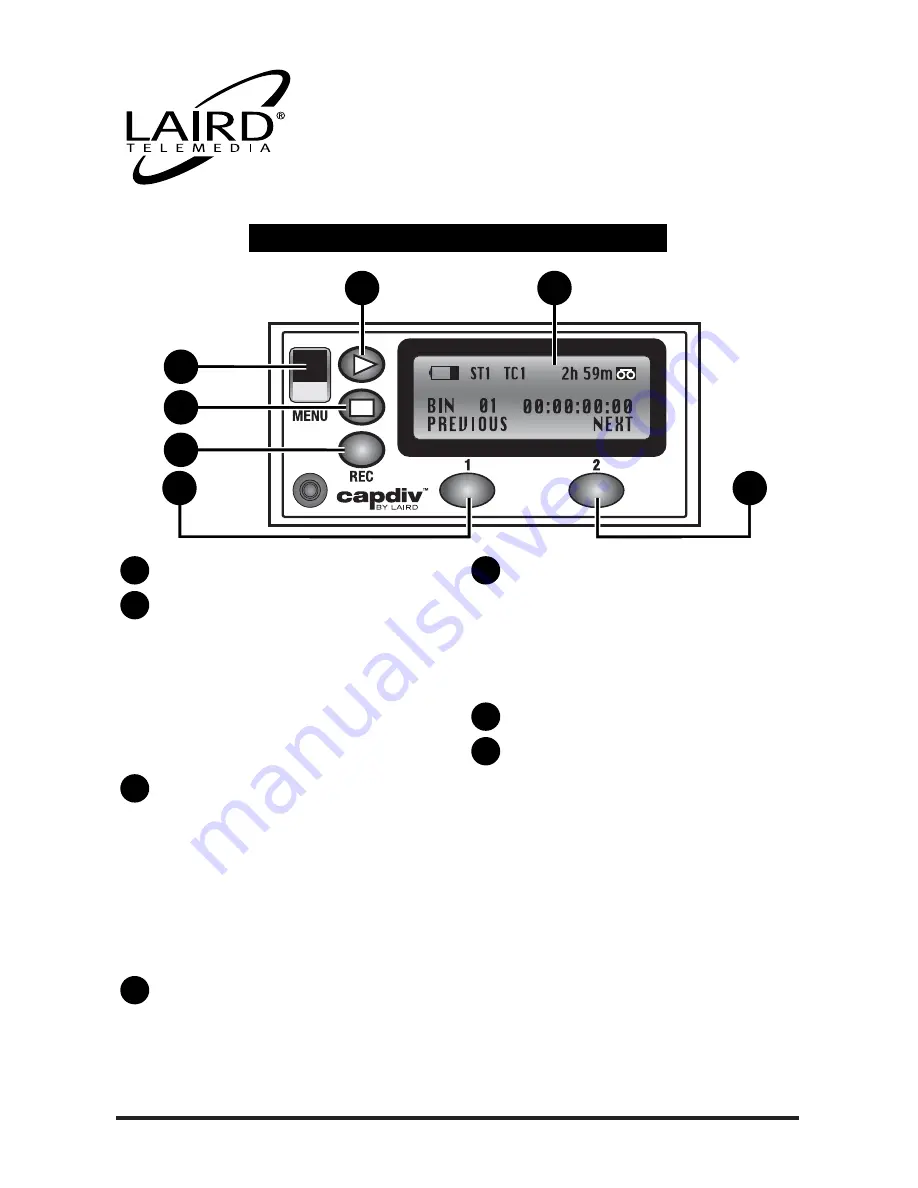
LCD - for LCD readout definitions, see page 11

PLAY/PAUSE

• In idle mode, pressing this button plays the

current bin from its beginning, or from its last
play position.

• In play mode, pressing this button will toggle

between the play and pause function.

• In idle mode, holding down the REC(5) button

and pressing PLAY(2) will begin a recording
session.

MENU

• Scroll through five CapDiv™ functions by

pressing the MENU button.

• Use softkeys to select and set different func-

tions (Functions listed under MENU SETUP
MODE).

• To select MENU option, press ENTER :Right

Softkey(7)

• To leave MENU function, press CANCEL: Left

Softkey(6)

STOP

• In play mode, pressing this button will stop

playing.

• In record mode, pressing this button will stop

recording.

RECORD

• Begins a recording session by holding down

REC and pressing PLAY at the same time.
When sync to tape is enabled, actual recording
will begin when the camera starts recording.

• While recording, press the REC button to drop

marks.

LEFT SOFTKEY

RIGHT SOFTKEY

• The functions of the softkeys depend entirely

on the currently displayed mode. The softkey’s
current function is always displayed directly
above each softkey, on the bottom line of the
LCD panel. For example, as seen in the photo,
in idle mode, the LEFT and RIGHT softkey’s
function as PREVIOUS and NEXT, respectfully.
To scroll through the bins, press RIGHT softkey
(NEXT) to advance forward one bin, or press
LEFT softkey (PREVIOUS) to scroll back one
bin.

NOTE:

Pressing and holding either softkey beyond 
2 seconds when CapDiv is in Fast Forward or
Reverse will increment search speed up to 32X.

7

6

5

4

3

2

1

Содержание LTM-CPDV

Страница 1: ...LTM CPDV CapDiv Portable DV Disk Recorder LTM CPDV User Manual CE 2003 Laird Telemedia...

Страница 2: ...during product shipment This warranty does not cover circumstances beyond Laird s control service or parts to correct problems resulting from the use of attachments accessories or alterations not mar...

Страница 3: ...n AV Hard Drive Mode 18 Support Information 22 Glossary of Terms Used in this Manual 23 Safety Precautions 24 Topics Covered in this Manual General media organization in VTR mode Menu setup mode Recor...

Страница 4: ...16 bits 48 kHz 2 channels 16 bits 44 1 kHz 4 channels 12 bits 32 kHz Operates in VTR Emulation Front Panel Control of RECORD PLAY REWIND FAST FORWARD STOP Operates as IEEE1394 HDD FAT32 Recording con...

Страница 5: ...ING Never leave your battery in the charge mode for longer than 24 hours Excessive charging can cause permanent damage to your bat tery and can cause leakage If the installed AUTOMATIC FUSE should blo...

Страница 6: ...oftkey 6 STOP In play mode pressing this button will stop playing In record mode pressing this button will stop recording RECORD Begins a recording session by holding down REC and pressing PLAY at the...

Страница 7: ...and the CapDiv is put in standby mode Sliding the switch off center and toward the VTR position turns the CapDiv on and initializes VTR mode Sliding the switch off center and towards the HDD position...

Страница 8: ...attery Level Sync to Tape on ST1 off ST0 Time Code Preserve on TC1 off TC0 Loop Play symbol is on only when loop play is enabled Time Remaining Displayed in hours and minutes next to a tape symbol Lin...

Страница 9: ...d command function The RECORD 5 key by itself will not provide the manual execution of the RECORD com mand The RECORD key has two functions as follows Keys Functions RECORD 5 PLAY 2 Manual RECORD RECO...

Страница 10: ...s directly above the appropriate Soft Key These control options are accessed during playback as follows Key Function PRESS Soft Key 1 To Reverse Playback PRESS Soft Key 2 To Playback FASTER NOTE Press...

Страница 11: ...o configure the CapDiv for the required task at hand Pressing the MENU button repeatedly will sequentially display these five 5 Menu Setup Mode functions on the LCD Making Media Files Sync to Tape Con...

Страница 12: ...corder is not moving Each time the RECORD button is depressed a new video clip is created with in a given BIN The default recording mode for CapDiv is with the SYNC TO TAPE function ON When the SYNC T...

Страница 13: ...r SYSTEM SETUP option there are six additional sub menu functions Setup Loop Play Set Default Audio Select AVI Type Total Space Init File System Firmware Revision To access these functions press ENTER...

Страница 14: ...cording time HH MM SS FF WARNING This step is irreversible All video media on the CapDiv will be lost Selecting this menu function will reinitialize the file system in the rare occasion that CapDiv pe...

Страница 15: ...ally separated in up to one hundred twenty eight 128 recorded video clips A BIN is analogous to a tape in a VTR with a series of recorded video clips on the tape CapDiv always defaults to BIN 01 upon...

Страница 16: ...ed on the top line of the LCD Display is the TimeCode of the last video frame played At all other times the TimeCode dis played indicates the total duration of the content present in that BIN Recordin...

Страница 17: ...rder In SYNC TO TAPE mode ON recording only occurs when the camcorder tape is moving Step 1 Hold the RECORD button and press the PLAY button at the same time This puts the CapDiv into a RECORD PAUSE m...

Страница 18: ...ying the first clip in the selected BIN in real time rate or at 1x real time speed Repeatedly pressing the PLAY button will alternate CapDiv between playing and pausing the selected clip in the BIN Du...

Страница 19: ...Consequently selecting a new BIN on CapDiv must be done by manu ally prior to capturing Capturing Video to Your NLE in VTR Mode CapDiv is recognized by and functions with NLE s exactly in the same man...

Страница 20: ...to need pre roll and does not include negative TimeCode adjust ments for this function Currently most NLE s do not permit pre roll to be dis abled so you must customize pre roll conditions within the...

Страница 21: ...conversion process in HDD mode the boundaries of the video clips set by Marks are not as accurate as in Marks in the VTR mode CapDiv design limits the conversion boundary location to an accuracy of o...

Страница 22: ...n performed the video content can be viewed in the VTR operat ing mode directly from CapDiv Connecting to a Windows Based Computer Connect CapDiv to your Windows based personal computer PC with a 6 pi...

Страница 23: ...iv HDD and you can then instantly have Drag Drop access your video content Disconnecting from a Mac Computer To dismount CapDiv from your Macintosh computer simply drag the CapDiv icon on your desktop...

Страница 24: ...d Mount Marion NY 12456 www lairdtelemedia com Page 22 LTM CPDV CapDiv Portable DV Disk Recorder For current support issues and answers to common questions please visit the Laird support website at ht...

Страница 25: ...tal data between compatible devices The system is sometimes referred to as Firewire and iLink Sync to Tape A mode of recording where the CapDiv will stay in a record pause until tape in the camera is...

Страница 26: ...r any area classi fied as a wet area 2 The operating temperature of this product must be kept between 40 C and 95 C Direct sun light or an intense source of heat direct or ambient must not be introduc...

Страница 27: ...Rev 3 01 27 05...

Страница 28: ...2000 Sterling Road Box 720 Mount Marion NY 12456 800 898 0759 845 339 9555 Fax 845 339 0231 www lairdtelemedia com...

Отзывы: