background image

18 


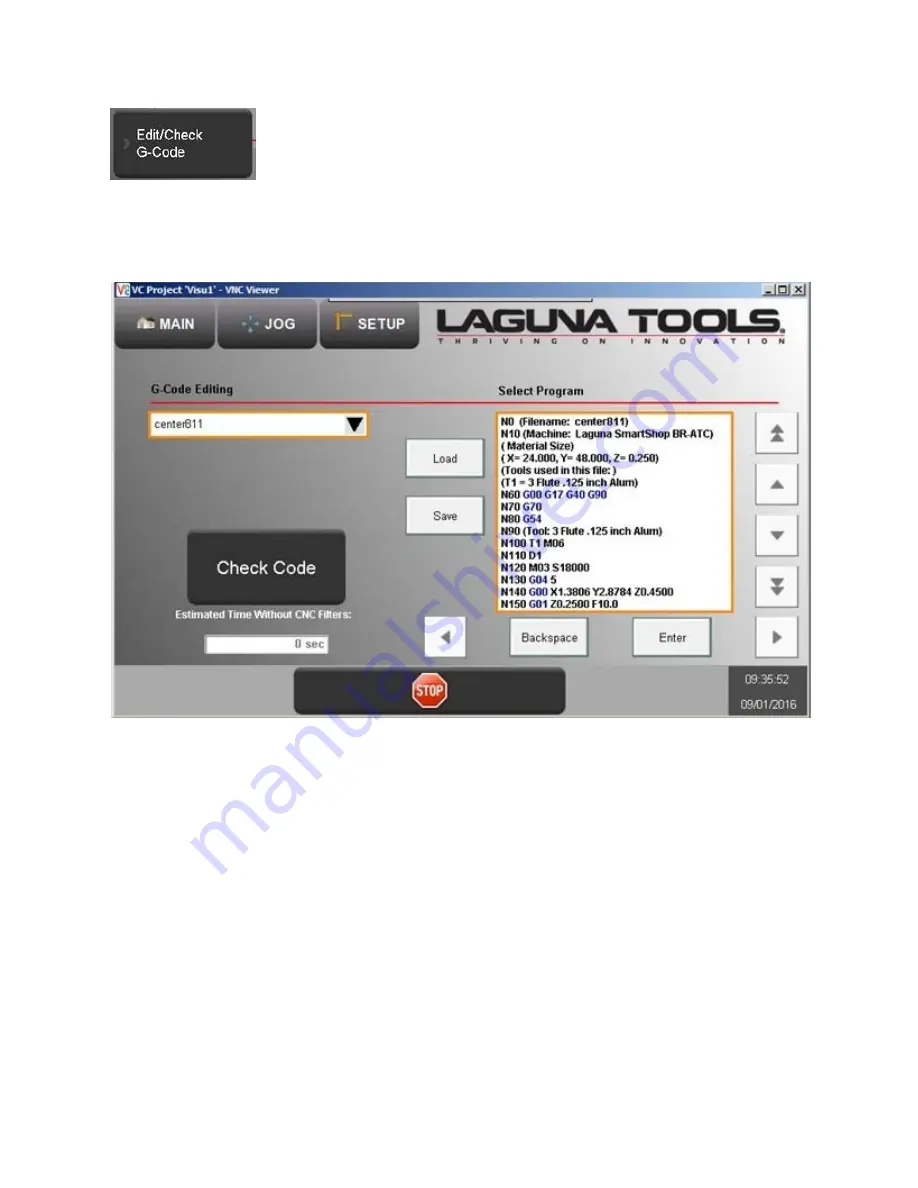
This screen has the tools to check a G-code 

program and give the ability to manually edit said G-code on 
the machine. 


Check Code

 = This button will  a program test by pre-running 

the code.  This will check that the code can be run within the 
machine limits and ZPO. 

Code Editing

 = Use the arrow keys and associated buttons to 

perform quick code edits on the machine. 


Содержание SmartShop II SUV

Страница 1: ...UAL LAGUNA TOOLS 2072 Alton Parkway Irvine California 92606 Ph 800 234 1976 www lagunatools com 2018 Laguna Tools Inc LAGUNA and the LAGUNA Logo are the registered trademarks of Laguna Tools Inc All rights reserved ...

Страница 2: ...et up Menu Screen Flow 4 Main Home Screen Defined 7 Jog Screen Defined 12 Program Preview Screen 13 Setup Screen Menu 14 Program Manager 16 CNC Tool Data 18 G code Editor 19 Machine 21 Set up Networking Screen 22 Alarm Screens ...

Страница 3: ...2 ...

Страница 4: ...3 ...

Страница 5: ...l in spindle into its tool holder and leave the spindle empty You should never leave a tool in spindle when machine is Idle Leaving a tool in spindle will cause rust and damage to tool holder and or spindle Verify Origin Pressing this button will move the machine to whatever ZPO is selected on the Jog screen G54 G59 ...

Страница 6: ...he Over ride MDI screen This is also accessible from the set up menu screen under CNC Settings Right side fields defined Select Program drop down window This field allows you to quickly select a program from the files copied to the controllers memory Active Tool This references the current tool in spindle Feedrate This shows the current federate as dictated by the active program Spindle RPM This s...

Страница 7: ... right drop down This is the selector for the X Y and Z coordinates displayed at the bottom of the Main page Machine coordinates These are the actual distances from machine Zero Relative coordinates These are resettable to zero from current position and equate to a digital tape measure function ZPO coordinates These are based on the G54 G59 set and selected from the Jog screen CNC Monitor These 5 ...

Страница 8: ...operator function for this Dust hood Up Down This button is used to manually retract or extend the dust hood Teach Tool Length This button is used to manually set tool length for the active tool This is handy on the jog page so you don t have to toggle to the tools page while manually jogging to a Z reference ...

Страница 9: ...tion for this Jogging Functions There are 3 settings for Jogging 1st Select the Jog type Either Continuous Jog or a Step jog at a specified increment 2nd For continuous Jog select the percentage of the max speed set in the controller If max speed is 1000 ipm then 50 Jog speed will move the Axis at 500 ipm 3rd For step jog select the step size you wish to increment jog at for each push of the jog o...

Страница 10: ...left of the Main screen or from the CNC settings button on the Set up menu screen or Over rides This screen allows for the adjustment of the Rapid Feed rate Cutting feed rate and the spindle RPM You can adjust all three with a percentage above or below the set parameters while the program is running ...

Страница 11: ... Delay This is used to force an On and Off delay in the control of the spindle This is in lieu of a programmed delay or used as an additional delay to the programmed ramp up and down Max Spindle Speed This field must match the maximum speed you speed can rotate This is only used if your factory spindle is replaced with a different top speed Enable Control Blocks This is function for higher end use...

Страница 12: ...rogram from the pause With this Button off the M0 is ignored DRO display The Digital Read Out s at the bottom of this screen reference the current machine coordinates for X Y and Z Stop This button cancels the program currently running Advanced This can only be accessed by use of a password and is used by technicians to perform Servo tuning adjustments There are no user functions here ...

Страница 13: ...12 Program Preview screen This screen will pre run the selected G code and give a X and Y graphical representation of the program as shown below ...

Страница 14: ...13 The following screens are accessible from the Setup Screen Menu See page 3 for screen flow chart ...

Страница 15: ...rograms within your controller User Tab This is used to display the various folders within the controller Programs Tab This displays the programs within a specified folder USB Tab This displays the programs from a USB stick when inserted into the control cabinet ...

Страница 16: ... open the Programs tab and select an empty field Press the paste button to insert the G code into the program folder for active selection The following buttons are standard file manager functions just like those used in P C s Rename Create directory Copy Cut Paste and Delete do exacting what they say Refresh This buttons polls the program storage area and brings the list up to a real time referenc...

Страница 17: ...ish to manipulate The tool number displayed propagates the fields below with its current data and allows for full manual adjustments if needed Tool Length field This represents the distance from Z home to the end of the cutter This can be propagated by the automatic touch off routine manually set with data entry or taught By Teach tool button followed by Set tool Data Button ...

Страница 18: ...r to the table or work surface Press the Teach Tool Length button to measure the Z axis distance Press Set Tool Data to write the measurement to the machine settings Failure to press the Set Tool Data will lose the measured value Set Tool in Spindle This field allows for the manual adjustment of the active tool physically in the spindle If you manually swap tool cones around you must update the ma...

Страница 19: ...manually edit said G code on the machine Check Code This button will a program test by pre running the code This will check that the code can be run within the machine limits and ZPO Code Editing Use the arrow keys and associated buttons to perform quick code edits on the machine ...

Страница 20: ...ssing the Save to CF button will write a copy of the machine settings to the controller s memory Pressing Save Settings to USB is recommended so a hard copy of machine settings is available if service requires them to re initialize the system This is also very handy for or service people so your machine can be exactly replicated in our shop for troubleshooting ...

Страница 21: ...ccess the much deeper settings that only a Laguna technician would need to access Servo tuning and motion settings can be done on the controller This eliminates the need for a technician to be on site for tuning issues if they arise Import Settings from USB This is used for recovery purposes if the controller was to be replaced ...

Страница 22: ...ork settings screen The information contained in this screen is used for networking directly to the controller This is needed for file transfers and remote diagnostic functions Via a P C network See chapter on making a network connection ...

Страница 23: ...s screen will display the 3 types of alarms that can be generated in the controller The check mark is used to acknowledge and clear a single alarm at a time to see all that occurred The Next button will open the Axis specific alarms page ...

Страница 24: ...23 The alarms displayed on this screen are Axis specific ...

Страница 25: ......

Страница 26: ...cations subject to change Machines may be shown with optional accessories 2018 Laguna Tools Inc LAGUNA and the LAGUNA Logo are the registered trademarks of Laguna Tools Inc All rights reserved 2072 Alton Parkway Irvine CA 92606 Ph 800 234 1976 www lagunatools com ...

Отзывы: