background image


3HP Mobile Dust Cyclone Manual 

4


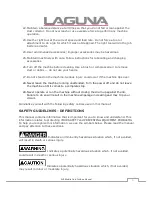
Your risk of exposure varies, depending on how often you do this type of work. To 
reduce your exposure to these chemicals, work in a well-ventilated area and work 
with approved safety equipment, such as face or dust masks that are specifically 
designed to filter out microscopic particles. 
 

9.


Do not operate this machine while tired or under the influence of drugs, alcohol or 
any medication. 
 

10.Make certain the switch is in the 

OFF 

position before connecting the machine to the 

power source. 
 

11.Make certain the machine is properly grounded. 


12.Make all machine adjustments or maintenance with the machine unplugged from 

the power source. 
 

13.Form a habit of checking to see that all extra equipment such as adjusting keys, 

wrenches, scrap, stock, and cleaning rags are removed away from the machine 
before turning on. 
 

14.Keep safety guards in place at all times when the machine is in use. If removed for 

maintenance purposes, use extreme caution and replace the guards immediately 
when maintenance is complete. 
 

15.Make sure the dust collector is on a flat even surface and the wheels locked in place 

before use.


16.Check damaged parts. Before further use of the machine, a guard or other part that 

is damaged should be carefully checked to determine that it will operate properly 
and perform its intended function. Check for alignment of moving parts, binding of 
moving parts, breakage of parts, mounting and any other conditions that may 
affect its operation. A guard or other part that is damaged should be properly 
repaired or replaced. 
 

17.Provide for adequate space surrounding work area and non-glare, overhead lighting. 


18.Keep the floor around the machine clean and free of scrap material, oil and grease. 


19.Keep visitors a safe distance from the work area. 

Keep children away.


20.Make your workshop child proof with padlocks, master switches or by removing 

starter keys. 
 

21.Give your work undivided attention. Looking around, carrying on a conversation and 

“horse-play” are careless acts that can result in serious injury. 

Содержание MDCCF32201

Страница 1: ...3HP CYCLONE 1 MICRON CANISTER...

Страница 2: ...For Dust Collectors Power Connections Motor Specifications Grounding Instructions Key Features and Components Functional Description Product Specifications Unpacking Assembly General Tool Assembly Ma...

Страница 3: ...ER Your personal safety is your responsibility This machine was designed for certain applications only We strongly recommend that this machine not be modified and or used for any application other tha...

Страница 4: ...ured or removed 3 This 3HP Portable Cyclone Dust Collector is designed and intended for use by properly trained and experienced personnel only If you are not familiar with the proper and safe operatio...

Страница 5: ...moved for maintenance purposes use extreme caution and replace the guards immediately when maintenance is complete 15 Make sure the dust collector is on a flat even surface and the wheels locked in pl...

Страница 6: ...running unattended Turn the power off and do not leave the machine until it comes to a complete stop 29 Never operate or run the machine without closing the drum up against the lid Failure to do so wi...

Страница 7: ...LDREN AND VISITORS AWAY All children and visitors should be kept a safe distance from work area DISCONNECT UNIT before servicing CHECK DAMAGED PARTS Before further use of the unit properly repair or r...

Страница 8: ...fire suppression system or have a fire extinguisher nearby Impeller hazards Do not place your hands or tools near the open inlet during operation for any reason The powerful suction could easily cause...

Страница 9: ...n overhead lights heaters electrical panels or other heat sources will increase the risk of fire This means that if precautions are not heeded it may result in minor injury and or possible machine dam...

Страница 10: ...can result in a risk of electric shock The wire with green insulation with or without yellow stripes is the equipment grounding wire If repair or replacement of the power cord or plug is necessary do...

Страница 11: ...20 VOLT Single Phase Operation The motor supplied with your machine is a 220 volt motor It is shipped ready to run for 220 volt operation FUNCTION High frequency remote control switch Hand held remote...

Страница 12: ...ON before programming the remote control 2 Press the BLACK set button on the bottom of the remote switch until you hear two beeps 3 Press the Remote set button on your hand held controller simultaneou...

Страница 13: ...er minute Max static pressure 11 2 Inches of water Fan size 15 5 Inlet 8 Switch High frequency remote control switch Collection capacity 46 gallon Octagon drum Packing Size L x W x H 49 6 x 30 3 x 49...

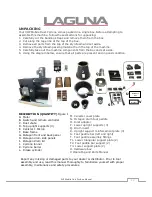
Страница 14: ...roller C Dust chute D Top upright supports 3 E Canister 1 Micron F Base frame G Octagon front and back panel H Octagon drum side panels I Octagon drum lid J Cyclone funnel K Cyclone barrel L Intake cy...

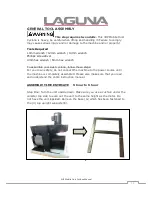
Страница 15: ...mm hex wrench To assemble your dust cyclone follow these steps For your own safety do not connect the machine to the power source until the machine is completely assembled Please also make sure that y...

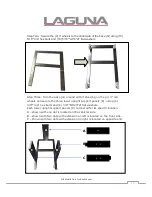
Страница 16: ...the 4 3 red wheels and secure the three lower upright support panels R using 6 3 8 3 4 hex bolts and 6 3 8 OD23 2t flat washers Each lower upright support panels R numbered for its specific location A...

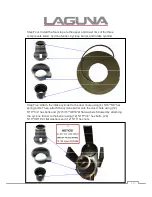
Страница 17: ...and Intake cylinder Step Five Attach the intake cylinder to the dust chute using 4 5 16 5 8 hex spring bolts Then attach the cyclone barrel onto the dust chute using 12 5 16 3 4 hex bolts and 12 5 16...

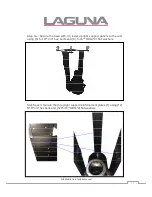
Страница 18: ...cure the base with 3 lower upright support panels to the unit using 6 5 16 3 4 hex bolts and 6 5 16 OD18 2t flat washers Step Seven Secure the 3 upright support reinforcement plates T using 12 5 16 3...

Страница 19: ...erson lift the unit up carefully to the right side up with the motor on top and the wheels at the bottom Step Nine Secure the lower triangular support plate to the base using 4 5 16 3 4 hex bolts and...

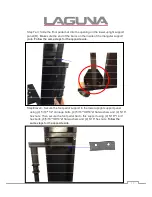
Страница 20: ...r support plate Follow the same steps for the opposite side Step Eleven Secure the foot pedal support to the lower upright support panel using 4 5 16 1 2 carriage bolts 4 5 16 OD18 2t flat washers and...

Страница 21: ...te by holding the lower support plate vertically up against the foot pedal bar using 4 5 16 1 3 4 hex bolts 8 5 16 OD18 2t flat washers and 4 5 16 hex nuts from the inside out Follow the same steps fo...

Страница 22: ...3HP Mobile Dust Cyclone Manual 21 Step Fourteen Secure the topping to the nut on the foot pedal bar Follow this step on the opposite side Step Fifteen Secure the topping with 2 M8 30mm hex bolts...

Страница 23: ...dle Step Seventeen Secure the movable supporting brace on the foot pedal bar with the octagon foot pedal using 2 3 8 46mm hex bolts Make sure the bolt head is on the inside of the octagon handle Adjus...

Страница 24: ...tening the bolts Failure to do will result in the drum lid not being able to align with the drum Step Nineteen Assemble the wheels to the Octagon drum Take the 4 3 wheels and secure to Octagon drum ba...

Страница 25: ...h 40 M4 12mm sheet metal thread bolts Take note of the left and right panels do not assemble the incorrect sides Refer to the next step Step Twenty One The panels have labels R and L on them to show y...

Страница 26: ...side plate and secure to the outside of the panel Photo shown is the inside of the panel using 6 1 4 1 2 carriage bolts 6 1 4 OD19 2t flat washers and 6 1 4 hex nuts Step Twenty Three Take the Octagon...

Страница 27: ...on the inside of the Octagon drum using 40 plastic end caps This step is necessary to prevent any injuries caused by the sharp end of the bolts Step Twenty Five Once completing the assembly apply sili...

Страница 28: ...h the window display using 4 flat head Philip bolt 4 5 16 OD23 2t flat washers and 4 5 16 hex nuts Step Twenty Seven Attach the rubber gasket to the top inner edges of the Octagon drum The wider end o...

Страница 29: ...l 28 Step Twenty Eight Insert the plastic bag inside the Octagon drum Open and spread out the plastic bag to the corners and edges Step Twenty Nine Place the drum insert inside over the plastic bag in...

Страница 30: ...ower the foot peddle bar s to seal the drum tight for normal machine operation Step Thirty One Make sure when aligning the drum that both the left and right side lift plates are over the topping on th...

Страница 31: ...nd 4 1 4 OD19 2t flat washers Step Thirty Three Take the paddle and paddle branch and assemble together using 4 1 4 5 8 hex bolts 8 1 4 OD13 1t flat washers and 4 1 4 hex nuts Step Thirty Four Assembl...

Страница 32: ...bly into the canister filter Slightly bend the paddles to get them into the canister filter Step Thirty Six Assemble the canister filter to the dust chute Tighten the band clamp and adjust the tightne...

Страница 33: ...rty Seven Attach the canister cover plate to the dust chute using 12 3 16 1 2 sheet metal thread bolts Step Thirty Eight From the bottom of the canister filter push the rotation shaft through the hole...

Страница 34: ...rotation shaft and pushing it down to the canister cover plate This will fix the rotation shaft in place and you will not need to keep holding it up Secure the bearing using 4 1 4 3 4 hex bolts and 4...

Страница 35: ...yclone Manual 34 Step Forty One Attach and secure the rotation crank to the top of the rotation shaft using 1 5 16 3 4 hex bolt and 1 5 16 OD30 3t flat washer Step Forty Two All the assembly steps hav...

Страница 36: ...he filter bag To keep your machine in good working condition it is recommended that you use the filter cleaner crank to clean the filter after every use To clean the filter using the crank simply rota...

Страница 37: ...ter bag 2 Empty or replace the filter bag and re attach using the spring loaded band clamp EMPTYING THE DRUM Periodically inspect the contents of the drum and empty as needed To inspect the contents o...

Страница 38: ...tall inlet restrictor replace weak breaker Replace batteries ensure un obstructed line of sight and signal range Inspect receiver circuit board replace if faulty Rewire or call certified service techn...

Страница 39: ...ne Suction route is too long or has too many sharp bends Wet lumber is clogging ducts Leaks in the duct work or too many open ports Inadequate velocity in the main suction line Wrong size ducting port...

Страница 40: ...MDC CF22201 SPARE PARTS LIST REV C 39 2016 08 25 Parts Breakdown...

Страница 41: ...MDC CF22201 SPARE PARTS LIST REV C 40 2016 08 SECTION A Close up view...

Страница 42: ...MDC CF22201 SPARE PARTS LIST REV C 41 SECTION B Close up view...

Страница 43: ...MDC CF22201 SPARE PARTS LIST REV C 42 SECTION C Close up view...

Страница 44: ...MDC CF22201 SPARE PARTS LIST REV C 43 SECTION D Close up view...

Страница 45: ...HEX NUT 3 8 4 2E FLAT WASHER 3 8 OD23 2t 4 2F HEX BOLT 3 8 1 1 4 4 2G SWITCH PLATE 1 2H HEX BOLT 1 4 3 4 4 2I FLAT WASHER 1 4 OD19 1t 4 2J LOCK WASHER 3 8 4 2K LOCK WASHER 3 8 4 3 FAN 15 5 1 3A FLAT...

Страница 46: ...0F FLAT WASHER 5 16 OD18 2t 8 10G HEX NUT 5 16 4 10H TOP UPRIGHT SUPPORT ONE DOT 1 10I LOWER UPRIGHT SUPPORT ONE DOT 1 10J UPRIGHT SUPPORT REINFORCEMENT PLATE 3 10K HEX BOLT 5 16 3 4 12 10L FLAT WASHE...

Страница 47: ...ANGULAR SUPPORT PLATE 170 102 28 2 12A HEX BOLT 5 16 1 3 4 4 12B FLAT WASHER 5 16 OD18 2t 8 12C HEX NUT 5 16 4 13 LOWER SUPPORT PLATE 30 28 98 2 14 PLASTIC BAG 55 95CM 3 15 BASE 1 15A HEX BOLT 3 8 3 4...

Страница 48: ...H OCTAGON DRUM BACK PANEL 1 16I OCTAGON DRUM RIGHT PANEL 1 16J OCTAGON DRUM LEFT PANEL 1 16K LEFT SIDE PLATE 1 16L RIGHT SIDE PLATE 1 16M CARRIAGE BOLT 1 4 1 2 6 16N FLAT WASHER 1 4 OD19 2t 6 16O HEX...

Страница 49: ...19B FLAT WASHER 5 16 OD18 2t 16 19C HEX NUT 5 16 8 19D PLUG MSP 16 1 19E NUT AGL 16 1 19F RUBBER GASKET 160CM 1 20 BAND CLAMP 400 1 20A SPRING BAND CLAMP 400 1 22 ROTATION CRANK 1 22A HEX BOLT 5 16 3...

Страница 50: ...AFT BASE 1 24B SHEET METAL PHILIP BOLT 3 16 3 4 4 24C HEX BOLT 5 16 3 4 1 24D FLAT WASHER 5 16 OD23 2t 1 24E FOAM TAPE 3 25mm 1 5M 1 25 PLASTIC BAG 40 60cm 3 27C INTAKE MANIFOLD 8 BY 4 X 3PORT 1 27A S...

Страница 51: ...MDC CF32201 SPARE PARTS LIST REV B 50 NOTES...

Страница 52: ...ations subject to change Machines may be shown with optional accessories 2017 Laguna Tools Inc LAGUNA and the LAGUNA Logo are the registered trademarks of Laguna Tools Inc All rights reserved 2072 Alt...

Отзывы: