Page. 25
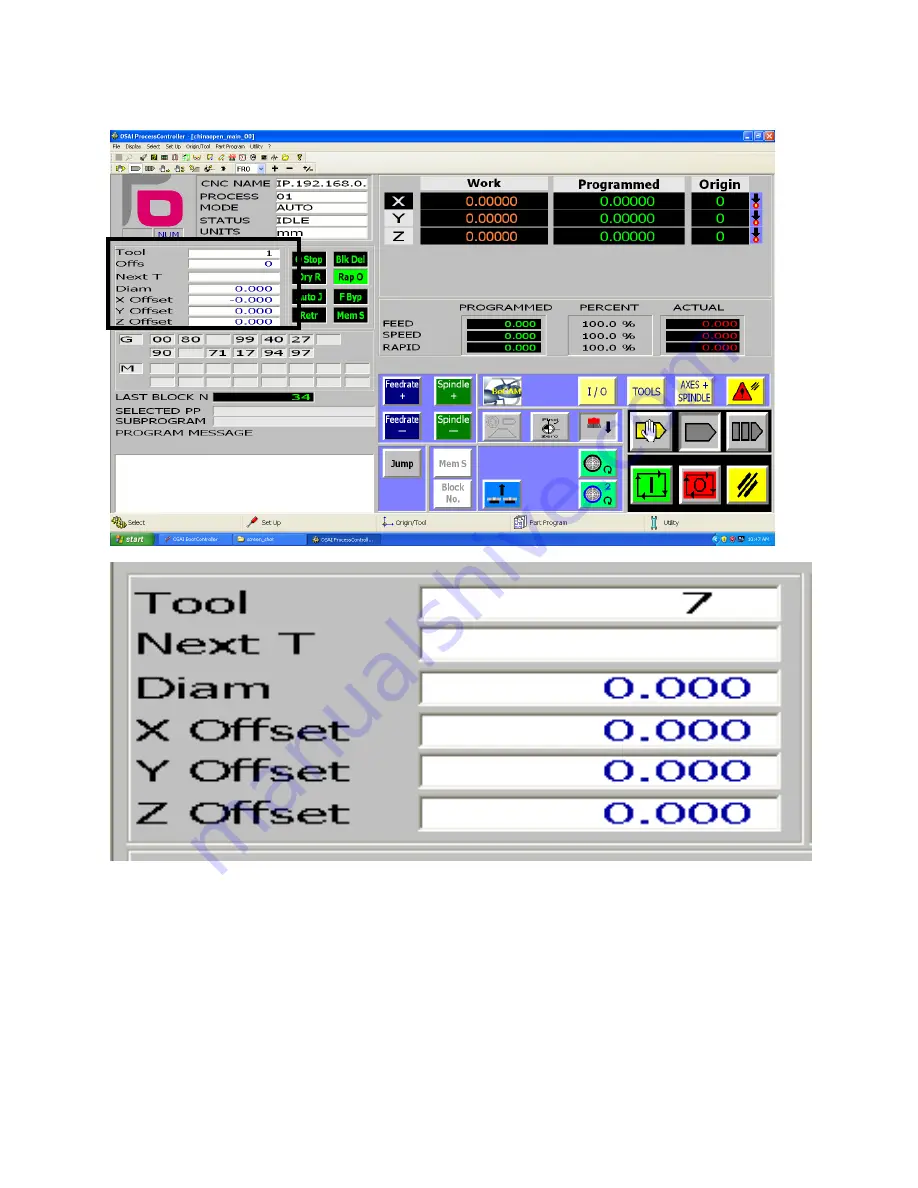
Tool Display Section
This section displays information regarding the tools. The machine can hold 8 tools in the tool changer.
The tools are numbered from 1 through 8. Each tool has its own diameter and X, Y, Z offset data.
Here are the descriptions of each fields of display:
Tool – Tool number of current tool in spindle
Next T – Tool number of the next tool to be picked up according to the active G-Code.
Diam – Diameter of the curent tool.
X Offset – the X offset of the current tool, this is factory set and is only used by Laguna Tools technician.
Y Offset – the Y offset of the current tool, this is factory set and is only used by Laguna Tools technician.
Z Offset – the Z offset of the current tool, this is the tool length compensation for the current tool.
Содержание Smartshop III Series
Страница 2: ......
Страница 11: ...Page 11 Tool Screen The screen that displays tool information Manual Pulse Generator MPG The axis...
Страница 20: ...Page 20 7 Select start shutdown 8 Click on the shutdown button and then wait for the computer to shut down...
Страница 22: ...Page 22 Main Screen The main page will load up at machine start up The sections are explained below...
Страница 50: ...Page 50 Tool Screen...
Страница 51: ...Page 51 CNC Display Section Please see Error Reference source not found CNC Display Section for reference...
Страница 58: ...Page 58 Requested Pocket pocket requested by the G Code Current Pocket The current active tool changer pocket...
Страница 83: ...Page 83 9 Click the Part Program button 10 Select Activate Part Program...
Страница 84: ...Page 84 11 If the directory isn t expanded click on the sign next to expend it...
Страница 85: ...Page 85 12 Select PROGRAMS drive...
Страница 86: ...Page 86 13 Click on the desired G Code file to highlight it 14 Click on the OK button to activate it...
Страница 87: ...Page 87 15 Upon activation the G Code program will be shown in the Active G Code Program section...
Страница 89: ...Page 89 18 Click on the run button The machine will start executing the G Code file...
Страница 91: ...Page 91 21 To Stop the program completely press the Reset button...
Страница 93: ...Page 93 4 Click on the MPG Run button to activate it...
Страница 99: ...Page 99 2 Manually input the command in the command box 3 Click confirm...
Страница 100: ...Page 100 4 Click the run button The MDI entry is completed 5 Click Auto mode button to exit the MDI mode...
Страница 107: ...Page 107 8 Click Auto mode button to exit the MDI mode...
Страница 109: ...Page 109 4 Make sure the machine is in Auto Mode by clicking on the Auto Mode button 5 Click on the Block No button...
Страница 112: ...Page 112 3 Click on the run button The machine will start the memory search...
Страница 116: ...Page 116 4 Click the boot button then click Shutdown 5 Click OK in the pop up window This will restart the controller...
Страница 118: ...Page 118 8 From the security window click on the Restore button 9 Click on the browse button...
Страница 119: ...Page 119 10 Navigate to the desired system backup file it should be named IP 192 168 0 1 11 Click Open...
Страница 122: ...Page 122 15 Click on the rocket symbol to access the boot control window...
Страница 123: ...Page 123 16 Click on the Normal mode button 17 Click Boot then click Shutdown...
Страница 128: ...Page 128 8 Click on the Normal mode button...


