2
300Mbps Ceiling
Wireless Access Point
Quick Installation Guide
300Mbps Ceiling
Wireless Access Point
Quick Installation Guide
1
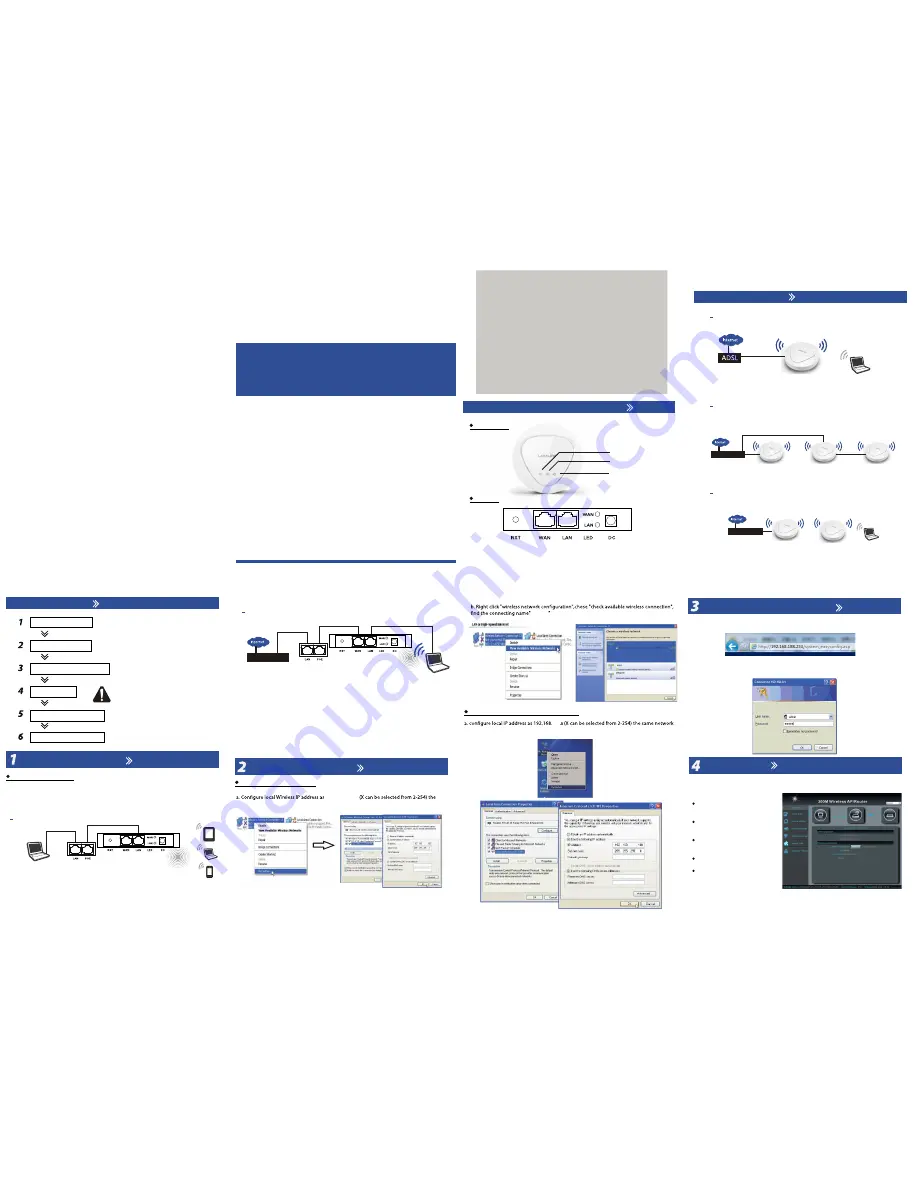
Hardware and Operation Mode
Interface
Gateway Mode
Access Point Mode
Repeater Mode
AP Mode
AP Mode
AP Mode
AP Mode
Repeater Mode
Router/Switch
Operation Mode
Thank you for purchasing the Ceiling AP.
This manual suit for quick installation of indoor
300Mbps 11N wireless AP & High Power Router.
This manual will instruct you how to configure
and manage indoor 300m 11N wireless AP &
High Power Router in right ways.
Introduction
Power LED
Wi-fi LED
Data LED
LED
RST:
Reset Button,and hold the RESET button for at least 18 seconds when the
wifi led is off, and then the AP reboots to its factory default settings.
WAN/LAN:
The Ethernet port is used to connect the power and should be
connected to the LAN and DHCP server.
LED:
When the Ethernet Port is connect with cable to other device, is Flashing
Gateway
Router/Switch
As belows shows.
Installation Steps
Hareware Conection
Ceiling AP
Setting the AP through Wireless
Router/Switch
PoE Power Supply
Setting the AP using Wireless
Connect the Switch or Router’s Ethernet Port to PoE Power Supply’s LAN Port, and connect
the PoE Power Supply’s PoE Port to AP’s WAN port. The computer using wireless to connect
the Ceiling AP (SSID
:
XD9800,Key:66666666), and then log the 192.168.188.253 to setting the
AP using the IE Browser.
Hardware Connection
Setting the Computer
Log in the Web Management
Setting the AP
Test the Wireless Network
Install the AP to the Ceiling
Note:
1. Before Install the AP on the Ceiling, you would
better complete the software setting.
2. Before the setting of the AP, you would better
complete the design of Topology of network
and IP address the devices.
Hardware Connection
Setting the Computer
Power for Wireless AP
1. Using IEEE 802.3af PoE Switch to supply the Power to the Wireless AP
2. Using PoE Power Adapter to supply the Power to the Wireless AP
3. Using DC Power Adapter 12V1A to supply the Power to the Wireless AP
Setting the AP through Wires with RJ45 Cable
Ceiling AP
POE Power Supply
Setting the AP using Wires
Connect the PoE Power Supply’s PoE Port to AP’s LAN port. The computer using wires to
connect the PoE’s LAN Port, and then log the 192.168.188.253 to setting the AP using the
IE Browser.
Setting the AP through Wireless
same network segment as AP, subnet mask 255.255.255.0
192.168.188.X
188
3
(To be continued...)
,
the default Passwords is"66666666"
segment as the AP subnet mask 255.255.255.0 As belows shows.
Log in the Web Management
Setting the AP
Setting the AP through Wires with RJ45 Cable
a.Open your web browser, type 192.168.188.253 in the address bar
b.enter the User name/Passwords: preset as admin/admin, then you can found on
the label attached to the router, click OK
Enter into the page of WEB software management page, then set ceiling AP as
requirement. The default working mode is AP.
XD9800
ZHH
188
9508S
188
Internet Setting:
The AP will setting
to Gateway Mode;
Wireless Repeater:
The AP will setting
to Repeater Mode;
Wireless Coverage:
The AP will setting
to APMode;
System Tools:
PING Tools
Advanced Settings


