background image

LaCie eSATA PCI Card • 

DESIGN BY SISMO


Installing Your LaCie PCI Card

User Manual 

page 9

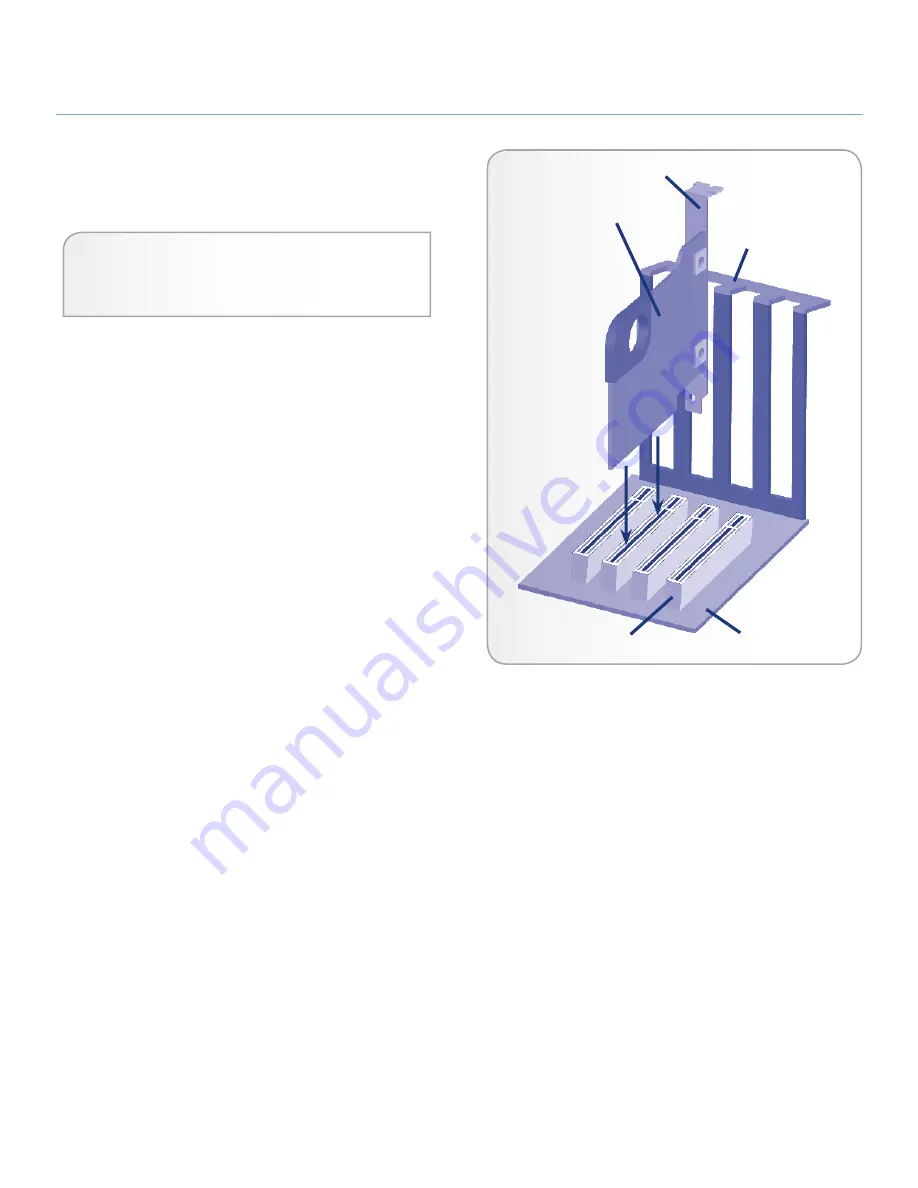
3.3.  Inserting Your LaCie PCI Card

Required Tools


Philips-head and/or flat-head screw driver


Computer System Manual

3.   Turn off your computer and disconnect all external periph-

eral devices and cables, i.e. power cord, modem/fax line, 
monitor, etc. 

4.  Remove your computer’s cover. For most computers, several 

screws will need to be unseated before you can remove the 
computer’s cover. These screws are usually located at the 
rear of the computer, along the edge of the cover. However, 
placement of these screws and cover attachment may vary by 
manufacturer, so please refer to your computer’s manual for 
specific details.

5.  Once you have removed the cover, you will need to locate 

the PCI slots on the motherboard. The PCI slots are generally 
located in the back of the computer, with the slots built into 
the side-wall of the computer (please refer to your computer 
system’s manual for the exact location of your PCI slots – the 
LaCie PCI Card may be installed in either a 32 or 64-bit PCI 
card slot). If necessary, you may need to remove the expan-
sion slot cover, and you may also need to remove any add-in 
boards which block access to the PCI slots. 

6.  Take the LaCie PCI Card out of its anti-static blister package 

and, being careful to touch only the anti-static gripping pad,  
push the card into the empty PCI card slot. There is only way 
to mount the card, so if you are having problems inserting 
the card into the PCI slot, make sure that it is oriented cor-
rectly. Be sure that the gold contact pins of the PCI card are 
seated completely inside your computer’s PCI slot. Be aware 
that it may take some force to get the card fully seated in 
the slot.

7.  Once the PCI card is seated correctly, tighten with a screw.

8.  If necessary, replace any add-in boards that you removed 

in Step 3.

9.   Now you are ready to put the computer’s cover back on 

and reconnect all of your external peripheral devices and 
cables.

10.   Power on your computer. After the start up procedure has 

finished, you should be able to connect devices through the 
available FireWire ports.

LaCie PCI Card

System frame

Motherboard

PCI or PCI-X slot

Bracket

Содержание eSATA PCI Card

Страница 1: ...1 Package Content 6 2 2 View of the Card 6 3 Installing Your LaCie PCI Card 7 3 1 Electrostatic Discharge ESD 7 3 2 Jumper Shunt Adjustment 8 3 2 1 Mac Users 8 3 2 2 Windows Users 8 3 3 Inserting You...

Страница 2: ...s and can radiate radio frequency en ergy and if not installed and used in ac cordance with the instruction manual may cause harmful interference to radio com munications Operation of this equipment i...

Страница 3: ...ard in an en vironment that is too cold or humid may damage the unit IMPORTANT INFO Any loss corrup tion or destruction of data while using a LaCie drive is the sole responsibility of the user and und...

Страница 4: ...s built for performance and inte grates easily into systems that require high data transfer speeds to serve up files quickly and efficiently maximizing your storage system utilization and enhancing yo...

Страница 5: ...arge for information on how to properly ground yourself IMPORTANT INFO During installation or removal always hold your card by the anti static gripping pad TECHNICAL NOTE Serial ATA is a new technolog...

Страница 6: ...ace cables 2 Jumpers Mac users need to change this configuration before installing the card See 3 2 Jumper Adjustment for Mac Operating System for details 2 1 Package Content 1 LaCie eSATA PCI Card De...

Страница 7: ...scharge or ESD ESD can cause two different types of damage to computers and peripherals 1 Catastrophic which is the complete loss of de vice functionality and 2 Latent Defect where the device is only...

Страница 8: ...d s hardware RAID function Do not adjust the jumper shunt unless you intend to connect a LaCie d2 Quadra v3 hard drive to the card If the jumper shunt is not adjusted connecting a LaCie d2 Quadra v3 h...

Страница 9: ...slots the LaCie PCI Card may be installed in either a 32 or 64 bit PCI card slot If necessary you may need to remove the expan sion slot cover and you may also need to remove any add in boards which...

Страница 10: ...You must install drivers for Windows 2000 XP and Vista Once the card has been detected on your operating sys tem install the correct driver from the Utilities CD ROM and follow the on screen instruct...

Страница 11: ...d reliability Serial ATA also uses 32 bit cyclic redun dancy checking CRC on all transfers to ensure correct data transmissions Due to this CRC capability Serial ATA performs protection and recovery f...

Страница 12: ...k properly con tact us via the provided Web link Before contacting us make sure that you are in front of your computer and that you have the following information on hand Your card s serial number Com...

Страница 13: ...tp www lacie com fr contact LaCie Germany Contact us at http www lacie com de contact LaCie Italy Contact us at http www lacie com it contact LaCie Japan Contact us at http www lacie com jp contact La...

Страница 14: ...placement goods or expense or inconvenience caused by service interruptions Under no circumstances will any person be entitled to any sum greater than the purchase price paid for the card To obtain wa...

Отзывы: