Lacava 1586 Скачать руководство пользователя страница 5

LACAVA LLC


®    

Page 5 of 9


Installation Instructions 
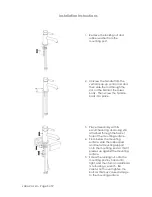
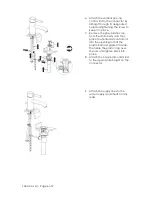


1.


Remove the locking nut and 
rubber washer from the 
mounting post. 


2.


Unscrew the handle from the 
vertical pop-up control rod and 
then slide the rod through the 
slot on the back of the mixer 
body.  Then screw the handle 
back into place. 


3.


Place mixer body with its 
escutcheon ring and o-ring still 
attached through the faucet 
hole of the mounting surface. 

4.


From below the mounting 
surface, slide the rubber pad 
and metal mounting support 
onto the mounting post so that it 
presses up against the mounting 
surface.  

5.


Screw the locking nut onto the 
mounting post by hand until 
tight, and then turn an additional 
¼ turn using a wrench.  Be 
careful not to over tighten the 
bolt, as this may cause damage 
to the mounting surface. 

Содержание 1586

Страница 1: ...t is the responsibility of the homeowner to ensure that this fixture complies with all local plumbing codes Please see our Terms and Conditions found in this booklet for additional information For technical assistance please contact 888 522 2823 toll free Please reference this number Table of Contents Page 2 Cleaning Care Instructions Page 3 Warranty Page 4 Parts Breakdown Page 5 Installation Inst...

Страница 2: ...e Extensive use of water may also discolor and damage the wood surface so wiping the wood surface dry after each use is highly recommended MARBLE Marble stone should be treated with marble sealer we recommend Stoneguard Sealer at least once a week to prevent staining Please follow the sealer manufacturer s instructions to assure the best results VITREOUS CHINA Vitreous china can be cleaned with a ...

Страница 3: ...ructions Furthermore it is the responsibility of the installer to ensure that this product complies with all local plumbing codes Warranty Conditions 1 LACAVA Subjects all its products to quality controls and guarantees them against manufacturing defects The guarantee covers the free elimination of all faults as judged by LACAVA by repair and or replacement of the product or parts of it The guaran...

Страница 4: ...LACAVA LLC Page 4 of 9 Parts Breakdown Item R086 Replacement cartridge ...

Страница 5: ...ce 3 Place mixer body with its escutcheon ring and o ring still attached through the faucet hole of the mounting surface 4 From below the mounting surface slide the rubber pad and metal mounting support onto the mounting post so that it presses up against the mounting surface 5 Screw the locking nut onto the mounting post by hand until tight and then turn an additional turn using a wrench Be caref...

Страница 6: ... Remove the gray plastic cap from the drain body and then place the horizontal control rod into the opening so that the plastic ball and gasket fit inside Then slide the plastic cap over the rod and tighten back into place 8 Attach the horizontal control rod to the appropriate height on the connector 9 Attach the supply lines to the water supply and check for any leaks ...

Страница 7: ...Max at 60 PSI Note Drawings provided herein are meant to give the user an idea of the product and are not made to scale The sizes in inches are rounded up to the nearest 1 16 For further information refer to the installation instructions included with your shipment ...

Страница 8: ...nce of the carrier s agent any visible tampering with the packaging In case of missing items you also have to inform LACAVA and send to LACAVA all related documents within 24 hours from the delivery date We will open an internal investigation and check the inventory count to determine if it was an error on our part If we realize it was our mistake we will promptly ship the missing item s to the pu...

Страница 9: ...LACAVA LLC Page 9 of 9 Notes ...

Отзывы: