background image

48

C

HAPTER

 3

Operating the Expert(t) 2000

TM

the raising of the body. 
Release the throttling by 
the end of the cylinder 
stroke to avoid useless 
collision.

6.

Slowly move the vehicle forward 
to prevent material from piling up 
under the tailgate.

7.

Cycle the packer until all the 
refuse has been ejected.

8.

When the unloading is done, 
lower the body.

9.

Close and lock the tailgate 
(safety pins in place).

Cab Extension Door

The Expert(t) 2000

TM

 is equipped with a 

cab extension and therefore, a cab 
door. The cab door is of a folding type 
to allow open-door operation while 
right hand-side driving.

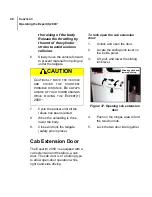
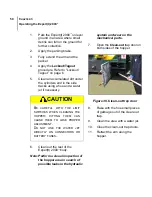
To lock open the cab extension 
door:

1.

Unlock and open the door.

2.

Locate the sliding lock lever on 
the inside panel.

3.

Lift, pull, and lower the sliding 
lock lever.

Figure 37. Opening cab extension 

door

4.

Push on the hinges area to fold 
the two door lids.

5.

Lock the two door lids together.

CAUTION

C

AUTIOUSLY


MOVE


THE


VEHICLE

AND


COVER


THE


SHORTEST

POSSIBLE


DISTANCE

. B

E


ALWAYS

AWARE


OF


YOUR


SURROUNDINGS

WHILE


MOVING


THE

  E

XPERT

(

T

)

2000

TM

.

Already pulled and 
lowered sliding 

Содержание expert 2000

Страница 1: ......

Страница 2: ......

Страница 3: ...OPERATOR MANUAL 1 10 2007 Part 90263 REV C...

Страница 4: ......

Страница 5: ...ty Conventions 3 General Safety Notions 3 Responsibilities of the Employer 5 Responsibilities of the Employee 6 Lockout Tagout 6 Protection Against Fire 7 Keeping the Expert t 2000TM Clean 7 Deadman S...

Страница 6: ...eed up Inhibitor Control 26 Control Station Selector Switch 26 Temporary Handbrake 27 Body Control Station 29 Strobe Light Switch 29 Chapter 3 Operating the Expert t 2000TM Approaching the Vehicle 31...

Страница 7: ...ng HandTM 35 Collecting Refuse Using the Cart Tipper 37 Manually Collecting Refuse 40 Packing Refuse In The Hopper 42 Packing Refuse into the Body 43 Changing Packer Multi cycle Settings 44 Floor Rise...

Страница 8: ...vi Table of Contents...

Страница 9: ...n order to operate the cool hand or helping hand lifting arm The sustained manual pressure control shall be located so that the co worker pressing it is not in the path of the arm and has a clear and...

Страница 10: ...tion ALL Expert t 2000TM vehicles are designed with a lowered hopper to allow easier manual collection That is instead of having the body on top of a straight frame chassis they have it on top of a ch...

Страница 11: ...clients with the most reliable vehicles the main safety feature there is remains in the user s commitment to respect all safety notions expressed in this guide and labels on the vehicle as well as to...

Страница 12: ...LE OR VEHICLES ARE IN ANY WAY EXPOSED TO ANY DANGER CAUSED BY THE USE OF THE EXPERT T 2000TM DANGER NEVER GET IN THE HOPPER AREA WHEN THE ENGINE IS RUNNING ONLY AUTHORIZED PERSONNEL MAY DO IT FOLLOWIN...

Страница 13: ...meet the manufacturer s standards and recommendations For help or more information contact the manufacturer or any authorized representative To keep records of any breakdowns or malfunctions of the v...

Страница 14: ...ion of possible danger Lockout Tagout The Lockout Tagout procedure must be applied to render the vehicle out of service and thus ensure its safety and that of persons around it To lock out and tag out...

Страница 15: ...Keeping the Expert t 2000TM Clean Keeping the Expert t 2000TM clean is both a safety and an optimization issue Therefore the following cleaning recommendations are useful Remove any waste or material...

Страница 16: ...the operator is not pressing the deadman switch while trying to move the arm with the joystick no movement will occur Therefore the operator must be consciously pressing the deadman switch to operate...

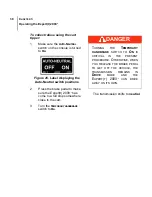
Страница 17: ...re also saves you time by eliminating the need to operate the transmission To correctly use the Auto Neutral feature 1 Turn the AUTO NEUTRAL switch on the console to the ON position Figure 5 Label dis...

Страница 18: ...tral feature 4 Get out of the vehicle and collect the refuse 5 Get back in the vehicle and press the brake pedal 6 Turn the TEMPORARY HANDBRAKE to OFF The transmission shifts to drive At this point yo...

Страница 19: ...doors to ensure maximum safety A sudden bump on the road may cause the door to unlock However having the safety sling properly attached will prevent the door from opening and causing damage and or acc...

Страница 20: ...CHAPTER 1 Safety Safety and Signaling Labels The following labels can be found on the Expert t 2000TM Familiarize yourself with these as they are important On the Body 43800 47260 47262 47266 47268 47...

Страница 21: ...13 Expert t 2000TM Operator Manual 47272 47280 47282 47286 47288 47312 47348 47350...

Страница 22: ...14 CHAPTER 1 Safety 47352 47360 47422 47452 47526 47572...

Страница 23: ...15 Expert t 2000TM Operator Manual In the Cab 43764 43786 43790 43792 43796 43798...

Страница 24: ...16 CHAPTER 1 Safety 43850 43852 43856 43858 43882 43892 43910 43912...

Страница 25: ...17 Expert t 2000TM Operator Manual 43920 43922 43972 43980 43982 43984...

Страница 26: ...18 CHAPTER 1 Safety 47276 47284 47434 47440 47526 47572...

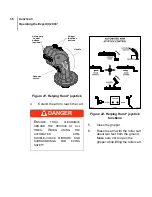
Страница 27: ...ical movements of the arm s two main components The top buttons are used to control the opening and closing movement of the gripper the right button is used to open the gripper the left button to clos...

Страница 28: ...ned to ON a red pilot light on the dashboard is turned on to indicate that the hydraulic system is engaged Note The PTO can only be turned on when the engine RPM is lower than 900 and the air pressure...

Страница 29: ...ENGINE THEREFORE IT WILL BE SERIOUSLY DAMAGED OR EVEN DESTROYED IF THERE IS NO OIL FEED INTO IT CAUTION WHEN A MAJOR LEAK IN THE HYDRAULIC SYSTEM OCCURS TURN OFF THE ENGINE AND CLOSE THE BALL VALVE O...

Страница 30: ...he inside the corresponding electrical wiring and devices Figure 5 Control console Red Emergency Stop Button The red emergency STOP button switches on and off all the hydraulic functions on the body I...

Страница 31: ...er for the number of cycles defined on the multi cycle module For more information see Changing Packer Multi cycle Settings on page 44 Figure 7 Green button Yellow Retract Button The yellow RETRACT bu...

Страница 32: ...f the increment or decrement of a predetermined value of the engine RPM revolutions per minute depending on the results the operator wants to achieve To achieve faster operation of moving parts such a...

Страница 33: ...ts That is turning the switch to ON will rev up the engine to a predetermined value usually 900 1200 or 1500 RPM This feature is effective under the following conditions The control station is properl...

Страница 34: ...pendently from which control station is controlling the functions of the body moving parts Figure 11 Speed up inhibitor control Note Decreasing the engine RPM direct and proportionally affects fuel co...

Страница 35: ...collection This brake is in the form of a toggle switch located near the right hand side door and must be applied only when you have used the brake pedal to bring the vehicle to a full stop For longer...

Страница 36: ...OLLECTION STOP ONLY SLIGHT PRESSURE ON THE BRAKE PEDAL AND SHIFTING THE TEMPORARY HANDBRAKE AND OR THE PARKING BRAKE ARE REQUIRED TO ENGAGE THE TRANSMISSION AND MOVE THE VEHICLE THIS CAREFUL SEQUENCE...

Страница 37: ...Body control station Strobe Light Switch The STROBE LIGHT switch is located on the control console of the Expert t 2000TM It is used to turn on and off the strobe lights that are installed on the Expe...

Страница 38: ...30 CHAPTER 2 Controls...

Страница 39: ...rform the inspection To start the Expert t 2000TM 1 Open the chassis manufacturer s manual and start the vehicle as stated therein 2 Once the engine is running check the following items Transmission i...

Страница 40: ...ined every day wheels and cleaning trap for leaks cracks or other types of problems 5 Go around the back check lights camera safety labels etc Report any defective systems to maintenance personnel Not...

Страница 41: ...change driving positions and Labrie recommends the following procedure To change driving positions 1 Stop the vehicle and apply the parking brake 2 Turn off the PUMP switch 3 Turn off the engine 4 Mo...

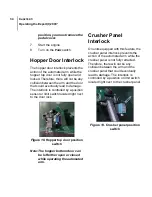
Страница 42: ...nsor or limit switch located right next to the door lock Figure 18 Hopper top door position switch Note The hopper bottom door can be left either open or closed while operating the automated arm Crush...

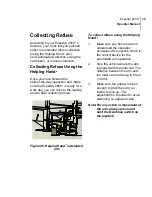
Страница 43: ...ing area to start collecting refuse Figure 20 Helping HandTM automated arm To collect refuse using the Helping HandTM 1 Make sure you have read and understood the operation principles of the joystick...

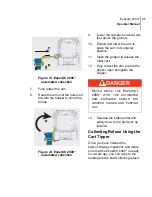
Страница 44: ...ipper 6 Raise the arm with the roller cart about two feet from the ground Make sure not to open the gripper while lifting the roller cart DANGER ENSURE TOTAL CLEARANCE AROUND THE VEHICLE AT ALL TIMES...

Страница 45: ...iginal position 11 Open the gripper to release the roller cart 12 Fully retract the arm to park the gripper open alongside the hopper 13 Release the brake pedal and safely drive to the next pick up lo...

Страница 46: ...e brake pedal to make sure the Expert t 2000TM has come to a full stop somewhere close to the cart 3 Turn the TEMPORARY HANDBRAKE switch to ON The transmission shifts to neutral DANGER TURNING THE TEM...

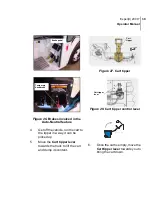
Страница 47: ...he tipper in a way it can be picked up 5 Move the Cart tipper lever towards the truck to lift the cart and dump its content Figure 27 Cart tipper Figure 28 Cart tipper control lever 6 Once the cart is...

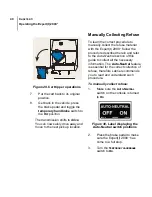
Страница 48: ...lect the refuse material with the Expert t 2000TM follow the procedure described herein and refer to the Auto Neutral section of this guide to collect all the necessary information The Auto Neutral fe...

Страница 49: ...oggle the temporary handbrake switch to the OFF position The transmission shifts to drive You can now safely drive away and move to the next pick up location DANGER TURNING THE TEMPORARY HANDBRAKE SWI...

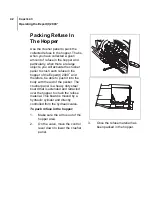
Страница 50: ...opper of the Expert t 2000TM and therefore be able to push it into the body with the aid of the packer The crusher panel is a heavy duty steel board that is extended and retracted over the hopper to c...

Страница 51: ...e collected a given amount of refuse in the hopper you activate the packer to push such refuse into the body of the Expert t 2000TM The packer is a heavy duty steel platform that is extended and retra...

Страница 52: ...on and the packer is activated However if these settings do not suit your needs you can manually change them for those you desire Note The packer multi cycle function lets you program up to 8 cycles a...

Страница 53: ...les the LED flashes red green the same number of times to confirm you the new settings have been stored 8 On the controls station or the console press the green button to test the new settings of the...

Страница 54: ...eight of the floor riser can be adjusted to either raise or lower your standing position To deploy the floor riser 1 When in vertical position release the latch See Floor riser in both horizontal and...

Страница 55: ...le is on safe stable and level ground 3 Apply the parking brake get off the cab and remove the tailgate safety pins 4 Back in the cab use the lever on the console to fully open the tailgate Figure 36...

Страница 56: ...2000TM is equipped with a cab extension and therefore a cab door The cab door is of a folding type to allow open door operation while right hand side driving To lock open the cab extension door 1 Unlo...

Страница 57: ...r duration of equipment parts better performance and constitutes an important safety issue It will minimize breakdowns and maintenance expenses Daily cleaning of lights reflectors warning indicators a...

Страница 58: ...he rest of the Expert t 2000TM body Note Perform a visual inspection of the hopper area in search of possible leaks in the hydraulic system and wear on the mechanical parts 7 Open the Clean out trap d...

Страница 59: ......

Страница 60: ......

Страница 61: ......

Страница 62: ......

Отзывы: