8
8.
Cleaning
The instrument must be cleaned in the following situations to assure correct operation:
- If the piston becomes stiff and difficult to move
- After dispensing liquids that can form deposits
- Before changing the reagent
- Prior to long term storage
- If some liquid has accumulated in the closure cap
- Prior of sterilization
- Before valves replacement
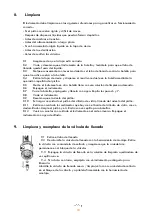
8.1
Ensure that the cap is locked
8.2
Empty and unscrew the instrument from the bottle and lift the instrument so that the filling
tube is out of the liquid but in the bottle.
8.3
Carefully tap the filling tube against the bottle from the inside so that the reagent runs back
into the bottle.
8.4
Remove the closure cap, and dispense the remaining reagent into the bottle by repeated
piston operation.
8.5
Mount the instrument onto another bottle filled with an appropriate cleaning solution.
8.6
Flush the instrument.
8.7
Empty the bottle, flush it and fill it with water. Repeat step 6 and 7.
8.8
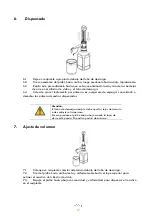
Empty the instrument. Figure 10
8.9
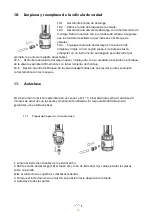
Unscrew the piston seat (1).
8.10
Carefully pull the piston (5) out of the glass cylinder (6) by pulling on the piston seat only.
8.11
Carefully remove deposits at the edge of the glass cylinder with a screw driver. Clean piston
and cylinder with a bottle-brush.
8.12
Carefully reassemble the instrument in the reverse order. Flush instrument with distilled water.
9.
Cleaning and replacing the filling valve
9.1
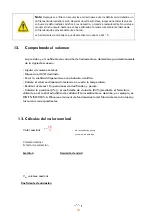
Remove the filling tube
9.2
Unscrew the filling valve using the mounting tool. Remove the valve with its
sealing washer. Make sure the sealing washer does not remain in the valve
block.
9.3
Rinse the filling valve in the cleaning solution, and clean with a soft brush.
If the ball gets stuck, push it with a pointed instrument to release the valve ball.
9.4
Screw the cleaned/new filling valve together with its sealing washer into the valve
block and tighten it firmly using the mounting tool.
Содержание EASY 20K
Страница 34: ...www labbox com...


