


Lab12 pre1- Triode Class A Line Preamplifier
Page
8
of
9
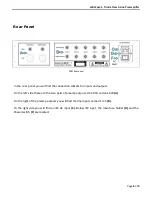
Main connections
Connect a High-Grade Power cable to the IEC input and to your wall socket. Make sure that your wall
socket provides a good ground before connecting the power cable
.
You can supply 230 to 240 Volts
AC /50Hz (115 to 120 AC Volts / 60Hz). (Every
pre1
is tuned and calibrated using the
Lab12 Knack mk2
Power Cable.
We strongly suggest using this cable).
Connect to your Power Amplifier
Connect the preamplifier analog output to an analog line level input to your Power Amplifier. Make
sure about the correct channel connections. We suggest using a good quality interconnect cable pair.
You can use RCA or/and XLR cables.
Connect an analog output Source
Make sure that your Source has an analog line level output. Connect an analog interconnect cable
from the source output to one of analog inputs of
pre1.
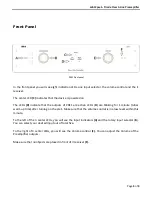
Select input number with the selector switch
on the left side of the front panel on your
pre1
.
For the safety of your equipment
! Make sure that all your equipment is turned off before any connection.
! To avoid damaging you speakers you have to turn on the pre1 some
seconds before turning on your power amplifier and turn it off some
seconds after turning off your power amplifier.


