background image

INDICE

1 - UTILIZZO E CONSERVAZIONE DEL MANUALE 

7

D’ISTRUZIONI

2 - FUNZIONI DEL MACINADOSATORE

7

3 - AVVERTENZE DI SICUREZZA

7

4 - SCHEMA E CARATTERISTICHE TECNICHE

8

5 - ALLACCIAMENTO ELETTRICO

9

6 - MONTAGGIO TRAMOGGIA E COLLEGAMENTI

9

7 - MESSA IN FUNZIONE DELL’APPARECCHIO

9

8 - AVVIAMENTO E CICLO DI LAVORO

9

8.1 - MODELLO AUTOMATICO

9 - DOSATURA DEL CAFFE’

9

10 - MANUTENZIONE

10

11 - OPERAZIONI DI PULIZIA

10

11.1 - PULIZIA CARROZZERIA
11.2 - PULIZIA TRAMOGGIA E CONTENITORE

CAFFE’ MACINATO

12 - CAUSE DI MANCATO FUNZIONAMNENTO

OD ANOMALIE

11

Содержание 790800155

Страница 1: ...i i V i i i L V i V V i i v V i V i...

Страница 2: ...ives specifiques auf das sich diese Erkl rung bezieht Entsprechend der Vorschriften der spezifischen Richtlinien al cual se refiere esta Declaraci n de acuerdo con lo prescrito por las especificas dir...

Страница 3: ...a Sua disposizione Disponibilit che la seguir anche in futuro per garantire a Lei ed ai Suoi clienti la doverosa soddisfazione English Dear Customer We thank you for buying one of our products made i...

Страница 4: ...5 ALLACCIAMENTO ELETTRICO 9 6 MONTAGGIO TRAMOGGIA E COLLEGAMENTI 9 7 MESSA IN FUNZIONE DELL APPARECCHIO 9 8 AVVIAMENTO E CICLO DI LAVORO 9 8 1 MODELLO AUTOMATICO 9 DOSATURA DEL CAFFE 9 10 MANUTENZIONE...

Страница 5: ...originale sicurezza dell impianto L installatore ha l obbligo di verificare le corrette condizioni ambien tali la temperatura ambiente deve essere compresa fra 5 e 35 C evitando l installazione in luo...

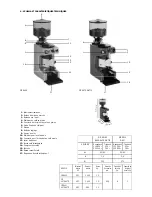
Страница 6: ...OPICO 14 CONTATORE CAFFE 15 FORCELLA 16 VASCHETTA RACCOGLI CAFFE 17 TARGHETTA DATI TECNICI ZIP BASE ZIP AUTOMATICO POTENZA GIRI MASSA DIAM PRODUZ CAPACIT MODELLO MOTORE MINUTO Kg MACINE ORA CONTEN HP...

Страница 7: ...serire il caff in grani nella tramoggia 4 Premere il perno di bloccaggio 9 Ruotare la ghiera di regolazione 8 in senso orario per avvicina re le macine caff fine ed in senso antiorario per allontanarl...

Страница 8: ...tare l apparecchio eseguendo le operazioni in senso inverso avendo cura di pulire il filetto della ghiera e ripristinarne l uso 11 OPERAZIONI DI PULIZIA Prima di qualsiasi operazione di pulizia e manu...

Страница 9: ...corrente 2 Controllare il cavo di alimentazione 1 Eliminare l eventuale presenza di corpi estranei tra le macine allentando la ghiera di regolazione di qualche giro e riavviare dopo di che riportare...

Страница 10: ...ONS 16 5 ELECTRICAL CONNECTION 17 6 HOPPER INSTALLATION AND CONNECTIONS 17 7 STARTING THE EQUIPMENT 17 8 STARTING AND RUNNING THE WORKING CYCLE 17 8 1 AUTOMATIC MODEL 9 CAFFEE DOSING 17 10 MAINTENANCE...

Страница 11: ...f the plant The installer is to ensure that environmental conditions are accepta ble temperature has to be included between the 5 and 35 C avoi ding to install the appliance in locations where water j...

Страница 12: ...UNTER 15 FORK 16 COFFEE TRAY 17 TECHNICAL DATA PLATE ZIP BASE ZIP AUTOMATIC MOTOR WEIGHT GRINDER PROD COFFEE MODEL POWER R P M Kg DIAM PER HOUR CONTAINER HP mm Kg CAPACITY Kg ZIP BASE 0 33 1400 13 ZIP...

Страница 13: ...ess the lock pin 9 Turn the regulation ring nut 8 clockwise to tighten the grinding parts fine coffee and anticlockwise to loosen them coarse coffee in order to obtain the desired coffee grinding regu...

Страница 14: ...t remove the lower grinding part and replace it Re assemble the equipment by following the above steps in the reverse order making sure you clean the ring nut thread and resto re its use 11 CLEANING O...

Страница 15: ...ug into the socket 2 Check the electricity supply cable 1 Remove any foreign body from the grinding parts by slightly loosening the regulation ring nut and then restart subsequently tighten the regula...

Страница 16: ...24 5 BRANCHEMENT ELECTRIQUE 25 6 INSTALLATION DU RECIPIENT DU CAF ET BRANCHEMENTS 25 7 MISE EN MARCHE DE L APPAREIL 25 8 DEMARRAGE ET CYCLE DE TRAVAIL 25 8 1 MODELE AUTOMATIQUE 9 DOSAGE DU CAF 25 10 E...

Страница 17: ...issent compromettre la s curit originale de l installation L installateur est oblig de v rifier les correctes conditions de l am biance temp rature parmi les 5 et 35 C vitant d installer l ap pareil d...

Страница 18: ...caf t lescopique 14 Compteur des caf s 15 Fourche 16 Bassin recueille caf 17 Plaque des donn s techniques I ZIP BASE ZIP AUTOMATIC Puissance Tours par Masse Diam tre Production Capacit du MOD LE mote...

Страница 19: ...L APPAREIL Enlever le couvercle 5 du r cipient pour le caf 4 et remplir ce dernier avec du caf en grains Pousser le goujon pour le bloc 9 Tourner la frette de r glage 8 en sans horaire pour rapproche...

Страница 20: ...les rem placer Remonter l appareil effectuant toutes les op rations au contraire nettoyant soigneusement le filet de la frette et remettre en marche 11 NETTOYAGE Avant toute op ration de nettoyage ou...

Страница 21: ...mentation 1 Enlever les ventuels corps trangers parmi les meules desserrant la frette de r glage en la tournant un petit peu mettre en marche et ensuite reporter la frette dans sa position d origine 1...

Страница 22: ...ELEKTRISCHER ANSCHLUSS 33 6 TRICHTERMONTAGE UND ANSCHL SSE 33 7 INBETRIEBNAHME DES GER TS 33 8 START DES FUNKTIONSZYKLUS 33 8 1 MODELL MIT AUTOMATIK 9 DOSIERUNG DES KAFFEES 33 10 WARTUNG 34 11 REINIG...

Страница 23: ...rpflichtet dem Konstrukteur eventuelle Defekte und Besch digungen welche die originale Sicherheit der Anlage gef hr den k nnen anzuzeigen Der Installateur ist verpflichtet die genauen Umweltbedingunge...

Страница 24: ...15 GABEL 16 KAFFEE SAMMELBEH LTER 17 SCHILD MIT TECHNISCHEN DATEN ZIP STANDARD ZIP AUTOMATIK LEISTUNG UMDREHUN MASSE DURCHMESSER PRODUKTION FASSUNGSVERM GEN MODELL MOTOR GEN Kg MAHLWERK STUNDE BEH LT...

Страница 25: ...GER TS Nehmen Sie den Deckel 5 vom Trichter ab und f llen Sie Kaffee in Bohnen hinein 4 Dr cken Sie auf den Sperrstift 9 Drehen Sie den Regulierungsring 8 im Uhrzeigersinn um das Mahlwerk anzun hern f...

Страница 26: ...wieder zusammen indem Sie die Arbeitsschritte in umgekehrter Reihenfolge durchf hren Achten Sie dabei darauf das Gewinde des Ringes zu s ubern und setzen Sie ihn wieder zum Gebrauch ein 11 REINIGUNSA...

Страница 27: ...hlscheiben abgenutzt L SUNG 1 Stecken Sie den Stecker in die Steckdose 2 berpr fen Sie das Stromkabel 1 Beseitigen Sie die eventuellen Fremdk rper im Mahlwerk indem Sie den Regulierungsring um einige...

Страница 28: ...AS T CNICAS 40 5 CONEXI N EL CTRICO 41 6 MONTAJE TOLVA Y CONEXIONES 41 7 PUESTA EN FUNCI N DEL APARATO 41 8 PUESTA EN MARCHA Y CICLO DE TRABAJO 41 8 1 MODELO AUTOMATICO 9 DOSIFICACI N DEL CAF 41 10 MA...

Страница 29: ...prometer la seguridad original de la instalaci n El instalador tiene la obligaci n de verificar las correctas condicio nes ambiantales la temperatura ambiente tiene que estar compren dida entre los 5...

Страница 30: ...CAF 15 HORQUILLA 16 CUBETA PARA RECOGER CAF 17 PLACA DATOS T CNICOS ZIP BASE ZIP AUTOM TICO POTENCIA REVOLU MASA DIAM PRODUCC CAPACIDAD MODELO MOTORE CIONES Kg PIEDRA HORA CONTEN HP MINUTO mm Kg CAF K...

Страница 31: ...loqueo 9 Girar la tuerca de regulaci n 8 en el sentido de las agujas del reloj para acercar las piedras caf fino y en el sentido inverso al de las agujas del reloj para alejarlas caf grueso para obten...

Страница 32: ...la desmontar la piedra inferior y sustituirla Volver a montar el aparato efectuando las operaciones en el senti do inverso con atenci n a limpiar la rosca de la virola y restable cer el uso 11 OPERACI...

Страница 33: ...fe en la toma de corriente 2 Controlar el cable de alimentaci n 1 Eliminar la eventual presencia de cuerpos extra os entre las piedras aflojando la virola de regulaci n unas cuantas vueltas y poner ot...

Страница 34: ......

Страница 35: ...6 n i i i n i iv n n V i i i J n i...

Отзывы: