Care and safe use guidelines
SAFETY INFORMATION
WARNINGS:
• Product labels and warnings affi xed with adhesive or other permanent means must never be removed; doing so
will invalidate the product’s regulatory compliance and its warranty.
• To prevent damage or surface cracking, do not drop this appliance.
• This appliance will become very hot in use, do not move it during operation.
• Always use heat resistant gloves when adding fuel or when using any safety tool (where supplied).
• Do not use this appliance in a confi ned and/or habitable space e.g. houses, tents, caravans, motor homes or
boats. Danger of carbon monoxide poisoning fatality.
• Keep children and pets away.
• Do not use this appliance as a furnace.
FIRE HAZARD:
• This appliance must be installed on a secure level base before use.
• Do not use this appliance on wooden decking or any other fl ammable surfaces such as dry grass, wood chips,
leaves or decorative bark, etc.
• Do not use this appliance on artifi cial grass or other surfaces that are not heat resistant.
• Hot embers may be emitted whilst in use.
• Ensure that this appliance is positioned at least 2 meters away from any fl ammable materials and has a minimum
clearance of 2 metres from overhead and adjacent surroundings.
• Never leave a hot or burning fi re unattended.
CARE & USE
• When lifting or moving this appliance, never drag it; seek assistance as necessary.
• As this appliance has components made from steel and/or cast iron, the surface will age and develop surface
rust over time once it is exposed to natural weather elements. This is to be expected and does not constitute an
appliance fault.
• For safety reasons, it is recommended to inspect this appliance before each use for signs of fatigue and damage.
Be sure to replace any appliance that has reached the end of its natural life.
• If this appliance is left outside temporarily a suitable cover must be used, once it has cooled completely.
• For long-term storage this appliance must be stored in an environment that is free from frost, rain and excessive
moisture.
• This appliance could mark or stain a patio; to protect against this place onto a separate patio slab or brick base.
SOLID FUEL TYPES & LEVELS
• For outdoor heating, the following fuel types may be used with this appliance: untreated wood, logs and
Easylogs.
• Do not burn coal in this appliance.
• Do not overload with fuel: it is recommended to fi ll only to half capacity of the fi re bowl or fuel burning area.
• The recommended quantity of fuel must never be exceeded by greater than 50%.
LIGHTING, REFUELLING & EXTINGUISHING
• WARNING! Do not use spirit or petrol for lighting or re-lighting! Use only fi relighters complying to EN 1860-3.
• Prepare a stack of loosely crumpled newspaper or eco fi relighters (or compatible, tested to EN 1860-3) into the
fuel-burning area.
• Pile fi nely split, dry, fi rewood on top of the paper.
• Add half of the fuel leaving access to light the paper.
• Light the paper or fi relighters using long safety matches or a long-reach lighter. Once the fi re is established add
the remaining fuel.
• Always use heat resistant gloves, tested to EN 407, when adding fuel, or when using any safety tool (where
supplied).
• Do not drop or throw fuel into the appliance as this can cause cracks/fractures to the appliance.
• To extinguish the fi re after use: stop adding fuel and allow the fi re to die; alternatively douse it with sand. Do not
use water as this may damage the appliance, and will also create excess ash particles.
FP_2_0_9
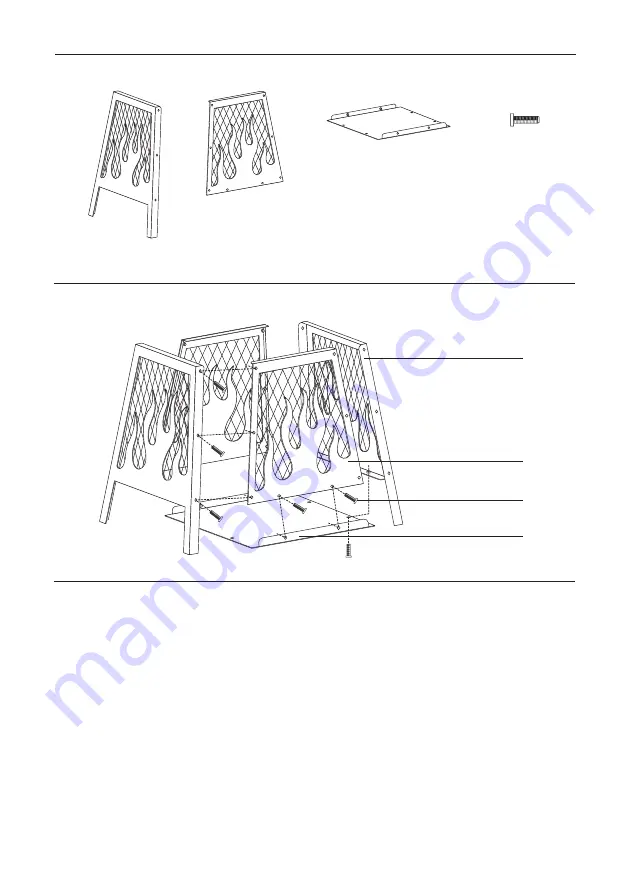
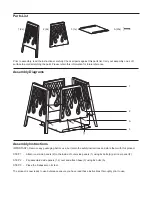
Parts List
2
A
3
1
1 (2x)
2 (2x)
3 (1x)
A (20x)
Prior to assembly, read the instructions carefully. Check all parts against this parts list. Carry out assembly on a soft
surface to avoid scratching the paint. Please retain this information for future reference.
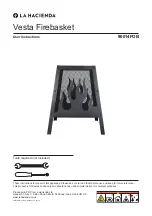
Assembly Diagrams
Assembly Instructions
IMPORTANT! - Remove any packaging before use, but retain the safety instructions and store them with this product.
STEP 1 - Attach inner side panels (2) to the inside of outer side panels (1) using 6x bolts (A) per inner panel (2) .
STEP 2 - Flip assembled side panels (1,2) over and attach base (3) using 8x bolts (A).
STEP 3 - Place the firebasket on its feet.
The product is now ready to use but please ensure you have read these instructions thoroughly prior to use.
Содержание Vesta 90014FOB
Страница 4: ......


