background image

WS6304 User Manual 


Reception of the Radio signal: 

 The clock automatically starts the 

DCF

 signal search after 7 minutes of any restart or changing of new fresh 

batteries. The radio mast icon starts to flash. 

 At 1:00 /2:00 / 3:00, the clock automatically carries out the synchronization procedure with the 

DCF

 signal to 

correct any deviations to the exact time. If this synchronization attempt is unsuccessful (the radio mast icon 

disappears from the display), the system will automatically attempt another synchronization at the next full 

one hour. This procedure is repeated automatically up to total 5 times.   

 To start manual 

DCF

 signal reception, press and hold down the “

” button for two seconds. If no signals 

received within 7 minutes, then the 

DCF

 signal search stops (the radio mast icon disappears) and start again 

at the next full one hour.   

 During DCF radio signal reception

to stop searching radio signal, press and hold down the “

” button for 

two seconds. 


F.Y.I.: 

 A flashing radio mast icon indicates that the 

DCF

 signal reception has started 

 A continuously displayed radio mast icon indicates that the

 DCF

 signal was received successfully 

  We  recommend  a  minimum  distance  of  2.5  meters  to  all  sources  of  interference,  such  as  televisions  or 

computer monitors 

  Radio  reception  is  weaker  in  rooms  with  concrete  walls  (e.g.:  in  cellars)  and  in  offices.  In  such  extreme 

circumstances, place the system close to the window. 

 During the DCF radio reception mode, only the “▲” button function, other button operations can only turn on 

the backlight. If you want to perform other operation functions, press the “▲” button to exit the DCF radio 

reception mode. 

 Note that when you enter the radio control time receiving mode, the backlight will automatically turn off. This 

is a normal phenomenon. After the radio control time receiving reception, the backlight will be automatically 

lit. 


Background lighting 


 If the product is powered by batteries, press the “

” button. Backlight lit 15 seconds. 


  When  the  power  supply  of  the  product  is  inserted  into  the  power  supply  adapter,  the  battery  will 

Содержание WS6304

Страница 1: ...mometer and frost alert Humidity Indoor Remote measurable range 20 RH 95 RH Minimum maximum display for air humidity and temperature Display of comfort and mold risk Wireless Remote Sensor 3pcs Wall M...

Страница 2: ...rk at 30 C to 70 C Please choose the right battery according to the limit temperature of the wireless sensor Alkaline zinc manganese battery can work at 20 C to 60 C Polymer lithium ion rechargeable b...

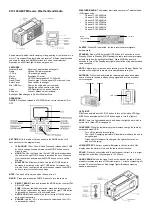
Страница 3: ...WS6304 User Manual Part A Positive LCD...

Страница 4: ...ote Channel 3 A13 Mold Risk of Wireless Remote Channel 3 A14 Humidity of Wireless Remote Channel 3 A15 Comfort Index of Wireless Remote Channel 3 A16 Atmospheric pressure A17 Temperature of Indoor A18...

Страница 5: ...will hear the buzzer and check the indoor temperature and humidity The weather station will now start connecting to the outdoor remote sensor This operation takes about 3 minutes and the receiving RF...

Страница 6: ...eekday English German French Italian Spanish Portuguese Dutch Danish Norwegian Swedish Polish Finnish Czech Hungarian and Russian Week language display Language Sunday Monday Tuesday Wednesday Thursda...

Страница 7: ...uttons to select the current weather Press to confirm your setting and to end the setting procedures enter the clock mode During the time setting process Press the button to exit the setting mode dire...

Страница 8: ...aturday to Sunday or L D from Monday to Sunday Press button to confirm your setting switch to the alarm 1 snooze time setting Use the and buttons to set the minute of snooze you need Press button to c...

Страница 9: ...4 times whilst the alarm signal is heard Switching off the alarm signal Press any button except the button to stop the alarm signal It is not necessary to reactivate the alarm It switches itself auto...

Страница 10: ...channel at the same time A total of 1 2 3 channels can be set three sensors need to set different channels If any channel of the weather station fails to receive the transmission from the outdoor sen...

Страница 11: ...t level as follows The temperature is any value the humidity is less than 40 Temperature in the range of 20 0 28 0 68 0 82 4 humidity in the range of 40 70 The temperature is any value and the humidit...

Страница 12: ...ngs and end the setup process When setting the upper and lower limit alerts for temperature and humidity press the button to switch the alert settings for setting the upper and lower temperature and h...

Страница 13: ...service into account as well as the forecast from your weather station If there are discrepancies between the information from your device and from the local weather forecasting service please take t...

Страница 14: ...e button for two seconds F Y I A flashing radio mast icon indicates that the DCF signal reception has started A continuously displayed radio mast icon indicates that the DCF signal was received succes...

Страница 15: ...ons set the required hour Press button to confirm your setting switch to the minute t of enter night mode setting Now use and buttons set the required minute Press button to confirm your setting switc...

Страница 16: ...be crushed or pinched particularly at plugs convenience receptacles and the point where they are connected to the apparatus The supplied power supply is intended for indoor use only Do not place nake...

Страница 17: ...reading take place This product is designed for use in the home only as indication of the temperature The plug on the power adapter if included is intended to serve as the disconnect device the socket...

Отзывы: