background image


120

La Crosse Technology, Ltd 

2809 Losey Blvd. S. 

La Crosse, WI 54601 

Phone: 608.782.1610 

Fax: 608.796.1020 


e-mail: 

[email protected] 

(Para trabajos de la garantía) 


[email protected] 

(Información sobre otros productos) 

web: 

www.lacrossetechnology.com 


¿Preguntas? ¿Instrucciones? Por favor visite nuestra página web: 

www.lacrossetechnology.com/9080 

 
Todos los derechos reservados. Este manual no puede ser reproducido de ninguna 
manera, ni siquiera en citas textuales, duplicarlo o procesarlo utilizando métodos 
electrónicos, mecánicos o químicos sin consentimiento por escrito del editor. 

Содержание WS-9037U-IT

Страница 1: ...19 WEATHER STATION WS 9037U IT Contents Language Page ____________________________________________________ English 1 French 35 Spanish 71...

Страница 2: ...the Time Date Manually 10 11 Temperature Measuring Units F C 11 Air Pressure Measuring Units inHg hPa 11 Relative Pressure Setting 11 12 Forecast Sensitivity Setting 12 Features and Operation Time Al...

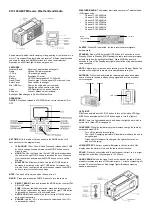
Страница 3: ...nual FEATURES The Weather Station Battery compartment Hanging hole This product offers INSTANT TRANSMISSION is the state of the art new wireless transmission technology exclusively designed and develo...

Страница 4: ...ndoor and outdoor humidity display with MIN MAX records Relative air pressure hPa inHg with adjustable reference value Weather icon sensitivity setting Relative air pressure history for the past 24 ho...

Страница 5: ...however the distance between the Weather Station and the transmitter should not be more than 330 feet 100 meters see notes on Positioning and 915 MHz Reception Note In the event of changing batteries...

Страница 6: ...rd transmitter within 45 seconds after the Weather Station displays the information of the first transmitter Or immediately after reception of the second transmitter is finished 8 In order to ensure s...

Страница 7: ...teries observing the correct polarity see marking 3 Replace the battery cover Note In the event of changing batteries in any of the units all units need to be reset by following the setting up procedu...

Страница 8: ...er Colorado A team of atomic physicists is continually measuring every second of every day to an accuracy of ten billionths of a second per day These physicists have created an international standard...

Страница 9: ...AX records Stop the alarm during alarm ringing Stop snooze mode Back light on ALM DATE key Press and hold key for 3 seconds to enter the alarm setting mode Active de active the alarm time Stop the ala...

Страница 10: ...in manual set mode Press to set the alarm minute inside alarm setting mode Stop the alarm during alarm ringing Stop snooze mode Back light on SNOOZE CH key Active snooze function during alarm ringing...

Страница 11: ...se indoor data weather forecast and outdoor data When the signal is successfully received by the Weather Station the outdoor transmission icon will be switched on If not successful the icon will not b...

Страница 12: ...time zone default of the Weather Station is 5h To set a different time zone 1 The current time zone value starts flashing 2 Use the OUT key to set the time zone The range runs from 0 to 12 and then r...

Страница 13: ...e as long as the Time Reception OFF function is activated The time reception icon and the WWVB icon will not be displayed on the LCD 12 24 HOUR FORMAT SETTING The hour display can be selected to show...

Страница 14: ...f the Weather station is 1 1 2006 Once the radio controlled time signals are received the date is automatically updated However if the signals are not received the date can also be set manually 1 The...

Страница 15: ...TTING The default relative pressure value is 29 92 inHg 1013 hPa This can be manually set to another value within the range of 28 35 30 72 inHg 960 1040 hPa for a better reference 1 The current relati...

Страница 16: ...e The alarm digits flash 2 Use the IN key to set the alarm hour 3 Use the OUT key to set the alarm minute 4 Confirm with SNOOZE CH key and exit the Alarm setting The icon will be displayed along with...

Страница 17: ...OGGLING AND RESETTING THE INDOOR READINGS 1 Press the IN key to toggle between the indoor current MAX MIN temperature and humidity data The time and dates of the recorded data will also be displayed i...

Страница 18: ...and not necessarily sunny or rainy as each icon indicates For example if the current weather is cloudy and the rainy icon is displayed it does not mean that the product is faulty because it is not rai...

Страница 19: ...wards Note Once the weather tendency indicator has registered a change in air pressure it will remain permanently visualized on the LCD AIR PRESSURE HISTORY ELECTRONIC BAROMETER WITH BAROMETRIC PRESSU...

Страница 20: ...o reset the respective MIN or MAX record to current temperature and humidity data and current time date display Note The MIN or MAX data needs to be reset individually TO VIEW THE MIN MAX DATA FROM DI...

Страница 21: ...itters should be at least 6 feet 2 meters away from any interfering sources such as computer monitors or TV sets 2 Avoid placing the transmitters onto or in the immediate proximity of metal window fra...

Страница 22: ...he desired wall leaving the head extended out the by about 0 2 5mm 2 Hang it onto the screw Remember to ensure that it locks into place before releasing POSITIONING THE THERMO HYGRO TRANSMITTER The th...

Страница 23: ...ubmerge the unit in water Special care shall be taken when handling a damaged LCD display The liquid crystals can be harmful to user s health Do not make any repair attempts to the unit Return them to...

Страница 24: ...All electronic instruments must from now on be recycled User shall take an active part in the reuse recycling and recovery of the electrical and electronic waste The unrestricted disposal of electroni...

Страница 25: ...Crosse Technology Ltd will pay all expenses for labor and materials for all repairs covered by this warranty If necessary repairs are not covered by this warranty or if a product is examined which is...

Страница 26: ...n may not apply to you For warranty work technical support or information contact La Crosse Technology Ltd 2809 Losey Blvd S La Crosse WI 54601 Phone 608 782 1610 Fax 608 796 1020 e mail support lacro...

Страница 27: ...WS 9080U IT 915 MHz WIRELESS TEMPERATURE STATION Instruction manual...

Страница 28: ...Contents Language Page ___________________________________________________________________ English 1 French 41 Spanish 79 1...

Страница 29: ...Settings 17 Display of Indoor Temperature Reading 25 Display of Outdoor Temperature Reading 26 Display of Indoor Minimum and Maximum records 26 Display of Outdoor Minimum and Maximum records 28 Daily...

Страница 30: ...GY INSTANT TRANSMISSION offers you an immediate update every 4 seconds of all your outdoor data measured from the sensors follow your climatic variations in real time This product offers INVENTORY OF...

Страница 31: ...FEATURES 4 The Temperature Station Foldout Stand Battery compartment cover Function Keys LCD Display Hanging hole...

Страница 32: ...nsmission at 915 MHz Outdoor signal reception intervals at 4 second Temperature display in degrees Fahrenheit F or Celsius C selectable Indoor and Outdoor temperature display with MIN MAX recording re...

Страница 33: ...nshine SETTING UP When one Sensor is used 1 First insert the batteries into the temperature sensor see Install and replace batteries in the temperature sensor 2 Immediately after and within 30 seconds...

Страница 34: ...e should be no more than 330 feet 100 meters between the final position of the Temperature Station and the sensor see notes on Mounting and 915 MHz Reception 5 Once the remote temperature has been rec...

Страница 35: ...perature from the second sensor and the channel 2 icon should then be displayed on the Temperature Station If this does not happen after 2 minute the batteries will need to be removed from all the uni...

Страница 36: ...lso be done for re synchronization 10 Once the remote temperature has been received and displayed on the Temperature Station the WWVB time code reception is automatically started This takes typically...

Страница 37: ...on Atomic auto set time WWVB Radio controlled Time and Manual Time Setting BATTERY INSTALLATION INSTALL AND REPLACE BATTERIES IN THE TEMPERATURE STATION The Temperature Station uses 2 x AAA IEC LR3 1...

Страница 38: ...ry cover on the unit Note In the event of changing batteries in any of the units all units need to be reset by following the setting up procedures This is because a random security code is assigned by...

Страница 39: ...cipate in the preservation of the environment Return used batteries to an authorized depot FUNCTION KEYS Temperature Station The Temperature Station has four easy to use function keys SET key MIN MAX...

Страница 40: ...ature records Press to exit the setting mode Press to reset the minimum and maximum or temperature records of the indoor and the outdoor channel will reset all records to current level key To make a p...

Страница 41: ...or Day Month or Second display Receiver low battery icon Outdoor Temperature Time reception icon Outdoor signal reception icon Sensor low battery icon Daily indoor max temp Daily outdoor max temp Dai...

Страница 42: ...r No will be shown when more than one outdoor sensor is adopted For better distinctness the LCD screen is split into 3 sections displaying the information for time and date Indoor data and outdoor dat...

Страница 43: ...rch for a signal every night when reception is best The WWVB radio station receives the time data from the NIST Atomic clock in Boulder Colorado A team of atomic physicists is continually measuring ev...

Страница 44: ...10 seconds per day MANUAL SETTINGS The following manual settings can be done in the setting mode LCD Contrast setting Time zone setting Daylight Saving Time ON OFF setting DST Atomic Time reception ON...

Страница 45: ...efault LCD contrast setting is LCD 4 To set the desired contrast level 1 The above display will be seen Press the key or CH key to select the level of contrast desired 2 Press the SET key to confirm a...

Страница 46: ...and enter the Daylight Saving time ON OFF setting or exit the setting mode by pressing the MIN MAX key DAYLIGHT SAVING TIME ON OFF SETTING flashing 1 The digit ON DST will start flashing on the LCD 2...

Страница 47: ...con will start flashing on the LCD 5 Use the key or CH key to turn OFF the time reception function 6 Confirm with the SET key and enter the 12 24 Hour Display setting or exit the setting mode by press...

Страница 48: ...key or CH to select the 12 h or 24 h display mode 3 Press the SET again to confirm and to enter the Manual Time setting or exit the setting mode by pressing the MIN MAX key Note When 24 h mode displa...

Страница 49: ...Quartz clock Minutes flashing Hours flashing To set the clock 1 The hour digits start flashing in the time display section 2 Use the key or CH key to adjust the hours and then press SET key to go to...

Страница 50: ...ion is 1 1 of the year 2006 after initial set up Once the radio controlled time signals are received the date is automatically updated However if the signals are not received the date can also be set...

Страница 51: ...y to set the day 5 Confirm with SET key and enter the F C TEMPERATURE UNIT SETTING or exit the setting mode by pressing the MIN MAX key Note The weekday of calendar will be automatically set after the...

Страница 52: ...unit has been chosen confirm with the SET key to exit the setting mode DISPLAY OF INDOOR TEMPERATURE READING The indoor temperature is measured and displayed on the second section of the LCD Indoor T...

Страница 53: ...or temperature Outdoor icon Outdoor Temperature in F DISPLAY OF INDOOR MINIMUM AND MAXIMUM RECORDS 1 In normal display mode press the MIN MAX key once the minimum indoor temperature will be shown in L...

Страница 54: ...f record 2 Then press the MIN MAX button one more time the maximum indoor temperature will be shown in LCD Also the time and date of recording this temperature will be displayed 3 Press three more tim...

Страница 55: ...r minimum temperature and the time and date of recording this temperature will be displayed 2 Press the MIN MAX button once more the outdoor maximum temperature and the time and date of recording this...

Страница 56: ...and maximum data to the current time date and temperature 3 Then press the MIN MAX button three more times to return to the normal display Note The indoor minimum and maximum record as well as the min...

Страница 57: ...mperature station also displays the daily minimum and maximum outdoor temperature for each outdoor channel in normal display Channel No Min daily temp of the channel Max daily temp of the channel To v...

Страница 58: ...s computer monitors or TV sets 2 Avoid positioning the Temperature Station onto or in the immediate proximity of metal window frames 3 Using other electrical products such as headphones or speakers op...

Страница 59: ...G THE TEMPERATURE STATION The Temperature Station has been designed to be hung onto wall or free standing To wall mount Choose a sheltered place Avoid direct rain and sunshine Before wall mounting ple...

Страница 60: ...aced onto any flat surface POSITIONING THE TEMPERATURE SENSOR The sensor is supplied with a holder that may be attached to a wall with the two screws supplied The sensor can also be position on a flat...

Страница 61: ...eceivable In event that the signal is not received relocate the sensors or move them slightly as this may help the signal reception CARE AND MAINTENANCE Extreme temperatures vibration and shock should...

Страница 62: ...sudden temperature changes this may lead to rapid changes in forecasts and readings and thereby reduce their accuracy SPECIFICATIONS Temperature measuring range Indoor 32 F to 139 8 F with 0 2 F reso...

Страница 63: ...cturing defects in materials and workmanship This limited warranty begins on the original date of purchase is valid only on products purchased and used in North America and only to the original purcha...

Страница 64: ...ination The owner must pay any shipping charges incurred in getting your La Crosse Technology Ltd product to a La Crosse Technology Ltd authorized service center La Crosse Technology Ltd will pay grou...

Страница 65: ...ulting from installation related circumstances LA CROSSE TECHNOLOGY LTD WILL NOT ASSUME LIABILITY FOR INCIDENTAL CONSEQUENTIAL PUNITIVE OR OTHER SIMILAR DAMAGES ASSOCIATED WITH THE OPERATION OR MALFUN...

Страница 66: ...td 2809 Losey Blvd S La Crosse WI 54601 Phone 608 782 1610 Fax 608 796 1020 e mail support lacrossetechnology com warranty work sales lacrossetechnology com information on other products web www lacro...

Страница 67: ...r chemical procedures without written permission of the publisher This handbook may contain mistakes and printing errors The information in this handbook is regularly checked and corrections made in t...

Страница 68: ...la lectura de la temperatura en interiores 104 Visualizaci n de la temperatura en exteriores 105 Visualizaci n de los m ximos y m nimos registros en interiores 106 Visualizaci n de los m ximos y m nim...

Страница 69: ...la LA CROSSE TECHNOLOGY TRANSMISION INSTANTANEA le ofrece una actualizaci n inmediata cada 4 segundos de todos los datos del tiempo en exteriores medidos por los transmisores sigue las variaciones del...

Страница 70: ...eratura 81 La hora radio controlada WWVB con opci n de ajuste manual Encendido apagado de la funci n de recepci n de la hora ON OFF Stand desprendible Cubierta del compartimiento de las pilas Teclas d...

Страница 71: ...t F o Cent grados C Muestra los datos de la temperatura con los MIN MAX registros Todos los MIN MAX registros en interiores y exteriores muestran la hora y fecha en que fueron registrados Todos los MI...

Страница 72: ...FUNCIONAMIENTO Cuando se utiliza solamente un Sensor 1 Primero inserte las pilas en el Sensor lea las instrucciones sobre Como instalar y cambiar las pilas en el Sensor de Temperatura anotadas m s ad...

Страница 73: ...des deber n ser reinstaladas nuevamente desde el paso 1 4 Recuerde que con el fin de asegurar una buena transmisi n de la se al de 915MHz la distancia de ubicaci n de las unidades bajo buenas condicio...

Страница 74: ...terior del primer sensor canal 1 Tambi n el s mbolo de la se al de recepci n titila en la pantalla Si estos datos no son mostrados en pantalla despu s de 2 minutos quite las pilas de ambas unidades y...

Страница 75: ...Nota Las pilas del tercer sensor deben ser puestas 10 segundos despu s de la recepci n de los datos del segundo sensor 8 Con el fin de asegurar una buena transmisi n de la se al de 915 MHz la distanci...

Страница 76: ...tal como se indic anteriormente En caso de cualquier problema de transmisi n retire las pilas de todas las unidades y empiece nuevamente el proceso de instalaci n desde el paso 1 10 Una vez que la est...

Страница 77: ...refi rase las instrucciones sobre La radio se al de la hora WWVB y Configuraci n Manual de la Hora INSTALLACION DE LAS PILAS INSTALACION Y CAMBIO DE LAS PILAS EN LA ESTACION DE LA TEMPERATURA La esta...

Страница 78: ...ater a en la unidad y aseg rela re atornillando nuevamente Nota Cuando cambie las pilas en alguna de las unidades todas las unidades del sistema necesitar n ser reajustadas reconfiguradas siguiendo lo...

Страница 79: ...rase a las Especificaciones T cnicas anotadas m s adelante 90 Por favor participe en la conservaci n del medio ambiente Deseche las pilas agotadas en un punto de reciclaje autorizado para este fin TEC...

Страница 80: ...ha la unidad de temperatura en grados en F C Tecla MIN MAX Sirve para intercambiar entre los registros de la m nima m xima temperatura registrada en interiores y exteriores P lsela para salir del prog...

Страница 81: ...92 Tecla CH Para hacer un ajuste negativo disminuir los datos en varias configuraciones Para intercambiar entre las lecturas de los diferentes canales sensores en exteriores...

Страница 82: ...al de Recepci n en Exteriores Min temperatura exterior registrada diariamente Muestra D a de la semana D a o D a Mes o Segundos Icono de recepci n para la hora WWVB No de Identificaci n del Transmisor...

Страница 83: ...res el pron stico del tiempo y los datos en exteriores Para una mejor distinci n de los datos la pantalla est dividida en 3 secciones una para visualizar los datos de la hora y la fecha otra para los...

Страница 84: ...exactas a una frecuencia de 60 kHz en todo el territorio de los Estados Unidos La se al puede ser recibida hasta una distancia o radio de 2 000 millas 3 200 Km con la ayuda de la antena incorporada en...

Страница 85: ...tambi n es conocido como la Hora del Meridiano de Greenwich GMT Esta hora no sigue el cambio de hora por cambio de estaci n Al llegar al minuto cerrado se escuchar un tono por cada segundo Es posible...

Страница 86: ...CD puede ser ajustado en 8 niveles diferentes para ajustarse a las necesidades del usuario viene preajustado en el nivel LCD 4 Para poner el nivel de contraste deseado 1 Aparecer el s mbolo mostrado a...

Страница 87: ...12 h en intervalos consecutivos de una 1 hora 2 Pulse la tecla SET para confirmar y entrar en el modo de Configuraci n de la hora de verano encendido apagado o para salir del programa de configuraci...

Страница 88: ...RECEPCION DE LA HORA ON OFF Titilando Icono de recepci n de la hora Titilando En reas donde la estaci n no pueda detectar la se al de la hora WWVB la funci n de recepci n de la hora puede ser apagada...

Страница 89: ...entar recibir la se al de recepci n de la hora WWVB mientras que esta funci n esta apagada El icono de recepci n no ser visualizado FORMATO DE VISUALIZACION DE LA HORA 12 24 HORAS Titilando 1 Despu s...

Страница 90: ...a no pueda detectar la se al de la hora WWVB por ejemplo debido a interferencias distancias de transmisi n etc la hora puede ser ajustada manualmente El reloj trabajar entonces como un reloj de cuarzo...

Страница 91: ...ET y entrar en el modo de Configuraci n del Calendario o salga del programa de configuraci n pulsando la tecla MIN MAX CONFIGURACION DEL CALENDARIO A o D a Mes para el formato de las 24h Mes D a para...

Страница 92: ...tecla SET para entrar en el modo de configuraci n del mes 3 El d gito del mes empieza a titilar Pulse a tecla o CH para poner el mes y luego pulse la tecla SET para pasar al modo de modo de configura...

Страница 93: ...nt grados 1 El s mbolo C F empieza a titilar use la tecla ou CH para cambiar entre C y F 2 Una vez que haya seleccionado la unidad de temperatura deseada confirme con la tecla SET y salga del modo de...

Страница 94: ...i n de la pantalla muestra la temperatura en exteriores y mostrar el n mero del canal debajo de esta lectura si se ha usado m s de un Sensor Temperatura Interior en F Icono interior Icono exterior N m...

Страница 95: ...eratura interior Tambi n mostrar la hora y fecha del registro de esta temperatura 106 2 Luego pulse la tecla MIN MAX una vez m s la pantalla mostrar entonces la m xima temperatura registrada en interi...

Страница 96: ...visualizaci n normal Pulse tres veces la tecla MIN MAX la pantalla mostrar la m nima temperatura registrada en exteriores y tambi n mostrar la hora y fecha del registro de esta temperatura 2 Pulse la...

Страница 97: ...anal No Hora de registro de la Max Temperatura Max temperatura 3 Pulse la tecla MIN MAX una vez m s para devolverse al modo de visualizaci n normal REAJUSTE DE LAS MAXIMAS MINIMAS LECTURAS REGISTRADAS...

Страница 98: ...a y hora actuales Nota Los m nimos y m ximos registros en interiores as como los m nimos y m ximos registros de todos los canales en exteriores ser n reajustados al mismo tiempo VISUALIZACION DE LA MI...

Страница 99: ...la en el modo de la pantalla normal 110 Para ver los m x y m n registros de la temperatura de otro canal pulse la tecla CH en el modo de la pantalla normal No del Canal Min temp diaria del canal M x t...

Страница 100: ...ubicaci n de aparatos tales como monitores de ordenadores o televisores 2 Evite poner la estaci n de temperatura en marcos de ventanas met licas o en sus alrededores 3 La utilizaci n de otros product...

Страница 101: ...no es posible recibir ninguna se al de recepci n a pesar de la observaci n de los factores antes mencionados todas las unidades del sistema tienen que ser reajustadas o reinstaladas vea las notas sob...

Страница 102: ...era aprox 5mm 2 Retire el stand soporte de la estaci n hal ndolo de la base y cu lguela en el tornillo Recuerde que debe asegurarse que la unidad quede bien instalada en su sitio antes de soltarla Par...

Страница 103: ...e en la base tal como lo muestra la figura Para colgar en la pared 1 Asegure el soporte travesa o en la pared deseada utilizando los tornillos y las anclas pl sticas 2 Cuelgue el Sensor de temperatura...

Страница 104: ...detergentes o agentes frotantes ya que estos pueden rayar la pantalla LCD y las cubiertas No sumerja las unidades en agua Retire inmediatamente las pilas usadas para evitar goteo y da os Cambie nicame...

Страница 105: ...por fuera de este intervalo Intervalo de chequeo de la Temperatura en Interiores Cada 15 segundos Recepci n de los datos en exteriores Cada 4 segundos Fuente de Energ a Estaci n de la temperatura 2 pi...

Страница 106: ...ramites de servicio Los servicios de la garant a deber n ser hechos por el centro autorizado de servicio al cliente de La Crosse Technology Ltd El recibo original de la compra del producto deber ser i...

Страница 107: ...sta un centro de servicio autorizado de La Crosse Technology Ltd La Crosse Technology Ltd pagar los gastos del env o de vuelta del producto al propietario por v a terrestre solamente en una direcci n...

Страница 108: ...vendedor o las variaciones de funcionamiento resultantes de las circunstancias relativas a la instalaci n del producto LA CROSSE TECHNOLOGY LTD NO ASUMIRA NINGUNA RESPONSABILIDAD POR DA OS INCIDENTALE...

Страница 109: ...om Informaci n sobre otros productos web www lacrossetechnology com Preguntas Instrucciones Por favor visite nuestra p gina web www lacrossetechnology com 9080 Todos los derechos reservados Este manua...

Страница 110: ...smitter FCC DISCLAIMER RF Exposure mobil The internal external antennas used for this mobile transmitter must provide a separation distance of at least 20 cm 8 inches from all persons and must not be...

Страница 111: ...lled and used in accordance with the instructions may cause harmful interference to radio communications However there is no guarantee that interference will not occur in a particular installation If...

Страница 112: ...es relev s de temp rature int rieures 63 Affichage des relev s de temp rature ext rieures 64 Affichages des maximum et minimum int rieurs enregistr s 64 Affichages des maximum et minimum ext rieurs en...

Страница 113: ...a TRANSMISSION INSTANTANEE actualise sans d lai toutes les 4 secondes toutes les donn es ext rieures relev es par les metteurs vous suivrez les variations climatiques en temps r el Ce produit pr sente...

Страница 114: ...r glage manuel Heure radio pilot e signal horaire WWVB avec option de r glage manuel R ception de l heure actiov e annul e R ception de l heure actiov e annul e Support amovible Couvercle des piles C...

Страница 115: ...ures avec MIN MAX enregistr s Toutes donn es enregistr es int rieures et ext rieures MIN MAX avec heure et date de r ception Toutes les donn es enregistr es MIN MAX All MIN MAX peuvent tre remises z r...

Страница 116: ...et remplacement des piles dans Capteur de temp rature 2 Dans les 30 secondes qui suivent la mise sous tension de Capteur installer les piles dans le station de temp rature voir Installation et remplac...

Страница 117: ...n de temp rature la r ception du code Heure radio pilot e signal horaire WWVB est lanc e automatiquement Ceci prend g n ralement 6 8 minutes dans de bonnes conditions Quand plus d un Capteur est utili...

Страница 118: ...s affichent pas dans les 2 minutes qui suivent retirer les piles de tous les appareils et recommencer partir de l tape 1 7 Installer les piles dans le troisi me capteur d s que l ic ne canal 2 et les...

Страница 119: ...ppareils et recommencer partir de l tape 1 8 Une fois que la temp rature est capt e et affich e sur le station de temp rature la r ception du code Heure radio pilot e signal horaire WWVB est lanc e au...

Страница 120: ...EMPLACER LES PILES DANS LE STATION DE TEMPERATURE Le station de temp rature fonctionne avec 2 piles AAA IEC LR3 1 5V Pour les installer ou les remplacer suivre les tapes ci dessous 1 Retirer le couver...

Страница 121: ...olarit s voir les marques 3 Remettre le couvercle et la vis en place Note Quand on remplace les piles de l un des appareils il est n cessaire de r enclencher tous les appareils conform ment aux proc d...

Страница 122: ...sion Cycle de vie des piles voir les Sp cifications ci dessous 51 Participez la protection de l environnement et d posez toutes piles usag es dans une d charge autoris e COMMANDES STATION DE TEMPERATU...

Страница 123: ...maximum de temp rature int rieure et ext rieure Appuyer pour sortir du mode de r glage Appuyer sans l cher pour r enclencher les rel ves de temp rature minimum et maximum Commande Pour faire faire un...

Страница 124: ...rature ext rieure en F Signal de r ception ext rieure Identification de capteur N de canal Affiche Jour Quanti me ou Jour Mois ou secondes Ic ne de r ception du signal horaire pour WWVB Ic ne ext rie...

Страница 125: ...s sections pour affichent l heure et la date les donn es int rieures et ext rieures Section 1 HEURE ET CALENDRIER Dans le mode normal affiche l heure et le jour quanti me Appuyer une fois sur pour aff...

Страница 126: ...nn es horaires de la pendule atomique NIST de Boulder Colorado Une quipde de physiciens atomistes mesure continuellement chaque seconde de chaque jour au dix millioni me de seconde pr s par jour Ces p...

Страница 127: ...ANUELS Les r glages manuels suivants peuvent tre effectu s dans le mode de r glage R glage du contraste du LCD R glage du fuseau horaire R glage de l heure d t Activation annulation de la r ception de...

Страница 128: ...er sur SET pour confirmer et entrer le R glage du fuseau horaire ou sortir du mode de r glage en appuyant sur MIN MAX REGLAGE DU FUSEAU HORAIRE clignotant Le r glage par d faut du fuseau horaire est 5...

Страница 129: ...avec SET et entrer le r glage de la r ception de l heure ou sortir du mode de r glage en appuyant sur MIN MAX REGLAGE DE LA RECEPTION DE L HEURE Ic ne de r ception de l heure clignotant clignotant Dan...

Страница 130: ...la fonction de r ception de l heure est d sactiv e manuellement la pendule ne tente aucun essai de r ception WWVB tant que cette fonction reste d sactiv e L ic ne de r ception de l heure ne s affiche...

Страница 131: ...st possible de r gler l heure manuellement La pendule fonctionne alors comme une pendule quartz normale Heures clignotent Minutes clignitent Pour r gler la pendule 1 Les chiffres des heures se mettent...

Страница 132: ...lement il continue essayer de recevoir le signal toutes les heures justes Quand il re oit le signal l heure capt e supplante l heure r gl e manuellement REGLAGE DU CALENDRIER Ann e Date Mois pour affi...

Страница 133: ...6 2 Appuyer sur SET pour entrer le mode de r glage du mois 3 Les chiffres du mois se mettent clignoter Appuyer sur ou CH pour r gler le mois puis sur SET pour passer au r glage du quanti me 4 Les chif...

Страница 134: ...la commande ou CH pour alterner entre F et C 2 Apr s avoir s lectionn l unit de temp rature d sir e confirmer avec SET et sortir du mode de R glages manuels AFFICHAGE DES RELEVES DE TEMPERATURE INTERI...

Страница 135: ...teur est utilis Ic ne ext rieure N d identification de capteur quand plus d un capteur est utilis Temp rature exterieures en F AFFICHAGE DES DONNEES INTERIEURES MINIMUM AND MAXIMUM 1 Dans le mode d af...

Страница 136: ...s fois de plus sur MIN MAX pour retourner l affichage normal AFFICHAGE DES DONNEES EXTERIEURES MINIMUM AND MAXIMUM 1 Dans le mode d affichage normal appuyer trois fois sur MIN MAX pour afficher la tem...

Страница 137: ...e Temp rature ext rieure max 3 Appuyer une fois de plus sur MIN MAX pour retourner l affichage normal REENCLENCHEMENT DES DONNEES INTERIEURES ET EXTERIEURES MINIMUM MAXIMUM ENREGISTREES 1 Dans le mode...

Страница 138: ...Note Les donn es int rieures minimum et maximum enregistr es ainsi que les donn es minimum et maximum de tous les canaux ext rieurs seront r enclench s simultan ment 67 AFFICHAGE DES MIN MAX QUOTIDIEN...

Страница 139: ...pour chaque canal ext rieur dans le bas du LCD avec l affichage normal 68 Pour afficher la temp rature min et max quotidienne d un autre canal appuyer sur CH dans le mode d affichage normal N de canal...

Страница 140: ...diate de cadres de fen tres m talliques 3 L utilisation d autres appareils lectriques tels que des casques ou enceintes fonctionnant sur la m me fr quence de signal 915MHz peut emp cher une bonne tra...

Страница 141: ...mp rature Le Station de temp rature est con u pour s accrocher un mur ou se poser sur une table Fix au mur Choisir un endroit abrit Eviter d exposer l appareil la pluie et aux rayons du soleil Avant d...

Страница 142: ...se poser sur n importe quelle surface plate 71 MISE EN PLACE DE L CAPTEUR DE TEMPERATURE Capteur est fourni avec un support qui peut se fixer au mur l aide des deux vis fournies On peut aussi le poser...

Страница 143: ...es d placer l g rement ce qui peut aider la r ception du signal ENTRETIEN Eviter les temp ratures excessives vibrations et chocs qui risquent d endommager l appareil et de produire pr visions et relev...

Страница 144: ...rapide des pr visions et des relev s ce qui en diminuerait la pr cision SPECIFICATIONS Rayon de relev de temp rature Int rieure 32 F 139 8 F 0 2 F pr s 0 C 59 9 C 0 1 C pr s OF L affich en dehors de...

Страница 145: ...ui entre en vigueur partir de la date d achat de l appareil n est valide que pour les produits achet s et utilis s en Am rique du Nord et uniquemement pour l acheteur d origine Pour recevoir les servi...

Страница 146: ...les frais de transport encourus pour faire parvenir le produit au service apr s vente de La Crosse Technology Ltd sont la charge du propri taire La Crosse Technology Ltd paiera les frais de renvoi du...

Страница 147: ...on LA CROSSE TECHNOLOGY LTD DECLINE TOUTE RESPONSABILITE POUR TOUS DOMMAGES FORTUITS INDIRECTS SECONDAIRES OU SIMILAIRES ASSOCIES A L UTILISATION OU AU MAUVAIS FONCTIONNEMENT DE CE PRODUIT CE PRODUIT...

Страница 148: ...td 2809 Losey Blvd S La Crosse WI 54601 Phone 608 782 1610 Fax 608 796 1020 courriel support lacrossetechnology com travaux sous garantie sales lacrossetechnology com information sur les autres produi...

Страница 149: ...ue m canique ou chimique sans l autorisation crite de l diteur Ce livret peut contenir des erreurs ou fautes d impression Les informations qu il contient sont v rifi es r guli rement et corrig es n ce...

Отзывы: