background image

123456-ABC

05

06

BASICS

Station Settings

This step is only required if you do not receive the Add Device notification within the app.

Prior to mounting/positioning your sensors, make sure your station is receiving sensor data.

Adding Your Sensors to the App

LA CROSSE VIEW

Upon getting the station connected to your Wi-Fi network, the app will 
explain how your connected sensor should be brought in. Within the 
next 15 minutes, you should receive an Add Device notification in your 
app. This is indicated by the Red Cloud and the numbers inside of it. 
Tap this icon to begin adding your sensors into the app.

1.

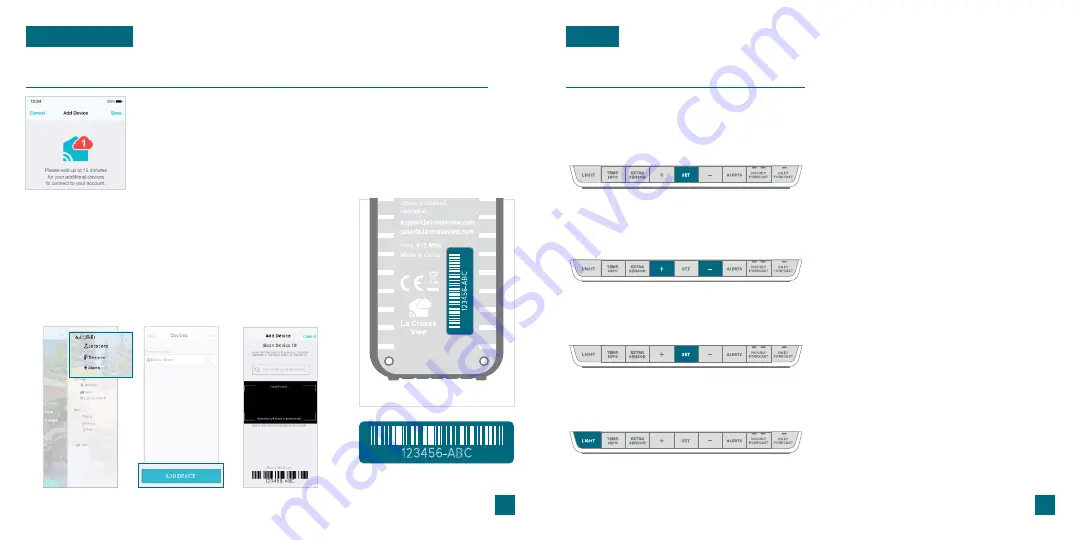
Manually Add Sensors Into the App*

3.

4.

2.

Open your La Crosse View app. On the Main Menu, scroll to 

ADD/EDIT

 and select 

DEVICES

.  

Scan the Barcode on your Sensor or type in the Device ID 
manually.
Confirm the sensor image and Device ID and add a Device 
Name and Location Name. Select 

DONE

.

On the Devices page, select the 

ADD DEVICE 

or

 PLUS (

+

button.

123456-ABC

Back of Sensor

Settings Menu Order

•  

Greeting/HELLO

•  

Language (English/Spanish/French)

•  

Beep ON/OFF

•  

12/24 Hour Time Format

•  

Hour  |  Minute  |  Year  |  Month  |  Date

•  

Calendar Order Month/Date or Date/Month

•  

Temperature Units (Fahrenheit/Celsius)

•  

Pressure Units (InHg/hPa) 

•  

Pressure Number Setting

The default pressure reading is 29.91 INHg (1013 hPa).

The station will acclimate on it’s own if the pressure

number is not set. Learn more on page 

16

•  

THANK YOU

Important:

 Settings such as language and units of measure must 

be set manually within the station’s Settings Menu. These are not 
controlled by the La Crosse View app.


When a language is selected, the following instructions and 

weekday will be presented in that language.


Weekday will set automatically after year, month, and date 

settings are adjusted.


When in 24 hour time format, seconds will show in place of

AM/PM markings.


If you’re connected to Wi-Fi, the time/date will automatically 

update from the Internet. See pages 3-4 for more info.

When the station is first powered on, it will begin searching for your sensors, 
which should connect within 10 minutes.

Navigating the Settings Menu

To manually set language, time/date, and 
other settings, hold the 

SET

 button to 

enter the Settings Menu.

1.

Use the 

+/-

 buttons on the top of the 

station to adjust the values.

2.

Press the 

SET

 button to confirm your 

selection and move to the next setting.

3.

You may exit the Settings Menu at any 
time by pressing the

 LIGHT 

button.

4.

Содержание V10v2

Страница 1: ...SET UP GUIDE MODEL NUMBER V10v2 Wi Fi COLOR FORECAST STATION...

Страница 2: ...cifications Cautions Statements Warranty Recycling Disposal 18 18 21 19 19 03 04 05 06 13 13 14 14 15 16 SENSORS Placement Mounting Add On Sensors Adding Extra Sensors 16 17 17 Note It may take up to...

Страница 3: ...outer However if you have trouble connecting please go to bit ly_v10v2_wifi or scan the QR code This will explain additional connectivity options including connecting by WPS or contacting our technica...

Страница 4: ...th Date Calendar Order Month Date or Date Month Temperature Units Fahrenheit Celsius Pressure Units InHg hPa Pressure Number Setting The default pressure reading is 29 91 INHg 1013 hPa The station wil...

Страница 5: ...e station to adjust the backlight intensity There are 4 brightness levels plus an off option 3 EXTRA SENSOR Press to toggle through extra sensors and pressure Hold to add sensors While viewing hold th...

Страница 6: ...en station battery needs to be replaced 11 DAILY FORECASTED HIGH AND LOW TEMPERATURES Forecasted high and low temperatures in the next 12 hours 3 AUTO DIM ICON Indicates active Auto Dim setting 9 OUTD...

Страница 7: ...midity Indoor Low Humidity Heat Index Dew Point 1 2 3 Hold the ALERTS button to enter the Alert Settings Menu Use the buttons to activate deactivate individual alerts or press the ALERTS button to ski...

Страница 8: ...play 6 additional forecast icons FORECAST Viewing Your Forecast Data FORECAST Forecast Icons Please Note The Forecast Icons may not represent your current weather They are a future prediction of the w...

Страница 9: ...umber is not set Daily and Hourly Forecast Buttons When connected to Wi Fi use the DAILY FORECAST and HOURLY FORECAST buttons on the top of the station to view future forecast information Daily Foreca...

Страница 10: ...ge 23 62 to 32 48 InHg 800 to 1100 hPa Power Requirements Primary Power 5 0V Adapter included Battery Backup 1 CR2032 Coin Cell Battery included Station Dimensions 7 80 in L x 1 23 in W x 6 44 in H 19...

Страница 11: ...ept any interference received including interference that may cause undesired operation Caution Any changes or modifications not expressly approved by the party responsible for compliance could void t...

Страница 12: ...provide feedback on our social media outlets Apple and the Apple logo are trademarks of Apple Inc registered in the U S and other countries App Store is a service mark of Apple Inc Google Play and the...

Отзывы: