background image

Station Settings

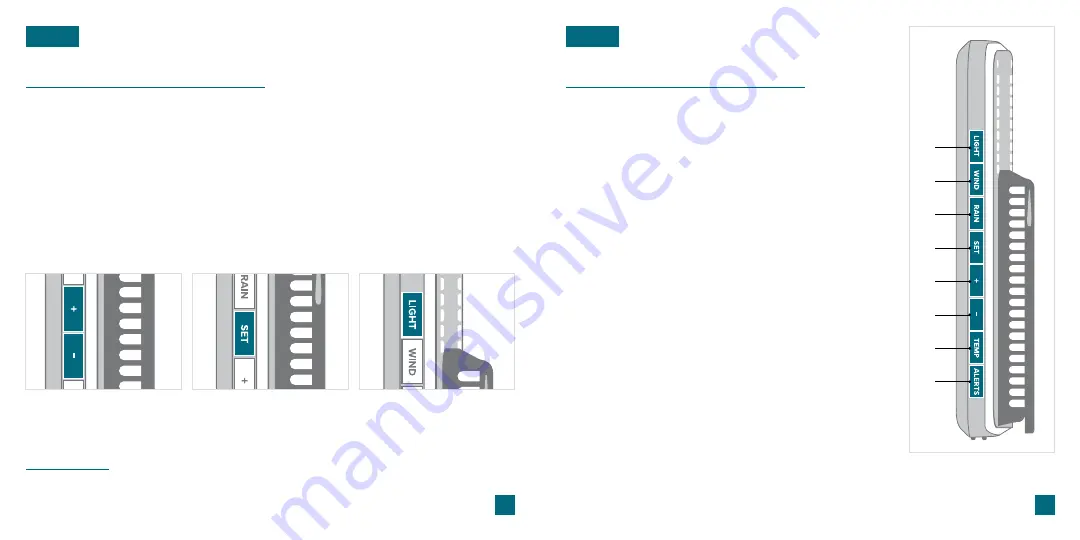
Buttons

BASICS

BASICS

1.  LIGHT

Press to adjust backlight.

Hold to enter Auto-Dim 

Settings.

2. WIND

Press to view Wind Speed 

History. While viewing, hold 

the 

MINUS 

button to reset 

the history reading.

3. RAIN*

When viewing Rain, Press 

RAIN

 to view rain history 

month, year etc. Hold 

RAIN


to search for Rain sensor. 

Hold 

RAIN

 and 

SET

 together 

to return to Time display.  

6. MINUS (-)

Hold to reset history readings. 

Use to adjust values in Settings 

Menu. Hold to delete add-on 

TH sensor.**

4. SET

Hold to enter Settings Menu. 

Press to toggle full weekday 

or month/date/year. 

7. TEMP

Press to view HI/LO 

temperature and humidity 

records. Hold to search for 

add-on TH sensor.**

5. PLUS (+)

Press to toggle indoor/

outdoor temperature & 

humidity readings. Use to 

adjust values in Settings 

Menu. 

8. ALERTS

Hold to enter the Alerts Settings. 

While viewing, use the 

+/-


buttons to activate an alert and 

the 

ALERTS

 button to confirm 

and move to the next option.

Use the 

+/-

 buttons on the 

side of the station to adjust 

the values.

Press the 

SET

 button to 

confirm your selection and 

move to next step. 

You may exit the Settings 

Menu at any time by 

pressing the 

LIGHT

 button.

Settings Menu Order

Greeting  

•  

Language  

•  

12/24 Hour Time  

•  

Hour  

•  

Minutes  

•  

Year  

•  

Month

Date  

•  

Month/Date or Date/Month Order  

•  

Fahrenheit/Celsius  

•  

Wind Speed Units 

(MPH or KMH)  

•  

Wind Direction (Letters or Degrees)   

•  

Rain Units (IN or MM)*

When the station is first powered on, a greeting will appear on the LCD display 

and then your station will move into the Settings Menu. 
To enter the Settings Menu after the initial setup, hold the 

SET

 button on the 

side of your station.

03

04

Notes: 

Weekday will set automatically after year, month, & date settings are adjusted.

*Rainfall data is only available when a compatible rain sensor is connected.

See page 

13 

for more information.

*Rainfall data is only available when a compatible rain sensor is connected.

 See page 

13 

for more information.

**Add-On Temperature & Humidity data is only available when a separate TH sensor is added.   

 See page 

11 

for more information.

1

2

3
4

5
6

7

8

Содержание S81120v2

Страница 1: ...SET UP GUIDE MODEL NUMBER S81120v2 WIRELESS WEATHER STATION WITH TEMPERATURE WIND HUMIDITY ...

Страница 2: ...tatements Add On TH Sensor Add On Rain Sensor Support Information Factory Reset Stay in Touch 02 Initial Setup Power Up 02 03 04 05 05 05 06 09 09 09 10 10 15 16 16 16 17 11 12 13 14 18 18 18 07 08 08 Note It may take up to 10 minutes for your sensor data to appear on your station s screen BASICS 1 Insert 3 AA batteries into your Breeze Pro Sensor 2 Insert the 5V Power Adapter into an outlet and t...

Страница 3: ...he next option Use the buttons on the side of the station to adjust the values Press the SET button to confirm your selection and move to next step You may exit the Settings Menu at any time by pressing the LIGHT button Settings Menu Order Greeting Language 12 24 Hour Time Hour Minutes Year Month Date Month Date or Date Month Order Fahrenheit Celsius Wind Speed Units MPH or KMH Wind Direction Lett...

Страница 4: ...onfiguration Press the SET button to select either the Full Weekday or Month Date Year Auto Dim Settings 1 2 3 4 Hold the LIGHT button to enter the Auto Dim Settings Menu Program your display to automatically dim during preselected times Press the buttons to turn the Auto Dim feature on or off Press LIGHT to confirm Press the buttons to adjust the starting hour Press LIGHT to confirm Press the but...

Страница 5: ...ind Speed Records Activate Deactivate Wind Speed Alert Important Notes Press the WIND button to toggle through wind speed records with time and date stamps The wind speed records include past 24 hours 7 days 1 month 1 year The icon will appear in the compass rose section of the LCD The alert is defaulted to be off When the armed alert value is reached the station will beep and the icon will flash ...

Страница 6: ... 1 OUTDOOR TEMPERATURE Current Outdoor Temperature 2 TH SENSOR RECEPTION ICON Appears if readings are provided by an add on TH sensor 3 Cycle Mode Icon Indicates if the indoor outdoor data is set to cycle 5 OUTDOOR HUMIDITY Current Outdoor Humidity 4 HI LO OUTDOOR TEMPERATURE ALERTS Appears if a temperature alert is set and active 6 HI LO OUTDOOR HUMIDITY ALERTS Appears if a humidity alert is set ...

Страница 7: ...ompartment to transmit a signal Once connected the TH Sensor Icon will appear on the LCD Note Your station will only show temperature humidity readings from one sensor either the Breeze Sensor or a separate TH Sensor If readings are lost from one of the sensors your station may pick up the readings from the other sensor on its own 12 Add On Temperature Humidity Sensor EXTRA SENSORS Lost Connection...

Страница 8: ...4 HOURS The accumulated total from the last 24 hours This value updates ever hour Not a midnight to midnight total 1 MONTH Accumulated total defined by the calendar month Press the PLUS button to view the past 11 individual monthly totals TOTAL Total rainfall since rain sensor was setup or since history was previously reset To return to the time display hold the RAIN and SET buttons together Hold ...

Страница 9: ...d grade of battery most suitable for intended use Clean the battery contacts and also those of the device prior to battery installation Ensure the batteries have with correct polarity Remove batteries from equipment that will not to be used for an extended period 16 Warranty Recycling Disposal Caution La Crosse Technology Ltd provides a 1 year limited time warranty from date of purchase on this pr...

Страница 10: ...interference that may cause undesired operation CAUTION Any changes or modifications not expressly approved by the party responsible for compliance could void the user s authority to operate the equipment This device complies with CNR Industry Canada license exempt devices Operation is subject to the following two conditions 1 This device may not cause interference and 2 This device must accept an...

Страница 11: ......

Отзывы: