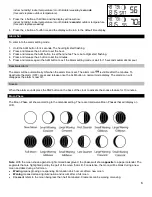
La Crosse Technology KWS-8140U-IT Скачать руководство пользователя страница 7


Gibbous

 describes a moon phase when more than half is illuminated. Gibbous can be waxing or waning. 


New Moon

 occurs when the moon is between the earth and sun, so the illuminated portion of the moon is on the back 

side facing the sun and we cannot see it. After a new moon, the illuminated (visible) portion will increase or wax until 
the full moon occurs. 


Full Moon

 occurs when the earth, moon and sun are in approximate alignment with the moon and the sun on 

opposite sides of the earth. The illuminated portion of the moon faces the earth, giving us complete visibility of one 
side of the entire moon. After a full moon, the illuminated portion will decrease or wane until the new moon occurs. 


First Quarter

 and 

Last Quarter

 moons occur when the moon is at a 90 degree angle to the earth and sun. We see 

half of the moon illuminated and half is in shadow.  
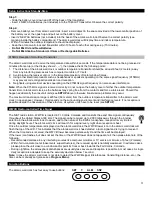
 

Low Battery Icon  

 
When the 

 symbol appears behind the time, replace the batteries in the atomic wall clock. 

When the 

 symbol appears near the outdoor temperature, replace batteries in the outdoor transmitter. 

Please help in the preservation of the environment and return used batteries to an authorized depot. 


Install Batteries in the Outdoor Transmitter  


The Outdoor Transmitter uses 2 x AAA, IEC, LR3, 1.5V batteries. To install and replace the batteries, please follow the 
steps below: 
1.  Slide the battery cover down and lift off the back of the transmitter.  
2.  Insert 2 NEW AAA batteries (not included) into the TX40U-IT transmitter. Observe the correct polarity. 
 

Note: 

When changing batteries in any unit, all units need to be reset by following the setup procedures. 

This is due to a random security code assigned by the transmitter at start-up. This code must be received 
and stored by the atomic wall clock in the first 3 minutes of power being supplied to the transmitter. If the 
atomic wall clock has been operating for more than 5 hours, remove batteries from the outdoor transmitter and the atomic 
wall clock for at least 15 minutes before completing a restart. 
 

Install Batteries in the Atomic wall clock  

 
The atomic wall clock uses 2 x AA, IEC LR6 1.5V batteries. To install and replace the batteries, please follow the steps 
below: 


1.  Remove battery cover from atomic wall clock: insert a solid object in the space 

provided at the lower-central position of the battery cover, then push up and pull out 
on the battery cover. 

2.  Insert 2 NEW AA batteries (not included) into the back of the atomic wall clock. 

Observe the correct polarity (see marking inside the battery compartment). The 
atomic wall clock will display time and indoor temperature. 

3.  Within 3 minutes the outdoor temperature should be displayed. 
4.  Keep the atomic wall clock and transmitter within 10 feet of each other during setup 

(15 minutes). 


Do Not Mix Old and New Batteries 


Do Not Mix Alkaline, Standard, Lithium or Rechargeable Batteries 


Note:

 If the atomic wall clock does not display 

indoor

 temperature after 60 seconds, remove batteries and  

wait for at least 60 seconds before repeating the setup process. 


Position the Atomic wall clock 


The atomic wall clock provides the option of table standing or wall mounting. Before mounting, please check that 
the outdoor data can be received from the desired locations.  
 

Foldout stands: 

Simply unfold the legs on the back and place the atomic wall clock on a desk or table. 


Wall mounted:  

1. Fix a screw (not supplied) into the desired wall, leaving the head extended out by about 0.2” (5mm).  

Содержание KWS-8140U-IT

Страница 1: ... Model KWS 8140U IT Instruction Manual The digital atomic wall clock features radio controlled time date alarm indoor temperature and humidity and moon phase Wireless outdoor temperature range open air up to 200 feet 60 96 meters Atomic Wall Clock Outdoor Temperature Transmitter TX40U IT ...

Страница 2: ...place Batteries in the Atomic Wall Clock 7 Position the Atomic Wall Clock 7 Position the Outdoor Transmitter 8 Care and Maintenance 8 Specifications 8 Warranty Information 9 FCC Statement 10 KWS 8140U IT 2 AA Alkaline batteries 9 17 x 1 16 x 8 30 233 x 29 4 x 210 8 mm Features Wireless outdoor temperature F or C Monitors indoor temperature F or C Monitors indoor humidity 12 moon phases Atomic time...

Страница 3: ...hen reset all units see SETUP above otherwise transmission problems may occur The maximum transmission range is 220 feet 60 meters from the outdoor temperature transmitter to the atomic wall clock in open space However this depends on the surrounding environment and interference levels If no reception is possible despite the observation of these factors all system units have to be reset see SETUP ...

Страница 4: ... setting Weekday setting 12 24h time format display ºF ºC temperature setting Time Zone The time zone can be set between the 12 hour range Hold the SET button for 5 seconds 1 The time zone 5 EST will flash Use the button to select the desired time zone Time zone settings 12 11 10 ALA PST MST CST EST ATL EST 4 3 2 1 0 1 2 12 Default EST 2 Press and release the SET button to enter the DST Setting DS...

Страница 5: ...button to select 12 hour or 24 hour time format 3 Press and release the SET button to move to select ºF or ºC Temperature F or C Temperature The temperature setting can be set to either to ºF or ºC Default setting F 1 The characters F or C will flash 2 Use the button to select F for temperature display in degrees Celsius or C for degrees Fahrenheit 3 Press and release the SET button to exit the se...

Страница 6: ...ill be automatically ON when the alarm time is set The alarm icon is visible after the minutes To deactivate the alarm OFF press and release once the ALM button in normal mode display The alarm icon will disappear the alarm is now off Snooze When the alarm sounds press the SNZ button on the back of the clock to activate the snooze feature for 10 minutes Moon Phase The Moon Phase will show accordin...

Страница 7: ... is due to a random security code assigned by the transmitter at start up This code must be received and stored by the atomic wall clock in the first 3 minutes of power being supplied to the transmitter If the atomic wall clock has been operating for more than 5 hours remove batteries from the outdoor transmitter and the atomic wall clock for at least 15 minutes before completing a restart Install...

Страница 8: ...et mark the mounting surface with a pencil 4 Screw mounting bracket onto the mounting surface Ensure that the screws are flush with the bracket Do not over tighten 5 Insert the outdoor temperature sensor into the bracket Note Mounting with adhesive tape is not recommended as a permanent mounting solution Only use adhesive tape during set up process Care and Maintenance Do Not Mix Old and New Batte...

Страница 9: ...ged for the repairs or examination The owner must pay any shipping charges incurred in getting the La Crosse Technology Ltd product to a La Crosse Technology Ltd authorized service center La Crosse Technology Ltd will pay ground return shipping charges to the owner of the product to a USA address only The La Crosse Technology Ltd warranty covers all defects in material and workmanship with the fol...

Страница 10: ...protection against harmful interference in a residential installation This equipment generates uses and can radiate radio frequency energy and if not installed and used in accordance with the instructions may cause harmful interference to radio communications However there is no guarantee that interference will not occur in a particular installation If this equipment does cause harmful interferenc...

Отзывы: