background image

Outdoor Temperature 

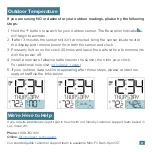
If you are seeing NO or dashes for your outdoor readings, please try the following 

steps:

 1. Hold the 

+

 button to search for your outdoor sensor. The Reception Indicator       

    will begin to animate. 
2. If after 3 minutes the sensor still isn’t connected, bring the sensor inside next to 
    the display and remove power from both the sensor and clock. 
3. Press any button on the clock 20 times and leave the parts sit for a few moments 
    with the power off. 
4. Install a new set of alkaline batteries into the sensor, then into your clock.
    For additional help visit: 

bit.ly/basic_restart

5. If your outdoor data is still not appearing after these steps, please contact our 
    support staff via the links below

If you require additional support, get in touch with our friendly customer support team based in 
La Crosse, WI.

Phone:

 1.608.782.1610 

Online: 

bit.ly/contact_techsupport

Our knowledgable customer support team is available Mon-Fri: 8am-6pm CST

We’re Here to Help 

8

Содержание 616-12667-INT

Страница 1: ...User Manual of Product 1 La Crosse Technology 616 12667 INT Silver Atomic Projection Alarm Clock with Temperature ...

Страница 2: ...SET UP GUIDE MODEL 616 1410B 616 41667 Atomic Projection Clock with Indoor Outdoor Temperature ...

Страница 3: ...th_sensor_mounting The clock will search for the Atomic Time Signal at power up and at UTC 7 00 8 00 9 00 10 00 and 11 00 The Atomic Time Signal Icon will flash while searching and be solid when it has connected From the normal time display press the SET button to manually start or stop a search for the WWVB time signal For information about WWVB visit bit ly AtomicTime Note The Backlight will be ...

Страница 4: ...ress and release the SNOOZE LIGHT button at any time to save and exit Settings Menu Order Language English Spanish French German Beep ON OFF Atomic ON OFF DST Settings DST AUTO ON Changes Spring and Fall DST ALWAYS OFF No change in Spring DST ALWAYS ON No change in Fall Time Zone 12 24 Format Hour Minutes Year Month Date Month Date or Date Month Fahrenheit Celsius TIME ZONE ATLANTIC EASTERN CENTRA...

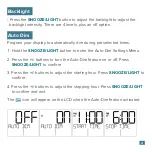
Страница 5: ...ected times 1 Hold the SNOOZE LIGHT button to enter the Auto Dim Settings Menu 2 Press the buttons to turn the Auto Dim feature on or off Press SNOOZE LIGHT to confirm 3 Press the buttons to adjust the starting hour Press SNOOZE LIGHT to confirm 4 Press the buttons to adjust the stopping hour Press SNOOZE LIGHT to confirm and exit The icon will appear on the LCD when the Auto Dim feature activated...

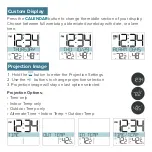
Страница 6: ...bbreviated weekday with date or alarm time Projection Image 1 Hold the button to enter the Projection Settings 2 Use the buttons to change projection selection 3 Projection image will stay on last option selected Projection Options Time only Indoor Temp only Outdoor Temp only Alternate Time Indoor Temp Outdoor Temp ...

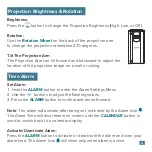
Страница 7: ...on a wall or ceiling Time Alarm Set Alarm 1 Hold the ALARM button to enter the Alarm Settings Menu 2 Use the buttons to adjust the flashing values 3 Press the ALARM button to confirm and move forward Note The alarm will activate after being set indicated by the Alarm Icon The Alarm Time will also remain on screen until the CALENDAR button is used to switch back to a calendar display Activate Deact...

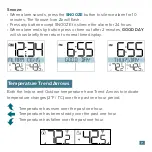
Страница 8: ...utton press or time out after 2 minutes GOOD DAY will show briefly then return to normal time display Temperature Trend Arrows Both the Indoor and Outdoor temperature have Trend Arrows to indicate temperature changes 2 F 1 C over the past one hour period Temperature has risen over the past one hour Temperature has been steady over the past one hour Temperature has fallen over the past one hour 7 ...

Страница 9: ...e clock 20 times and leave the parts sit for a few moments with the power off 4 Install a new set of alkaline batteries into the sensor then into your clock For additional help visit bit ly basic_restart 5 If your outdoor data is still not appearing after these steps please contact our support staff via the links below If you require additional support get in touch with our friendly customer suppo...

Страница 10: ...r an extended period Promptly remove expired batteries Specifications Projection Clock 616 1410B 616 41667 Temperature Range 32 F to 99 F 0 C to 37 C Power Requirements 5 volt Power cord AC6 GPU280500150WAOO Optional 3 AAA LR3 IEC batteries for backup not included The plug on the power adapter is intended to serve as the disconnect device the socket outlet shall be installed near the equipment and...

Страница 11: ...vice complies with Part 15 of the FCC Rules Operation is subject to the following two conditions 1 This device may not cause harmful interference and 2 This device must accept any interference received including interference that may cause undesired operation Caution Any changes or modifications not expressly approved by the party responsible for compliance could void the user s authority to opera...

Отзывы: