background image

Page  

49

LA CORNUE

Installation Guide Centenaire

08NOTINSTAL100/USA-6

US

A & C

AN

AD

A

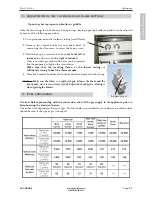
Save the orifices removed from the appliance for future use.

If the range is to be used above 3000ft the burner orifices must be changed. This conversion must be
performed by a qualified gas installer.
Read the instructions before converting this appliance.
Failure to convert the appliance correctly could invalidate any warranty or liability claims and lead to
prosecution.

When servicing or replacing gas-carrying components disconnect from gas before commencing operation.
Use the correct orifices for high altitude given by La Cornue service only for your appliance.
When you have completed the changes, check the appliance is gas sound.

CAUTION: DO NOT USE A FLAME TO CHECK FOR GAS LEAKS.

Do not use re-conditioned or unauthorized gas controls.

Save the orifices removed from the appliance for future use.

Check operation of all the burners.

After conversion the installation must comply with the relevant regulations and also the local electricity
supply company requirements.

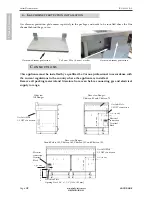
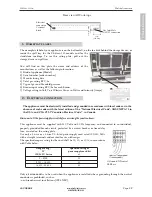
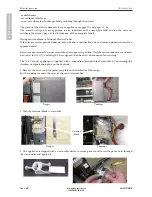
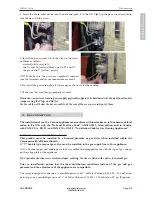
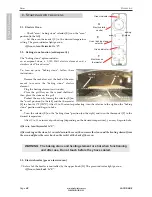
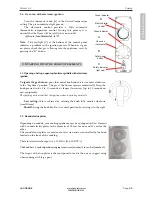
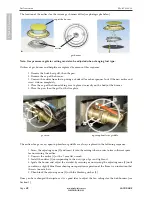
Remove the brisk heat grill (A), the cap of the burner (B), then the pan (C). The regulator is now accessible.
The regulator has a bayonet mounted top cap. Using a small coin press in and turn the cap to remove it.
Turn the cap over so that the letters “LP” (for propane gas) or “NAT” (for natural gas) are visible on base
of the hollow in the cap. Replace the cap making sure that the bayonet pins are securely located

M

AINTENANCE

Gas Pressure Regulator

WARNING

The conversion kit shal l be instal led by a qualified service
agency in accordance with the manufacturer's instructions and
all applicable codes and requirements of the authority having
jurisdiction. If the information in these instructions is not follo-
wed exactly, a fire, explosion or production of carbon monoxi-
de may result causing property damage, personal injury or loss
of life. The qualified service agency is responsible for the pro-
per installation of this kit. The installation is not proper and
complete until the operation of the converted appliance is chec-
ked as specified in the manufacturer's instructions supplied
with the kit.

4. G

AS

P

RESSURE

R

EGULATOR

3.  C

ONVERTING FOR

H

IGH

A

LTITUDE

Содержание Grand Palais 180

Страница 1: ...lation Operation and Maintenance M A N U A L C H T E A U S E R I E S RANGES COOKTOPS Centenaire Grand Palais 180 Ch teau 165 Ch teau 150 Ch teau 120 Ch teau 90 Ch teau 75 ANSI CGA Standard Designation...

Страница 2: ......
Страница 3: ...you cannot reach your gas supplier call the fire depart ment Installation and service must be performed by a qualified installer service agency or the gas supplier WARNING IF THE INFORMATION ON THIS...

Страница 4: ...a Important Save the installation instructions for the local electrical inspector s use In The Commonwealth Of Massachusetts This product must be installed by a licensed plumber or gas fitter when ins...

Страница 5: ...le use a multipurpose dry chemical or foam type fire extinguisher If fire is in an oven pan smother by closing oven door Open doors and windows or if a hood is fitted turn it on to remove smoke and od...

Страница 6: ...ers with hoods in materials matching the appliance The hoods are sold without blower systems since every installation is unique The individual requirements are best handled by a professional ventilati...

Страница 7: ...o play with controls or any other part of the range Destroy the carton and plastic bags after unpacking the range Never allow children to play with packaging material u Wear Proper Apparel Loose fitti...

Страница 8: ...ass ceramic cera mic earthenware or other glazed utensils are suitable for range top servi ce without breaking due to the sudden change in temperature u Utensil Handles Should Be Turned Inward and Not...

Страница 9: ...towels as well as flammable liquids Do not store explosives such as aerosol cans on or near the appliance Flammable materials may explode and result in fire or property damage u Wear Suitable Clothin...

Страница 10: ...IS UNOBSTRUCTED DO NOT TOUCH SURFACE UNITS AREAS NEAR UNITS HEATING ELEMENTS OR INTERIOR SURFACES OF OVEN Surface units and heating elements may be hot even though they are dark in color Areas near s...

Страница 11: ...e product is manufactured using noble and pure materials The choices made for some components such as brass for the burners and cast iron for the gas simmering plate are the result of criteria of tech...

Страница 12: ...Handrail installation 37 2 Riser installation 37 3 Height adjustment 37 4 Gas chimney protection installation 38 CONNECTIONS 38 1 Nameplate label 39 2 Electrical connection 39 3 Gas connection 41 OPE...

Страница 13: ...800 mm Le Ch teau 165 width 65 1 650 mm Le Ch teau 150 width 59 1 500 mm Le Ch teau 120 width 47 1 4 1 200 mm Le Ch teau 90 width 35 900 mm Le Ch teau 75 width 29 1 2 750 mm Refer to nameplate to det...

Страница 14: ...e of the models of the La Cornue series consists of 2 thermostatically controlled large vaulted ovens gas and electric only ranges One cooktop bounded at the rear by a stainless steel backsplash creat...

Страница 15: ...ight 280 to 320 kg 100 to 130 kg according to the models 617 to 705 lbs 220 to 286 lbs Depth to the wall Front 26 1 8 665 mm Rail 31 785 mm Hob edge 27 1 2 700 mm Thickness 1 5 8 40 mm DESCRIPTION Le...

Страница 16: ...nd for each model the tables below summarize the total electric power W and the input ratings BTU hr Le Grand Palais 180 DESCRIPTION Page 14 LA CORNUE Installation Guide Centenaire 08NOTINSTAL100 USA...

Страница 17: ...mall burner at the rear 1 gas hotplate 1 maxi burner 2 gas burners small burner at the rear L1 2 gas burners small burner at the rear 2 gas hotplates 2 gas burners small burner at the rear L0 Page 15...

Страница 18: ...Width 65 1 650 mm 65 1 650 mm Weight 260 to 290 kg 90 to 130 kg according to the models 573 to 639 lbs 198 to 286 lbs Depth to the wall Front 26 1 8 665 mm Rail 31 785 mm Hob edge 27 1 2 700 mm Thick...

Страница 19: ...NUE Installation Guide Centenaire 08NOTINSTAL100 USA 6 USA C ANADA For each gas type and for each model the tables below summarize the total electric power W and the gas input ratings BTU hr ELECTRIC...

Страница 20: ...1 gas hotplate 2 gas burners small burner at the rear 1 reversible gas snack griddle K8 2 gas burners small burner at the rear 1 gas hotplate 2 gas burners small burner at the rear 2 round electric pl...

Страница 21: ...59 1 500 mm 59 1 500 mm Weight 250 to 280 kg 80 to 100 kg according to the models 550 to 617 lbs 176 to 220 lbs Depth to the wall Front 26 1 8 665 mm Rail 31 785 mm Hob edge 27 1 2 700 mm Thickness 1...

Страница 22: ...e 20 LA CORNUE Installation Guide Centenaire 08NOTINSTAL100 USA 6 USA C ANADA For each gas type and for each model the tables below summarize the total electric power W and the gas input ratings BTU h...

Страница 23: ...DESCRIPTION Le Ch teau 150 Page 21 LA CORNUE Installation Guide Centenaire 08NOTINSTAL100 USA 6 USA C ANADA GAS SUPPLY INFORMATION...

Страница 24: ...he wall thus ensuring the removal of burnt gases and smells ranges and cooktops 4 4 D DESCRIPTION ESCRIPTION L LE E C CH TEAU H TEAU 120 120 Page 22 LA CORNUE Installation Guide Centenaire 08NOTINSTAL...

Страница 25: ...4 1 200 mm 47 1 4 1 200 mm Weight 200 to 220 kg 80 to 100 kg according to the models 440 to 485 lbs 176 to 220 lbs Depth to the wall Front 26 1 8 665 mm Rail 31 785 mm Hob edge 27 1 2 700 mm Thicknes...

Страница 26: ...each gas type and for each model the tables below summarize the total electric power W and the gas input ratings BTU hr Page 24 LA CORNUE Installation Guide Centenaire 08NOTINSTAL100 USA 6 USA C ANAD...

Страница 27: ...DESCRIPTION Le Ch teau 120 Page 25 LA CORNUE Installation Guide Centenaire 08NOTINSTAL100 USA 6 USA C ANADA GAS SUPPLY INFORMATION...

Страница 28: ...ners small burner at the rear 1 small gas hotplate 1 reversible gas snack griddle C4 2 gas burners small burner at the rear 1 small gas hotplate 2 gas burners small burner at the rear C2 The Le Ch tea...

Страница 29: ...1 2 900 mm 35 1 2 900 mm Weight 100 to 150 kg 70 to 100 kg according to the models 220 to 330 lbs 154 to 220 lbs Depth to the wall Front 26 1 8 665 mm Rail 31 785 mm Hob edge 27 1 2 700 mm Thickness 1...

Страница 30: ...e 28 LA CORNUE Installation Guide Centenaire 08NOTINSTAL100 USA 6 USA C ANADA For each gas type and for each model the tables below summarize the total electric power W and the gas input ratings BTU h...

Страница 31: ...DESCRIPTION Le Ch teau 90 Page 29 LA CORNUE Installation Guide Centenaire 08NOTINSTAL100 USA 6 USA C ANADA GAS SUPPLY INFORMATION...

Страница 32: ...burner at the rear 1 maxi burner B1 2 round electric plates 2 round electric plates BA The Le Ch teau 75 range one of the models of the La Cornue series consists of 1 thermostatically controlled smal...

Страница 33: ...1 2 750 mm 29 1 2 750 mm Weight 100 to 130 kg 60 to 80 kg according to the models 220 to 286 lbs 130 to 176 lbs Depth to the wall Front 26 1 8 665 mm Rail 31 785 mm Hob edge 27 1 2 700 mm Thickness 1...

Страница 34: ...UE Installation Guide Centenaire 08NOTINSTAL100 USA 6 USA C ANADA For each gas type and for each model the tables below summarize the total electric power W and the gas input ratings BTU hr ELECTRIC S...

Страница 35: ...jacent vertical combustible walls extending 18 457 mm above the top panel is 12 305 mm The maximum depth of overhead cabinets is 13 330 mm The minimum horizontal distances between overhead cabinets is...

Страница 36: ...n mind the fact that on the appliance the gas inlet is located On the left hand side of the appliance approximately 2 1 2 60 mm from the edge 24 620 mm above the floor for the ranges NOTE Make sure th...

Страница 37: ...lowing instructions are to be followed by qualified personnel trained to handle extremely heavy loads Usually a single oven cooker can be lifted by two people a double oven cooker is best handled by a...

Страница 38: ...ATION 4 Create a harness with four Installer s straps 5 Twist the harness and tilt the cooker to place the harness 6 When lifting up stairs the straps of the handlers at the bottom should be shorter s...

Страница 39: ...legs so the cooker rests on the outside legs and adjust the height Once the cooker is resting at the right height and is level screw down the central legs to balance the weight A ASSEMBLY SSEMBLY INST...

Страница 40: ...nd electrical supply to range C CONNECTIONS ONNECTIONS Electrical connection Terminal Block Gas Inlet Male 1 2 NPT connection Rear view Ranges Ch teau 90 and Ch teau 75 24 620 mm 2 1 2 60 mm Electrica...

Страница 41: ...l Electrical Code ANSI NFPA 70 in the USA and CSA C22 2 Canadian Electrical Code in Canada Disconnect all the power supply circuits before accessing the junction boxes This appliance must be supplied...

Страница 42: ...e specifications have a licensed electrician install an approved outlet Because range terminals are not accessible after range is in position flexible service conduit or cord must be used at least 4 f...

Страница 43: ...rnue appliance must conform with local codes or in the absence of local codes in the USA with the National Fuel Gas Code ANSI Z223 1 latest edition and in Canada with CAN CGA B149 1 and CAN CGA B149 2...

Страница 44: ...il the new hookup has been completed Don t forget to relight the pilot on other gas appliances when you turn the gas back on Because hard piping restricts movement of the range the use of a CSA Intern...

Страница 45: ...use the electronic safety device of the gas oven may switch on the red indicator light goes on Please press the reset button B until air is also displaced in the oven and the flame goes on 1 TESTS O O...

Страница 46: ...stone position and begin to bake or Turn the selector E on the baking stone position on the right and turn the thermostat F to the desired temperature After 10 to 15 minutes of pre heating depending...

Страница 47: ...nob pressed in for 5 to 10 seconds or longer if necessary up to 30 seconds on new equipment The sparking noise means that the ignition system is operating normally Low setting this is achieved by rota...

Страница 48: ...range before servicing Your selection of LA CORNUE equipment is your assurance of quality and dependability that reflects over 100 years of experience in manufacturing the finest gas cooking equipment...

Страница 49: ...w rate can be adjusted For the propane gas tighten the screw down Make sure that the resulting flame at the lowest setting is sufficiently strong to heat the thermocouple 4 Place back control knob bez...

Страница 50: ...the grill or the fire plate The orifices for gas oven open top broiler or griddle are always replaced in the following sequence 1 Screw the adjusting cone 2 and insert it into the mixing tube in order...

Страница 51: ...also the local electricity supply company requirements Remove the brisk heat grill A the cap of the burner B then the pan C The regulator is now accessible The regulator has a bayonet mounted top cap...

Страница 52: ...lator The light is located on the side at the top of the oven it is automatically switched on when the oven door is opened Please note disconnect your stove before interfering with the light to preven...

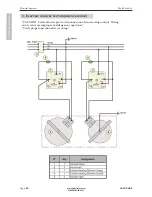
Страница 53: ...grams 1 GAS COOKTOP ELECTRONIC IGNITION E ELECTRICAL LECTRICAL DIAGRAMS DIAGRAMS CAUTION Label all wires prior to disconnection when servicing controls Wiring errors can cause improper and dangerous o...

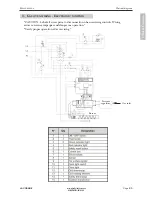
Страница 54: ...0 USA 6 USA C ANADA Electrical diagrams MAINTENANCE 2 ELECTRIC COOKTOP SECTION WHEN PROVIDED CAUTION Label all wires prior to disconnection when servicing controls Wiring errors can cause improper and...

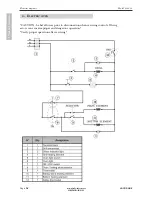
Страница 55: ...ADA MAINTENANCE Electrical diagrams 3 GAS OVEN WIRING ELECTRONIC IGNITION CAUTION Label all wires prior to disconnection when servicing controls Wiring errors can cause improper and dangerous operatio...

Страница 56: ...08NOTINSTAL100 USA 6 USA C ANADA Electrical diagrams MAINTENANCE 4 ELECTRIC OVEN CAUTION Label all wires prior to disconnection when servicing controls Wiring errors can cause improper and dangerous o...

Страница 57: ...the extent that performance is effected within 50 miles from an office of a qualified service agency of Company except that such obligation to bear labor charges shall not apply to products or parts...

Страница 58: ...lacornue com e mail a table la cornue com USA 185 Park Lane Brisbane CA 94005 USA Phone 800 457 1356 or 415 468 6620 Fax 415 358 4377 After sales Service of 7 00 a m and 4 00 p m Pacific Time Monday t...

Отзывы: