background image

Corrective maintenance

Disassembly

Procedure

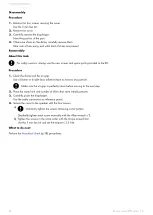
1.

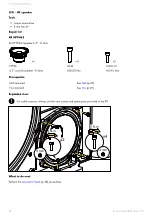
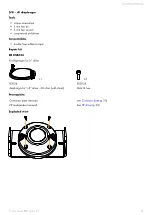
Remove the four screws securing the cover.
Use the 3 mm hex bit.

2.

Remove the cover.

3.

Carefully remove the diaphragm.
Note the position of the part.

4.

If there are shims on the dome, carefully remove them.
Take note of how many and what kind of shims are present.

Reassembly

About this task

For safety reasons, always use the new screws and spare parts provided in the KR.

Procedure

1.

Clean the dome and the air gap.
Use a blower or double face adhesive tape to remove any particle.

Make sure the air gap is perfectly clean before moving to the next step.

2.

Place the same kind and number of shims that were initially present.

3.

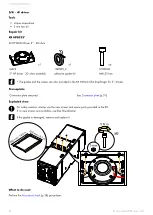
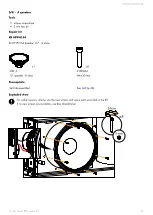
Carefully place the diaphragm.
Use the cable connectors as reference points.

4.

Secure the cover to the speaker with the four screws.

a)

Gradually tighten the screws following a star pattern.

Gradually tighten each screw manually with the Allen wrench n°3.

b) Tighten the screws in the same order with the torque screwdriver.

Use the 3 mm hex bit and set the torque to 3.5 Nm.

What to do next

Perform the 

Acoustical check

 (p.38) procedures.

34 

 K1 user manual (EN) version 6.0

Содержание K1

Страница 1: ...K1 user manual EN...

Страница 2: ...anual EN version 6 0 Distribution date May 5 2021 2021 L Acoustics All rights reserved No part of this publication may be reproduced or transmitted in any form or by any means without the express writ...

Страница 3: ...11 K1 SB 11 KS28 or SB28 13 Additional down ll element 15 Kara 15 K2 16 Loudspeaker connection 17 Connectors 17 Connection to LA8 19 Connection to LA12X 20 Preset description 23 Recommendation for spe...

Страница 4: ...relating to maximum sound levels and exposure times Intended use This system is intended for use by trained personnel for professional applications Read the RIGGING MANUAL before installing the syste...

Страница 5: ...enclosure is based on a 3 way active design with 2 LF sections 1 MF section and 1 HF section each one at the nominal impedance of 8 ohms The K1 enclosure is made of rst grade Baltic birch plywood to e...

Страница 6: ...ft and SP25 25 m 82 ft SP Y1 breakout cable for two passive enclosures 2 5 mm gauge provided with a CC4FP adapter 4 point speakON to 2 2 point speakON DO 8 point PA COM loudspeaker cables 4 mm gauge...

Страница 7: ...ers Refer to the Soundvision help Refer to the LA Network Manager help System component illustrations Cables 0 7 m 5 m 10 m 25 m CH 1 CH 2 1 m SP 7 SP 5 SP10 SP25 SP Y1 0 7 m 10 m 25 m SPK1 SPK2 SPK3...

Страница 8: ...ced throw using the K1SB_X preset with K1 As a subwoofer for increased impact using the K1SB_60 preset Both applications of K1 SB can be combined in the same con guration K1 SB as an LF extension in a...

Страница 9: ...nced LF throw By providing the K1 SB with the same frequency response as the K1 low section the K1SB_X preset allows the K1 SB enclosure to be used as an LF line source element increasing the length o...

Страница 10: ...losure K1 K1 SB Preset K1 K1SB_X Frequency range 10 dB 35 Hz 20 kHz Recommended ratio 2 K1 1 K1 SB Minimum line length 8 K1 4 K1 SB When using K1 with K1SB_X do not add any delay value between the K1...

Страница 11: ...ce K1 SB and SB28 are driven by the LA8 LA12X ampli ed controller KS28 is driven by the LA12X ampli ed controller K1 SB K1 SB provides an extension of the bandwidth in the low end down to 30 Hz Depend...

Страница 12: ...with K1 SB behind PRESET K1SB_60 K1 LINE SOURCE K1 K1 SB LINE SOURCE 1 5 to 2 m 5 to 7 ft Enclosure K1 K1 SB in line source K1 SB as subwoofer Preset K1 K1SB_X K1SB_60 Frequency range 10 dB 30 Hz 20...

Страница 13: ...e with KS28 or SB28 PRESET xxxx_60 K1 LINE SOURCE K1 K1 SB LINE SOURCE Enclosure K1 K1 SB in line source K1 SB as subwoofer KS28 or SB28 Preset K1 K1SB_X K1SB_60 xxxx_60 Frequency range 10 dB 25 Hz 20...

Страница 14: ...tion When using K1 with K1SB_X do not add any delay value between the K1 and K1 SB elements of a same line source Pre alignment delays are identical for KS28 and SB28 Pre alignment delays presets pre...

Страница 15: ...ed controller This section is about Kara down ll only Refer to the K1 addendum for information about using Kara II as a down ll Line source with Kara down ll system PRESET KARADOWNK1 K1 LINE SOURCE K...

Страница 16: ...LINE SOURCE K1 K1 SB LINE SOURCE Enclosure K1 K1 SB in line source K2 Preset K1 K1SB_X K2 110 Frequency range 10 dB 35 Hz 20 kHz Do not add any delay between the K1 and K2 elements of a mixed line sou...

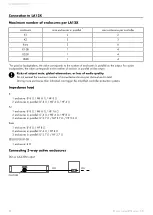
Страница 17: ...oint speakON connectors Internal pinout for L Acoustics 2 way active enclosures speakON points 1 1 2 2 Transducer connectors LF LF HF HF K1 is equipped with two 8 point PA COM connectors IN LINK K2 is...

Страница 18: ...and safety instructions before use Made in France European Community SAFE USE 16 KS28 FOROTHERCONFIGURATIONS CHECKMECHANICAL SAFETYWITHSOUNDVISIONSOFTWARE USEONLYWITHL ACOUSTICSAMPLIFIEDCONTROLLERS KS...

Страница 19: ...loss of audio quality Do not exceed the maximum number of connected enclosures per channel and in total Driving more enclosures than indicated can trigger the ampli ed controller protection systems Do...

Страница 20: ...n or loss of audio quality Do not exceed the maximum number of connected enclosures per channel and in total Driving more enclosures than indicated can trigger the ampli ed controller protection syste...

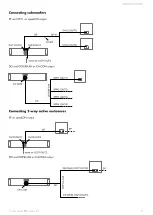
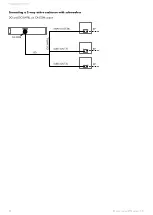
Страница 21: ...UT1 CH 2 OUT2 DO and DOSUB LA8 on CA COM output CA COM DO DOSUB LA8 SPK1 OUT1 SPK2 OUT2 SPK3 OUT3 SPK4 OUT4 Connecting 2 way active enclosures SP on speakON output SP OUT1 OUT2 OUT3 OUT4 same as OUT1...

Страница 22: ...Loudspeaker connection Connecting a 2 way active enclosure with subwoofers DO and DO3WFILL on CA COM output CA COM DO DO3WFILL 2WAY OUT3 4 SUB1 OUT1 SUB2 OUT2 SP SP SP 22 K1 user manual EN version 6 0...

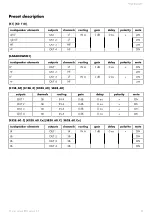
Страница 23: ...1 LF ON HF OUT 2 HF IN A 0 dB 0 ms ON LF OUT 3 LF ON HF OUT 4 HF IN A 0 dB 0 ms ON K1SB_60 K1SB_X KS28_60 SB28_60 outputs channels routing gain delay polarity mute OUT 1 SB IN A 0 dB 0 ms ON OUT 2 SB...

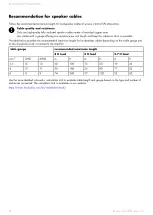
Страница 24: ...elow provides the recommended maximum length for loudspeaker cables depending on the cable gauge and on the impedance load connected to the ampli er recommended maximum length cable gauge 8 load 4 loa...

Страница 25: ...ce K1 K1 exploded views In order to operate follow the order outlined here Each assembly refers to the corresponding Disassembly Reassembly D R procedure and the necessary repair kit GRILL LF SPEAKER...

Страница 26: ...Corrective maintenance GRILL FINS MF SPEAKER KR HPPH62 HF DRIVER KR HPBC33 HF DIAPHRAGM KR HSBC33 CONNECTOR PLATE 26 K1 user manual EN version 6 0...

Страница 27: ...PH62 Kit HP PH62 Speaker 6 5 8 ohms 2 2 S100155 S158 M5 25 hex plain washer 5 mm Prerequisite The enclosure is placed on its top Exploded view For safety reasons always use the new screws and spare pa...

Страница 28: ...M6 30 hex Prerequisite Grill disassembled See Grill p 27 Exploded view For safety reasons always use the new screws and spare parts provided in the KR If no new screws are available use blue threadloc...

Страница 29: ...maintenance D R Fins Tools torque screwdriver T20 Torx bit Prerequisite Grill disassembled See Grill p 27 Exploded view Save the screws and fasteners for reassembly x3 3 N m T20 K1 user manual EN vers...

Страница 30: ...42 S100113 6 5 coaxial speaker 8 ohms M5 20 hex M5 16 hex Prerequisite Grill removed See Grill p 27 Fins removed See Fins p 29 Exploded view For safety reasons always use the new screws and spare part...

Страница 31: ...diaphragm for 3 driver 1 10 100585_2 S100110 adhesive gasket kit M6 25 Torx Exploded view For safety reasons always use the new screws and spare parts provided in the KR If no new screws are availabl...

Страница 32: ...provided in the KR HSBC33 Kit diaphragm for 3 driver Prerequisite Connector plate removed See Connector plate p 31 Exploded view For safety reasons always use the new screws and spare parts provided...

Страница 33: ...wer Consumables double face adhesive tape Repair kit KR HSBC33 Kit diaphragm for 3 driver 1 4 03024 S03024 diaphragm for 1 4 driver 20 ohms with shims M4 14 hex Prerequisite Connector plate removed Se...

Страница 34: ...ower or double face adhesive tape to remove any particle Make sure the air gap is perfectly clean before moving to the next step 2 Place the same kind and number of shims that were initially present 3...

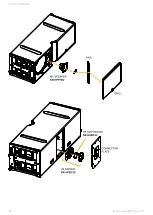
Страница 35: ...exploded view In order to operate follow the order outlined here Each assembly refers to the corresponding Disassembly Reassembly D R procedure and the necessary repair kit GRILL LF SPEAKER KR HPPH15...

Страница 36: ...PPH154 Kit HP PH154 Speaker 15 8 ohms 2 2 S100155 S158 M5 25 hex plain washer 5 mm Prerequisite The enclosure is placed on its top Exploded view For safety reasons always use the new screws and spare...

Страница 37: ...54 Speaker 15 8 ohms 1 8 300_2 S100054 15 speaker 8 ohms M6 30 hex Prerequisite Grill disassembled See Grill p 36 Exploded view For safety reasons always use the new screws and spare parts provided in...

Страница 38: ...air leak visually inspect the grill gasket cabinet and connector plate for loose missing or damaged parts Connection Use only 10 m 30 ft 4 mm AWG 11 speaker cables Do not connect enclosures in parall...

Страница 39: ...e met in particular that the loaded preset corresponds to the connected speaker s family b inspect the cables and connections c go to step 8 p 39 8 Under NC NOK and UNDEF results press and hold the co...

Страница 40: ...tightened with the appropriate torque There is an air leak in the gasket There is dust on the cone The cone is damaged The surround is torn or delaminated The voice coil or the spider is damaged Proc...

Страница 41: ...tape to remove any particles 4 Perform the diaphragm reassembly procedure Pay close attention to the number of shims and the position of the diaphragm Apply the recommended torque 5 Repeat the listeni...

Страница 42: ...Nominal impedance LF 2 8 MF 8 HF 8 Connectors IN 1 8 point PA COM LINK 1 8 point PA COM Rigging and handling 4 handles integrated into the cabinet inter enclosure angles 0 0 5 1 1 5 2 2 5 3 4 or 5 We...

Страница 43: ...tical load LF bass re ex L Vents MF bass re ex HF DOSC waveguide Nominal impedance LF 2 8 MF 8 HF 16 Connectors IN 1 8 point PA COM LINK 1 8 point PA COM Rigging and handling 4 point captive rigging s...

Страница 44: ...Speci cations K2 dimensions 400 mm 15 8 in 1338 mm 52 7 in 286 mm 11 3 in 354 mm 13 9 in 44 K1 user manual EN version 6 0...

Страница 45: ...SC waveguide Nominal impedance LF 8 HF 8 Connectors IN 1 4 point speakON LINK 1 4 point speakON Rigging and handling captive rigging system rigging system handles integrated into the cabinet inter enc...

Страница 46: ...Speci cations Kara dimensions 482 mm 19 in 164 mm 6 4 in 250 mm 9 8 in 730 mm 28 7 in 383 mm 15 1 in 46 K1 user manual EN version 6 0...

Страница 47: ...system 4 point rigging system inter enclosure angles 0 0 5 1 1 5 2 2 5 3 4 or 5 4 handles integrated into the cabinet Weight net 83 kg 183 lb Cabinet premium grade Baltic birch plywood Front coated st...

Страница 48: ...Speci cations K1 SB dimensions 505 mm 19 9 in 1342 mm 52 8 in 520 mm 20 5 in 438 mm 17 1 in 48 K1 user manual EN version 6 0...

Страница 49: ...h tting 2 point rigging system 6 ergonomic handles 2 ground runners 8 side runners Weight net 79 kg 174 lb Cabinet premium grade Baltic beech and birch plywood Front coated steel grill acoustically ne...

Страница 50: ...e 4 Connectors IN 1 4 point speakON Rigging and handling integrated rigging system handles integrated into the cabinet Weight net 93 kg 205 lb Cabinet premium grade Baltic birch plywood Front coated s...

Страница 51: ...Speci cations SB28 dimensions 700 mm 27 6 in 1300 mm 51 2 in 550 mm 21 7 in K1 user manual EN version 6 0 51...

Страница 52: ...L Acoustics 13 rue Levacher Cintrat 91460 Marcoussis France 33 1 69 63 69 63 info l acoustics com www l acoustics com...

Отзывы: