background image

Printing Operation 

2-3

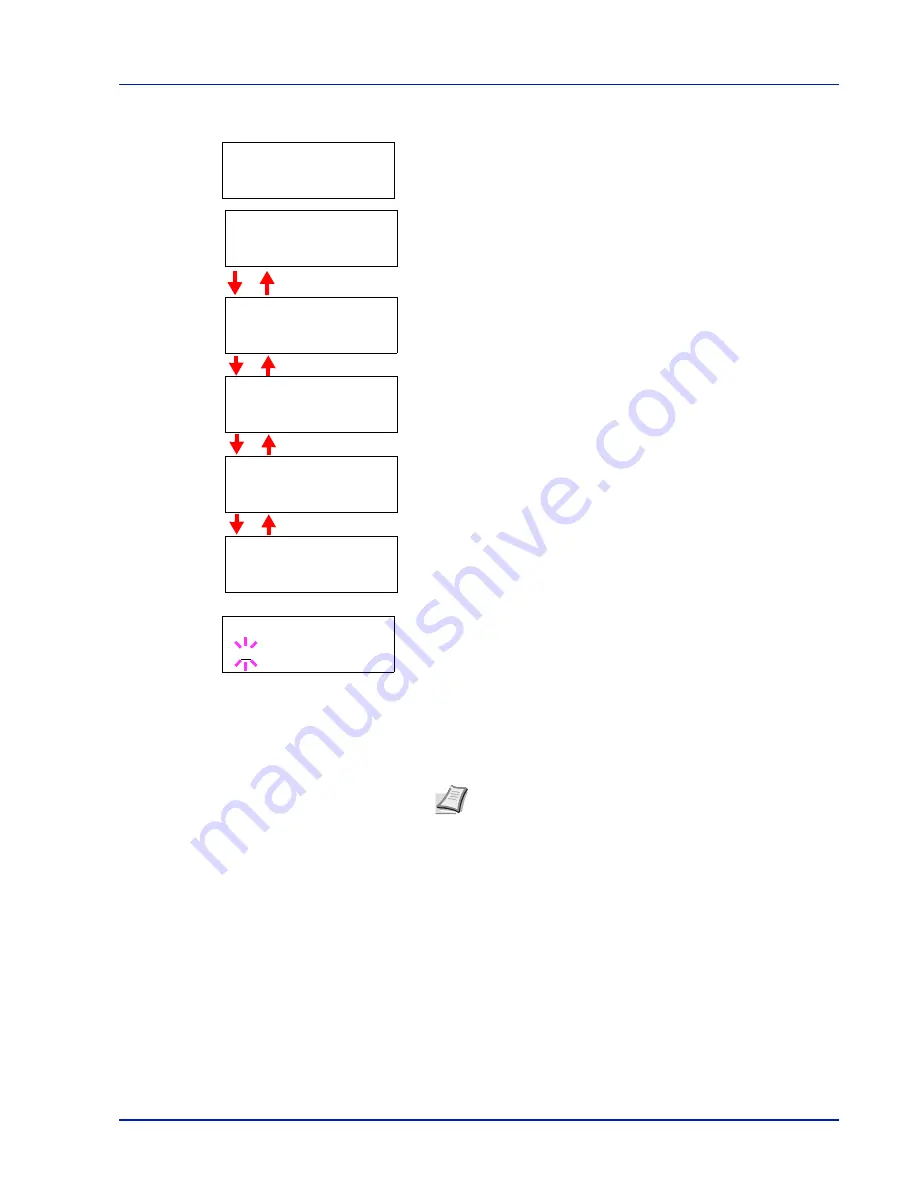
TCP/IP

1

This section describes how to enable the TCP/IP protocol. If 

TCP/IP


is set to 

Off

, use 

U

 or 

V

 to select 

On

 and press 

[OK] ([ENTER])

.

2

Press 

Z

.


Each time you press 

U

 or 

V

, the selection changes.


3

Display the item you want to set and press 

[OK] ([ENTER])

. A 

blinking question mark (

?

) appears while you are setting 

DHCP

 and 

Bonjour

. A blinking cursor (

_

) appears while you are setting 

IP 

Address

Subnet Mask

 and 

Gateway

.

4

Press 

U

 or 

V

 to select 

On

 or 

Off

 as the setting for 

DHCP

 and 

Bonjour

.

For the 

IP Address

Subnet Mask

 and 

Gateway

 settings, press 

U

 or 

V

 to move the blinking cursor to the number you want to change 

(

000

 to 

255

). Use 

Y

 and 

Z

 to move the cursor right and left.

5

Press 

[OK] ([ENTER])

.

6

Press 

[MENU]

.


The display returns to 

Ready

.

Note  

Check with your network administrator for the network 

address settings.

>TCP/IP        >

  On

>>Bonjour

  Off

>>IP Address

 000.000.000.000

>>Subnet Mask

 000.000.000.000

>>Gateway

 000.000.000.000

>>DHCP

  Off

>>Subnet Mask

 000.000.000.000

Содержание Ecosys FS-C5300DN

Страница 1: ...Operation Guide FS C5100DN FS C5200DN FS C5300DN...

Страница 2: ......

Страница 3: ...ion Changing Network Interface Parameters 2 2 Printing a Network Interface Status Page 2 9 Loading Printer Driver 2 11 Printing from Application Software 2 14 3 Maintenance General Information 3 2 Ton...

Страница 4: ...iv...

Страница 5: ...opying is done Regarding Tradenames PRESCRIBE is a registered trademark of Kyocera Corporation KPDL is trademark of Kyocera Corporation Hewlett Packard PCL and PJL are registered trademarks of Hewlett...

Страница 6: ...ied copies or portions merged into other programs IBM retains title to the Programs IBM owns or has licensed from the owner copyrights in the Programs 1 License Under this license you may use the Prog...

Страница 7: ...an intended beneficiary of this Section Some jurisdictions do not allow these limitations or exclusions so they may not apply to you 4 General You may terminate your license at any time IBM may termi...

Страница 8: ...contain the same proprietary notices as those appearing on the original 5 This License shall continue until the last use of the Software and Typefaces unless sooner terminated This License may be ter...

Страница 9: ...en SSLeay License Copyright c 1998 2006 The OpenSSL Project All rights reserved Redistribution and use in source and binary forms with or without modification are permitted provided that the following...

Страница 10: ...ribution is covered by the same copyright terms except that the holder is Tim Hudson tjh cryptsoft com Copyright remains Eric Young s and as such any Copyright notices in the code are not to be remove...

Страница 11: ...MITED TO PROCUREMENT OF SUBSTITUTE GOODS OR SERVICES LOSS OF USE DATA OR PROFITS OR BUSINESS INTERRUPTION HOWEVER CAUSED AND ON ANY THEORY OF LIABILITY WHETHER IN CONTRACT STRICT LIABILITY OR TORT INC...

Страница 12: ...g measures Reorient or relocate the receiving antenna Increase the distance between the equipment and the receiver Connect the equipment into an outlet on a circuit different from that used for the re...

Страница 13: ...xiii Cautionary Labels The printer bears any of the following labels For Europe Asia and other countries For U S A and Canada...

Страница 14: ...mpanies retain the following technical documentation in anticipation of the inspection that may be conducted by the authorities concerned User s instruction that conforms to the applicable specificati...

Страница 15: ...tions Technical drawings Descriptions of procedures that guarantee conformity Other technical information The manufacturer has been employed with ISO9001 scheme JQA and BS have attested the manufactur...

Страница 16: ...sided printing as a standard function For example by printing two 1 sided originals onto a single sheet of paper as a 2 sided print it is possible to lower the amount of paper used For more informati...

Страница 17: ...C5300DN Initial Auto Sleep Setting 5 minutes 60 minutes 5 minutes 60 minutes 15 minutes 60 minutes Power consumption in Auto Sleep 16W 45W for USA and Canada 16W 45W for Europe Asia and other countrie...

Страница 18: ...after installation CAUTION Avoid placing the printer on or in locations which are unstable or not level Such locations may cause the printer to fall This type of situation presents a danger of persona...

Страница 19: ...electrical shock Plug the power cord securely into the outlet If metallic objects come in contact with the prongs on the plug it may cause a fire or electric shock Always connect the printer to an out...

Страница 20: ...the power plug from the outlet to avoid the danger of fire or electrical shock Then contact your service representative Do not remove or connect the power plug with wet hands as there is a danger of...

Страница 21: ...s They could be damaged by static electricity Do not attempt to perform any operations not explained in this handbook If the printer will not be used for an extended period of time remove the paper fr...

Страница 22: ...ription Example Italic Typeface Used to emphasize a key word phrase or message In addition references to other publications are displayed in italic typeface A Completed message displays and the Copy B...

Страница 23: ...ns Try to be familiar with the names and functions of these parts for correct use and optimal performance This chapter contains explanations on the following topics Components at the Front of the Prin...

Страница 24: ...Tray 4 MP Multi Purpose Tray 5 Paper Cassette 6 Power Switch Components at the Left of the Printer 7 Left Cover 8 Waste Toner Box 9 Main Charger Units on the Drum Units 10 Magenta Toner Container M 11...

Страница 25: ...per Transfer Unit 15 Envelope Switch Components at the Rear of the Printer 16 USB Memory Slot 17 Power Cord Connector 18 Option Interface Slot 19 Network Interface 20 Network indicators 21 USB Interfa...

Страница 26: ...4 MachineParts Operation Panel 23 Message Display 24 Ready Indicator 25 Data Indicator 26 Attention Indicator 27 Arrow Key 28 MENU Key 29 OK ENTER Key 30 GO Key 31 CANCEL Key 23 24 25 26 27 28 29 30 3...

Страница 27: ...ting Operation This chapter contains explanations on the following topics Changing Network Interface Parameters 2 2 Printing a Network Interface Status Page 2 9 Loading Printer Driver 2 11 Printing fr...

Страница 28: ...atedly until Network appears 3 Press Z Each time you press U or V the selection changes Refer to the explanations below when specifying the settings Set this item to On when you connect to a network u...

Страница 29: ...ou are setting IP Address Subnet Mask and Gateway 4 Press U or V to select On or Off as the setting for DHCP and Bonjour For the IP Address Subnet Mask and Gateway settings press U or V to move the bl...

Страница 30: ...are setting Prefix Length 4 Press U or V to select On or Off as the setting for ICMPv6 NDP and DHCPv6 For the Prefix Length settings press U or V to move the blinking cursor to the number you want to...

Страница 31: ...istrator password By default the administrator password is 000000 For details see Admin Administrator Settings in the Advanced Operation Guide Set this item to On when you connect to a network using N...

Страница 32: ...e U or V to select On and press OK ENTER 2 Press Z 3 Press OK ENTER A blinking question mark appears Each time you press U or V the selection changes 4 Display the item you want to set and press OK EN...

Страница 33: ...ER A blinking question mark appears 3 Press OK ENTER again 4 Press MENU The display returns to Ready IPP 1 This section explains the procedure for enabling IPP Enter the administrator ID and password...

Страница 34: ...and press OK ENTER A blinking question mark appears 4 Select On or Off using U or V 5 Press OK ENTER 6 Press MENU The display returns to Ready IPSec 1 This section explains the procedure for enabling...

Страница 35: ...ows Color Calibration Registration Normal Registration Details Restart Printer Service 1 Press MENU 2 Press U or V repeatedly until Adjust Maintenance appears 3 Press Z while Adjust Maintenance is dis...

Отзывы: