background image

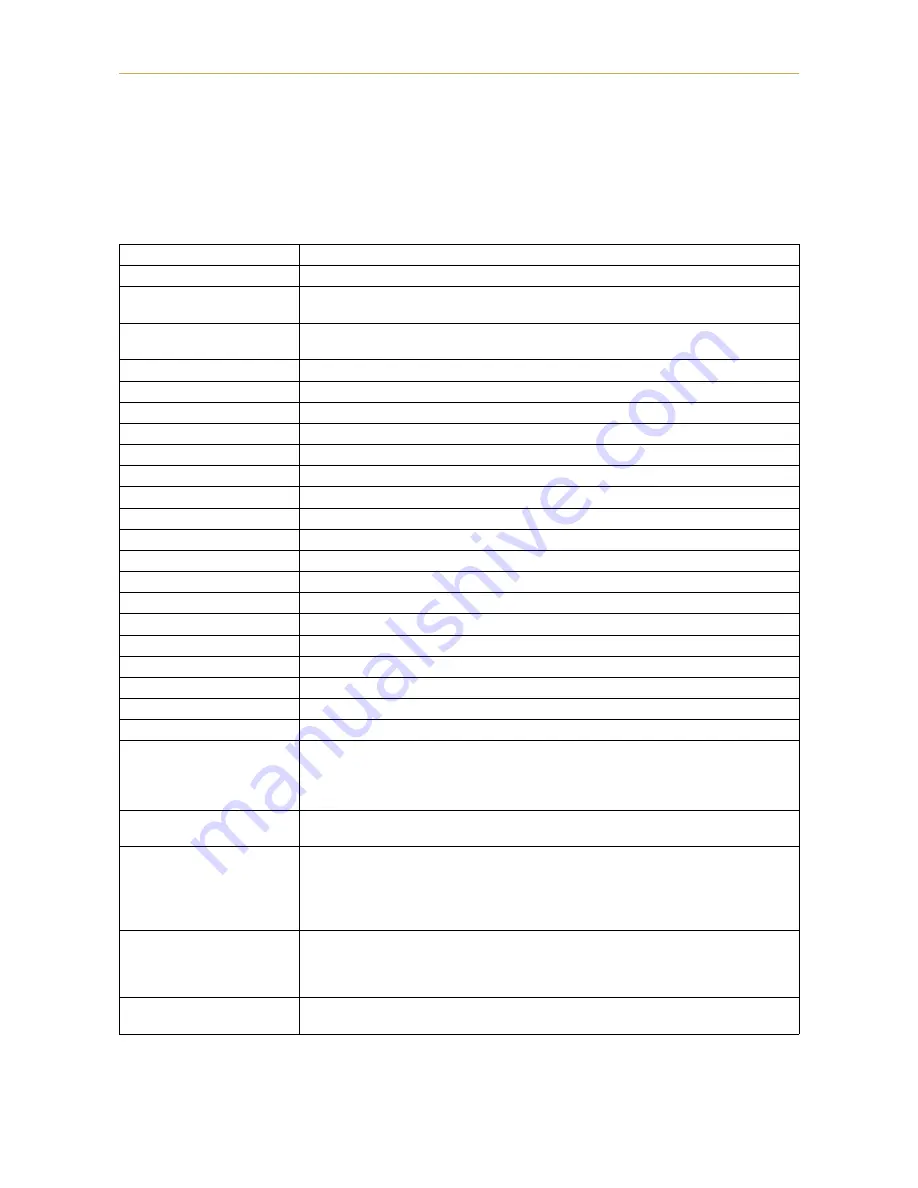
Printer Specifications

A-1

Appendix A

Printer Specifications

Item

 Description

Printing method

 Electrophotography, laser scan.

Printing speed

12 pages/minute (A4 or letter-size paper, when printing multiple copies of the same 
page)

Resolution

600 dpi (vertical and horizontal) with KIR 2 (Kyocera Image Refinement 2)
300 dpi (vertical and horizontal) with KIR 2 (Kyocera Image Refinement 2)

First print

Approx. 15 seconds (A4 or letter size), depends on input data.

Warm-up time

Approx. 55 seconds (at 23°C, 120 V or 220 V)

Controller

PowerPC 71 MHz RISC Processor

Main memory*

4 MB, expandable up to 68 MB

Memory card slot

One, PC CARD (PCMCIA 2.1/JEIDA 4.2 [type I , memory card] )

Self test

Performed at power-up

Scanning system

Laser diode, polygon mirror.

Maximum duty cycle

20,000 pages/month

Drum

Organic Photoconductor

Developer

Mono-component dry developer

Main charger

Positive scorotron charger

Transferring

Negative charger roller

Separation

Curvature separation

Drum cleaning

Blade cleaner

Drum discharging

Illumination by eraser LED array

Fuser

Heat roller and pressure roller

Toner saving

Ecoprint mode

Paper

Plain paper. See 

Appendix B

.

Paper feed trays

Cassette:  Legal size to A5 universal cassette  148-216 mm (5.83-8.50") × 210-356 mm
                       (8.27-14.02").  Holds 250 sheets of thickness 0.1 mm
MP tray:   80-148 mm (3.1-5.8") × 216-356 mm (8.5-14") (see 

page B-2

).  Holds 100

                       sheets of thickness 0.1 mm

Capacity of output trays

Face-down tray — 250 sheets of thickness 0.1 mm
Face-up tray — 250 sheets of thickness 0.1 mm

Ambient conditions

Temperature: 10°C to 32.5°C (50°F to 90.5°F)
Humidity: 20% to 80% RH
Optimum conditions: 20°C (68°F), 60% RH
Altitude: Max. 2000m (6500 feet)
Illumination: Max. 1500 lux

Power requirements

120 V, 60 Hz, max. 5.2 A (U.S.A./Canada)
220–240 V, 50 Hz/60 Hz, max. 2.8 A (European countries)
Max. allowable voltage fluctuation: ±10%
Max. allowable frequency fluctuation: ±2%

Power consumption

Max. 595 W
During sleeping 12 W

* Including the raster memory (video-RAM). Extendable to 8-68 MB with optional memory.

Содержание Ecosys FS-1200

Страница 1: ...Table of Contents FS 1200 User s Manual Kyocera Laser Printer...

Страница 2: ...bjectmustcontainthesamecopyrightnoticeasthematerialfromwhich the copying is done Regarding Tradenames PRESCRIBE is a registered trademark of Kyocera Corporation PRESCRIBE 2e KPDL and KIR2 Kyocera Imag...

Страница 3: ...the Program except as provided in this license 2 reverse assemble or reverse compile the Program or 3 sublicense rent lease or assign the Program 2 Limited Warranty The Programs are provided AS IS THE...

Страница 4: ...proprietary information concerning the Typefaces in strict confidence and to establish reasonable procedures regulating access to and use of the Software and Typefaces 4 You agree not to duplicate or...

Страница 5: ...eethatinterferencewillnotoccurinaparticularinstallation If this equipment does cause harmful interference to radio or television reception which can be determined by turning the equipment off and on t...

Страница 6: ...nce Standard according to Radiation Control for Health and Safety Act of 1968 This means that the printer does not produce hazardous laser radiation Since radiation emitted inside the printer is compl...

Страница 7: ...h a 3 wire grounding type plug a plug having a third grounding pin This plug will only fit into a grounding type power outlet This is a safety feature If you are unable to insert the plug into the out...

Страница 8: ...eration is subject to the following two conditions 1 This device may not cause harmful interference and 2 this device must accept any interference received including interference that may cause undesi...

Страница 9: ...odel number FS 1200 as tested with enhancement optional units PF 20 DU 20 HS 20 and ST 20 etc Description of device This Page Printer Model FS 1200 is the 12ppm A4 size and utilized plane paper laser...

Страница 10: ...nada Cet appareil num rique de la classe B est conforme la norme NMB 003 du Canada ISO 7779 Maschinenl rminformationsverordnung 3 GSGV 18 01 1991 Der h chste Schalldruckpegel betr gt 70 dB A oder weni...

Страница 11: ...it The procedure for removing these is as follows 1 Get the supplied plastic bag ready remove the toner container and the waste toner bottle from the printer and put them into each plastic bags 2 Get...

Страница 12: ...sing the printer for extended periods of time For details on the sleep timer function and printer power consumption refer to the instruction manual pro vided with the printer Initial settings of the s...

Страница 13: ...ch the printout is close to typeset quality Also Kyocera Image Refinement 2 KIR 2 technology provides excellent sharpness and consistency High speed A4 sizes typically print at the rate of 12 pages pe...

Страница 14: ...ssages in other languages Please contact your Kyocera dealer Memory card slot for option fonts macros forms etc Data in the memory card can be selectively read from the printers control panel Simple n...

Страница 15: ...ROM To view these documents you need the Adobe Acrobat software installed in your computer For details read the instructions on the CD ROM package The User s Manual guides you through topics concernin...

Страница 16: ...y Feeding 1 18 First Mode Automatic Manual Feeding 1 18 Cassette Mode 1 18 Duplex Printing from the MP tray 1 18 Selecting the MP Tray 1 18 1 6 Memory Card 1 21 Handling a Memory Card 1 21 1 7 Memory...

Страница 17: ...ints on Writing Fonts to the Memory Card 2 15 Reading Fonts Data from a Memory Card 2 15 Writing Data to a Memory Card 2 15 Deleting Data from a Memory Card 2 16 Formatting a Memory Card 2 17 Printing...

Страница 18: ...k printout 5 3 Dropouts horizontal streaks stray dots 5 4 Black or white vertical streaks 5 4 Faint or blurred printing 5 5 Grey background 5 5 Dirt on the top edge or back of the paper 5 6 Characters...

Страница 19: ...C 1 Interface Signals C 2 C 2 Serial RS 232C RS 422A Interface Option C 4 RS 232C interface C 4 RS 422A interface C 5 C 3 RS 232C RS 422A Protocol C 6 PRESCRIBE FRPO D0 command C 7 C 4 RS 232C Cable C...

Страница 20: ...Direct drafts of hot or cold air Direct drafts from outside Avoid locations near doors leading outside Sudden temperature or humidity changes Sources of high temperature for example near stoves or rad...

Страница 21: ...the printer alone see section Power Supply on next page Power requirements are The outlet should be earthed or an adapter should be used If an extension cord is used the total length of the power cor...

Страница 22: ...d for Examine the package for any signs of damage that may have been caused during transportation If the car ton is found to be badly damaged leave the carton unopened and immediately notify the deale...

Страница 23: ...c bag for Developer Unit To remove the printer from the box grasp the handholds on either side of the printer Lift the printer from the carton as shown below Always use these handholds when ever you l...

Страница 24: ...ajor parts The part names intro duced here will be used throughout this manual Front View Face down Output Tray Paper Stopper Control Panel MP Multi Purpose Tray PaperFeedUnit Release Lever Paper Cass...

Страница 25: ...overed with the supplied protective cap when not in use Toner Container Release Lever Green Top Cover Toner Container Side Cover Cleaner Knob Green Waste Toner Bottle Main Charger Unit Rear Cover Para...

Страница 26: ...the way 2 Install the toner container 1 Take the toner container 2 Withthelabelsidedown thoroughlyshakethetoner container in the direction of the arrow ten times or more to loosen and mix the toner in...

Страница 27: ...er 3 Close the top cover Close the top cover by pressing the arrowed part in this diagram 4 Install the waste toner bottle The waste toner bottle is in the toner kit supplied with the printer The wast...

Страница 28: ...Opentheside coverontheleftside oftheprinter 3 Insert the waste toner bottle with the bottle tilted slightly towards you as shown in the figure 4 Ensuring that it is correctly inserted close the side...

Страница 29: ...cassette all the way from the printer Read the paper manufacturer s instructions concerning handling of the paper 1 Remove the paper cassette from the printer and place it on a flat stable surface 2 P...

Страница 30: ...tte is the one on which printing is done Do not load paper into the cassette higher than the limitation mark on the right The cassette should hold approximately 250 sheets of paper with a 0 1 mm thick...

Страница 31: ...ace up output tray skip Step 7 and go to Step 8 If you want the printed pages stacked face up in reverse order mount the face up output tray as follows Depending on the size of the paper you use mount...

Страница 32: ...uter power are switched off Parallel interface Plugone endofthecable intothe connectormarked Par allel on the printer Close the clips on both sides to hold it in place Plug the other end into a parall...

Страница 33: ...ollow the procedure below 1 Check that the printer s message display indicates 5HDG and that the ON LINE indicator is ON 2 Boot the computer in DOS mode or set the computer to DOS prompt mode 3 At the...

Страница 34: ...ion screen appears when the CD ROM for the printer is inserted into the computer ifthecomputerissetforCDauto run Proceedwiththeinstallationaccordingtotheinstructionsthatappear on the screen Read the e...

Страница 35: ...lecting the printer to be connected will appear Select the most appropriate printer and click on Next 6 Next Click the manufacturer and model of your printer screen will appear At this point select Ha...

Страница 36: ...brary CD ROM in your CD ROM drive 2 Start Windows on your computer 3 Double click on Control Panel 4 Double click on Printers 5 Click on Add 6 Click on Install 7 Select Install Unlisted or Updated Pri...

Страница 37: ...fed from the paper source originally set This is the factory set default Cassette Mode The cassette mode provides faster printing speed than the first mode Approximately 100 sheets of paper can be co...

Страница 38: ...you may have problems with paper jams or incorrect print positioning An incorrect paper size setting can also result in printing of tiny black dots on the page or other defects in image quality The f...

Страница 39: ...an be inserted at one time 5HDG appears on the message display 6 Carefully lower the protector bar and the paper will be correctly set in the MP tray Feeding Envelopes Envelopes should be fed face up...

Страница 40: ...y 3 Switch printer power on The printer reads the contents of the memory card during its power up sequence The information nonresident fonts etc on the memory card is now available for use If the memo...

Страница 41: ...oper installation of the expansion memory The minimum memory requirements for the printer with various options installed are listed in the table below Please refer to this table when expanding the pri...

Страница 42: ...plug the printer s power cable and disconnect the printer from the host computer 2 Remove the three screws from the printer s rear cover 3 Pull the main circuit board all the way out of the printer Be...

Страница 43: ...DIMM Installing DIMM Insert the DIMM into the socket as shown right 1 Remove the DIMM from its package 2 Open the clips on both ends of the DIMM slot 3 Insert the DIMM into the memory slot so that th...

Страница 44: ...n Memory After you have finished installing DIMM in the printer test the printer to see if the installation has been successful To test the expansion memory proceed as follows 1 Make sure the power sw...

Страница 45: ...o use the page printer 2 1 Control Panel The printer control panel comprises a message display keys and indicators as shown below ENTER STATUS key Page 2 5 Symbolic Indicators Page 2 4 FORM FEED Key S...

Страница 46: ...de and 300 dpi in other emulation modes The printer s resolution can be selected using the printer s control panel See the last page in this manual Print at 300 dpi Print at 600 dpi Default Message Me...

Страница 47: ...are Copy Indicator Indicates the number of copies set in the current interface and the number is reduced as printing proceeds ISO A4 21 cm 29 7 cm ISO DL 11 22 cm ISO A5 14 8 cm 21 cm ISO C5 16 2 22 9...

Страница 48: ...nter is out of paper Load more paper Lit Indicates when paper is fed from the paper feed cassette MP tray indicator Flashingrapidly Indicatesthepossibilitythatpapermaybejammed at this point open and r...

Страница 49: ...up tray or optional sorter stacker if installed 2 Lets you access the desired item or enter numeric values In some of the control procedures the CONTINUE and FORM FEED keys are used to enter or exit...

Страница 50: ...H XS WUD DFH GRZQ WUD If you have installed the optional sorter or stacker 6RUWHU or XON VWDFNHU will also be displayed The current selection is indicatedbya green light on the printer symbol above th...

Страница 51: ...key to take the printer offline 3 Perform the necessary procedure on the computer to halt printing 4 Press the CANCEL key 5 The message 3ULQW DQFHO will appear in the message display and the interface...

Страница 52: ...the printer must be on line Proceed as follows 1 Make sure the message display indicates 5HDG 2 Press the STATUS key The printer prints a page of status information The message display indicates 3URFH...

Страница 53: ...2 2 Operating Procedures 2 9 Sample Status Page 2 3 7 8 9 1 4 5 6...

Страница 54: ...ter starts up default font It is possible to set dif ferent fonts for the parallel interface and the serial interface The figure on page 2 9 shows default settings The font is set to Courier font font...

Страница 55: ...HG The following settingscan be made from the optional IB 10 serial interface Baud rate Data bits Stop bits Parity Protocol If an optional network board is installed also makes the network settings Pa...

Страница 56: ...this mode is set to 2Q Off 0 025 5 Readsorwritesdatafromortoanmemorycardinthe printer s memory card slot Also this menu allows deletion of data from an memory card and format ting the memory card 3DS...

Страница 57: ...or This interface selection does not select which interface data will be received from The printer auto matically selects that interface Parallel Interface The parallel interface mode of this printer...

Страница 58: ...ing the ENTER key will cause a to flash Press the or keys to dis play 2Q and then press the ENTER key 4 Press the key to display 5 0 6 VL H 5 Press the ENTER key again and change the RAM DISK size usi...

Страница 59: ...and specifies the name of the partition in the memory card to be read automatically at power up See PRESCRIBE 2e Programming Manual Chapter 5 Writing Data to a Memory Card A memorycardcanholdupto127da...

Страница 60: ...ritten to the card Write data length The size of the written data on the memory card in bytes Others Error information When the memory card write information page is printed the message display return...

Страница 61: ...of data names The printer prints a list of all data names referred to as partitions stored in a memory card for reference Printing a list is also available for a font card The printout example above i...

Страница 62: ...nit settings completed GLPHQVLRQ appears as shown in the diagram below the paper width setting Press the ENTER key while in this state and the cursor begins to flash The width that can be set must be...

Страница 63: ...selected but it is also possible for the user to define and select customized paper types The following types of paper can be set For details on paper please see Appendix B Cassette Media Type and Cu...

Страница 64: ...urces Paper Type User Setting The following describes the procedure used to set a user defined paper type for the printer Eight custom user settings may be registered After having been set any of thes...

Страница 65: ...below In addi tion all paper type settings made using 7 SH DGMXVW can be reset to the default values shown in the table below using the 5HVHW W SH DGMXVW menu These paper types will cause slower prin...

Страница 66: ...as above it times out and enters into sleeping mode indicating 6OHHSLQJ on the message display When you send data for printing to the printer again or press a key on the control panel the printer sta...

Страница 67: ...ain 3URFHVVLQJ will be shown for a second then the message DLWLQJ will appear on the message display 3 Senddata to be dumped to the printer The message 3URFHVVLQJ will be displayedduringreceiving the...

Страница 68: ...ty printing by providing a software type improvement to the resolution Set the print density to when setting the KIR 2 mode For details on print density see page 2 26 You can look at the check line th...

Страница 69: ...he status page again If you still get white vertical stripes adjust the print density control to a darker setting See the last page in this manual 2 12 Ecoprint Mode The Ecoprint enables you to reduce...

Страница 70: ...mulation mode is changed from PCL 6 to another or vice versa 5HVRXUFH SURW 3HUP 7HPS In this mode the printer stores both permanent and temporary resources when the emulation mode is changed from PCL...

Страница 71: ...m Buzzer These error messages are displayed if the relevant option is fitted Priority Error Message Alarm Frequency Remarks Short beeps approx 0 8 s Long beeps approx 0 4 s High 5HSODFH 7RQHU OHDQ SUL...

Страница 72: ...ter 5 of this manual or to the oper ating manuals accompanying the various optional equipment If you wish to cancel the data being processed while the audio alarm is sounding press the CAN CEL key twi...

Страница 73: ...y a font These include the code set For details on the code sets please read the Programming Manual on the supplied CD ROM spacing pitch height style stroke weight and typeface family The printerhas 8...

Страница 74: ...rintthe samefontlistfromthe printer by using the printer s control panel key To print a list of fonts refer to Mode Select Menu List of fonts Internal Scalable and Bitmap Fonts Font number Font sample...

Страница 75: ...3 2 List of Fonts 3 3 Font number Font samples 38 39 40 41 42 43 44 45 46 47 48 49 50 51 52 53 54 55 56 57 58 59 60 61 62 63 64 65 66 67 68 69 70 71 72 73 74 75 76 77 78 79 80...

Страница 76: ...3 2 List of Fonts 3 4 KPDL Fonts 1...

Страница 77: ...3 2 List of Fonts 3 5 KPDL Fonts 2...

Страница 78: ...imately once every 5 000 pages Turning the Ecoprint mode ON conserves toner Refer to Chapter 2 for details In the case of a new printer in which a toner kit has been installed for the first time the n...

Страница 79: ...th the toner kit Dispose of the toner con tainer The old toner container may be incinerated with out the risk of generating harmful gas 4 Take the new toner container from its bag Withthelabelsidedown...

Страница 80: ...that the toner container is properly locked in the printer 8 Close the top cover by pressing the arrowed part in this diagram It is necessary to clean the inside of the printer after replacing the to...

Страница 81: ...e as shown right Remove the waste toner bottle as gently as possi ble so as not to scatter the waste toner inside Do not let the opening of the waste toner bottle face downward 3 Cap the waste toner b...

Страница 82: ...and install in the printer as shown right Do not cap the new waste toner bottle Insert the new waste toner bottle with the bottle tilted slightly towards you as shown in the figure 6 After ensuring t...

Страница 83: ...5HSODFH 7RQHU OHDQ SULQWHU was displayed the message OHDQ SULQWHU 3UHVV 217 18 will be displayedafter replacement After cleaning the insideoftheprinter following theprocedure shown below press the CO...

Страница 84: ...tion ofslowlypulling out andthenpushingback inthe main charger unit at least 5 times It is easier to pull out the main charger for the first time if it is raised slightly as shown in the figure The gr...

Страница 85: ...upanddraw the paper feed unit all the way out until it stops 2 Wipe the paper dust on the registration roller and the paper ramp using the wiper cloth included in the toner kit Do not touch the transf...

Страница 86: ...If the printing is abnormal With the printer on line and ready press the STATUS key to print a status page You can also optimize print quality using the KIR test pattern printed at the bottom of the...

Страница 87: ...all for the assistance of a service person If the above checks do not solve the problem call for the assistance of a service person 5 3 Interface Problems If the printer prints a status page correctly...

Страница 88: ...call for the assistance of a service person Completely blank printout Check the developer unit Open the printer top cover and check that the developer unit is inserted correctly and check that the de...

Страница 89: ...ects occur at regular intervals of 94 mm 3 7 inches the problem may be a damaged drum unit or fuser roller Call for the assistance of a service person Black or white vertical streaks Check the control...

Страница 90: ...U message is displayed and the indicator is flashing install a new toner kit See Section 4 1 Check the print density Display the print density menu from the control panel and select a lighter density...

Страница 91: ...Check the transfer roller Ifthetransferrollerisdirtywithtoner tryprintingseveralpages orcallfortheassistanceofaserviceperson Characters out of position Check the file or program See if the problem is...

Страница 92: ...1 Toner Empty Fast Flashing There is a paper jam There is a possibility that paper may be jammed at the pointindicatedbyflashing openandremoveanyjammedpaper See Section 5 6 Slow Flashing The paper has...

Страница 93: ...4 1 OHDQ SULQWHU 3UHVV 217 18 Please clean the inside of the printer See Section 4 2 This message will be displayed when replacing the toner container after the message 5HSODFH 7RQHU OHDQ SULQWHU has...

Страница 94: ...WLYH andyoucanchangethesourceforpaperfeeding Further youcan change the paper source by pressing the FEED key After selecting a paper source and pressing the MODE key 3DSHU KDQGOLQJ appears By pressing...

Страница 95: ...not on disk No memory for use by disk system Expand printer memory Cannot format disk because host data is spooled there Format the disk after 5HDG is displayed Unable to read files during the sorting...

Страница 96: ...res formatting Format the memory card from the control panel The capacity of the memory card is insufficient This error code appears when an attempt is made to write more data on the memory card than...

Страница 97: ...e jammed paper was removed If you cannot solve the problem by changing the paper there may be a problem with the printer Call a ser vice person A Check the face down output tray If paper is partially...

Страница 98: ...he paper pull it gently so as not to tear it Torn pieces of paper are difficult to remove and may be easily overlooked deterring the jam recovery Figure 5 2 Rear Cover Figure5 3 PaperCassette Figure 5...

Страница 99: ...nsferring Negative charger roller Separation Curvature separation Drum cleaning Blade cleaner Drum discharging Illumination by eraser LED array Fuser Heat roller and pressure roller Toner saving Ecopr...

Страница 100: ...79 Bystander Position sound pressure level at the front During printing LpA 50 dB A During standby LpA 39 dB A During sleep mode Immeasurably low Dimensions 373 mm 14 7 wide 310 mm 12 2 high 383 mm 15...

Страница 101: ...ant difference between grades is the ease with which they pass through the printer This is affected by the smoothness size and moisture content of the paper and the way in which the paper is cut The h...

Страница 102: ...on Do not use paper that has been coated or surface treated and contains plastic or carbon The heat of fusing can cause such paper to give off harmful fumes Bond paper should contain at least 80 pulp...

Страница 103: ...entofthepapervaries with therelativehumidityinthe room Whentherelative humidity is high and the paper absorbs moisture the paper edges expand becoming wavy in appearance When the relative humidity is...

Страница 104: ...r Thissectionexplainsprintingonspecialpaper Thepageprintercanusethefollowingtypesofspecialpaper In this case set the media type according to the table below When using the above types of paper be sure...

Страница 105: ...le in printing Adhesive label paper must be entirely covered by its top sheet with no spaces between the individ ual labels Labels with spaces in between are apt to peel off causing serious jam proble...

Страница 106: ...re printer wear To avoid jamming due to curled envelopes do not leave more than approximately 10 printed envelopes stacked in the paper trays during multiple printing of the envelopes Colored Paper Co...

Страница 107: ...canbeacti vated from the printer s control panel see Chapter 2 Operating the Laser Printer as follows Use a parallel printer cable that complies with the IEEE1284 standard Auto default The printer au...

Страница 108: ...on 1 In Strobe nStrobe 2 In Data 0 Data 1 3 In Data 1 Data 2 4 In Data 2 Data 3 5 In Data 3 Data 4 6 In Data 4 Data 5 7 In Data 5 Data 6 8 In Data 6 Data 7 9 In Data 7 Data 8 10 Out Acknowledge nAck 1...

Страница 109: ...uns out of paper On Line Select Pin 13 This signalis high whenthe printer is on line andlow when the printeris off line It goes low whenthe upper unit is raised or when the ON LINE key is pressed to s...

Страница 110: ...ial asynchronous data sent by the computer to the printer RTS Request To Send Pin 4 This output is always held high above 3 volts CTS Clear To Send Pin 5 DSR Data Set Ready Pin 6 Unused SG Signal Grou...

Страница 111: ...d in Table C 3 Overview of Signals RS 422A FG Frame Ground Pin 1 This pin is connected directly to the printer frame SG Signal Ground Pin 7 All signals can transmit betweenthe printer and the host com...

Страница 112: ...rate The factory setting is 9600 baud H2 Data bits 7 or 8 factory set to 8 H3 Stop bits 1 or 2 factory set to 1 H4 Parity The factory setting is None 0 on the status printout H5 Protocol logic The fac...

Страница 113: ...232C cable check that it is wired correctly referring to the pin assignment table in Appendix C If you have an IBM communication adapter cable type 1502067 you will have to resolder the wiring at the...

Страница 114: ...1 Parity None The three RS 232C protocols are XON XOFF and DTR The printer performs all three of them simulta neously using positive logic for DTR 8 Set the computer to the same parameters as the prin...

Страница 115: ...Error messages 5 10 5 11 Expansion memory 1 22 F Face up output tray install 1 12 Feed selection 2 6 Font definition 3 1 identifying characteristics 3 1 Form Feed Time Out 2 2 Format error MEMORY CAR...

Страница 116: ...Ready 2 2 Ready indicator 2 6 Recycled paper B 6 Registration roller 4 8 Replace Toner Clean printer 5 8 Replace Waste toner bottle 5 8 Resolution Indicator 2 2 Resource protection 2 26 RS 232C C 4 R...

Страница 117: ...s the desired item 3 Press the key to move to a submenu Press the key to return 4 PresstheENTERkeyoncethedesiredmenuappears willflash and the current setting can be changed 5 Press the and key to sele...

Страница 118: ...u is Internal 4 The 6L H menu is not available for the Courier and Letter Gothic fonts 5 The 3LWFKmenuis displayed instead forthese fixed width fonts 6 Although XWR is thedefault setting and thismenu...

Страница 119: ...isable the difference between A4 size and letter size Under the default setting of 2II the paper size of the paper source is matched to the paper size given for the data and if these differ a correspo...

Отзывы: