background image

Section 1  Fax Operation (Names of Parts / Preparations / Features and Functions of this Fax)

1-2

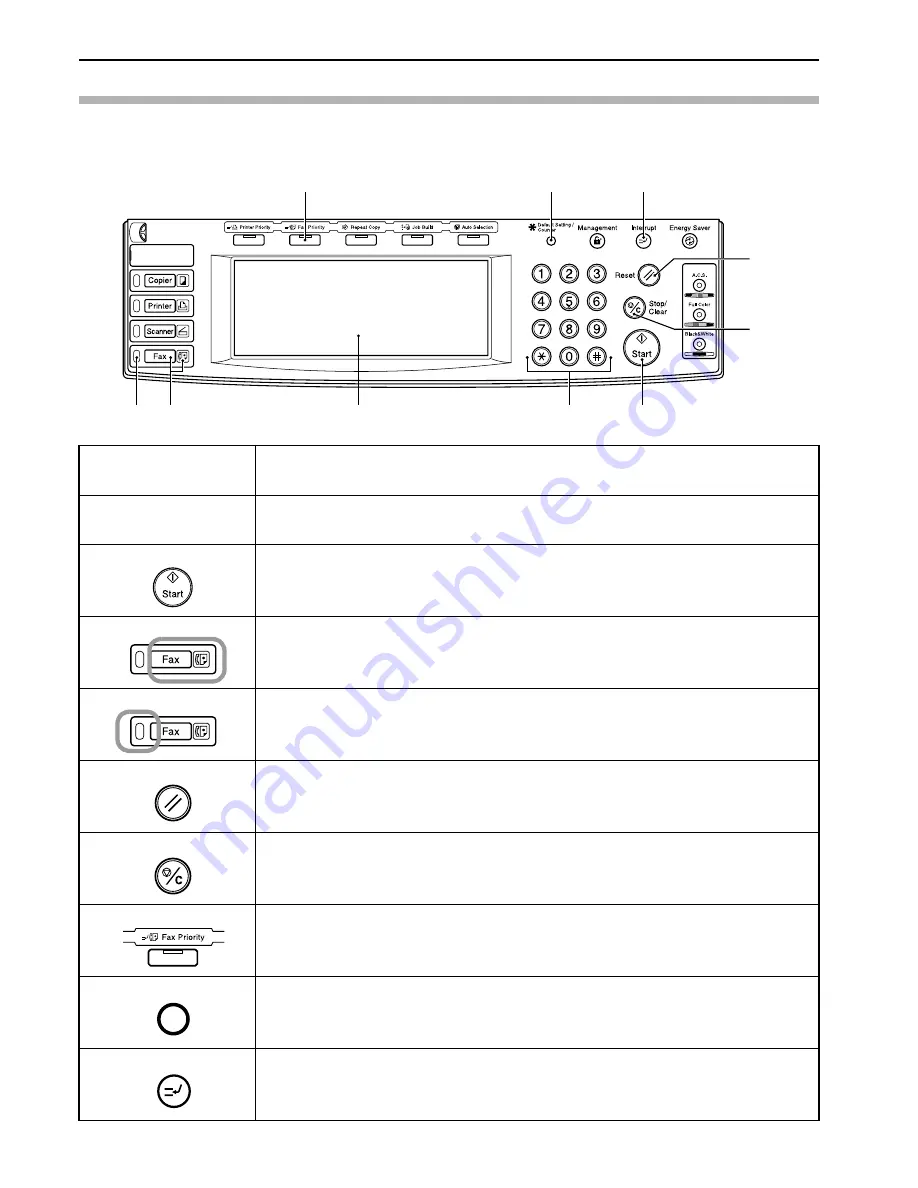
Operation Panel and their Functions

The following contains explanations on the names and functions of the keys and indicators that are utilized when this machine is used as a 
facsimile. Refer to the Operation Guide for your copier for information on the keys and indicators that are utilized when this machine is used 
as a copier.

(1)  Touch panel

Indicates operation procedures as well as trouble with the machine. Keys related to operational 
procedures which appear on the touch panel with their name displayed are indicated in this handbook 
within double quotation marks. (Ex.: Press the “xxx” key.)

(2)  Keypad

Use the keypad to enter fax numbers, etc.
*  Even if your telephone service is for pulse dialing, press the star (*) key and any key pressed on the 

keypad after that will transmit the related tone signal. (Inch version only)

(3)  Start key

Press this key when you want to initiate a fax communication.

(4)  Fax key / Fax indicator

Press this key when you want to switch between the Copy Operation and Fax Operation modes. The Fax 
indicator is lit when the machine is in the Fax Operation mode.

(5)  Fax data indicator

This indicator blinks during a fax communication. When this indicator is lit, there are received 
documents or documents to be transmitted, etc., stored in memory.

(6)  Reset key

Press this key when you want to cancel an operation in progress and have the touch panel return to the 
initial mode settings.

(7)  Stop/Clear key

Press this key when you want to delete registered fax numbers or names, as well as when you want to 
stop an operation in progress.

(8)  Fax Priority key

Press this key when you want to give priority to printing out a received fax during a copy operation. 
 (Refer to page 1-18.)

(9)  Default key

Press this key when you want to perform settings related to the various default modes for the fax 
functions of this machine.

(10)  Interrupt key/indicator lamp

Press this key when you want to interrupt a fax reception in order to make copies. The indicator lamp in 
the Interrupt key will light when the machine is in the Interrupt mode. (Refer to page 1-18.)

(1)

(2)

(3)

(4)

(5)

(6)

(7)

(8)

(9)

(10)

Содержание DCC 2526

Страница 1: ...ALWAYS read this Operation Guide thoroughly before use After reading maintain it in good condition and keep it together with the Operation Guide for your copier FAX System G FAX System H Operation Guide ...

Страница 2: ...information for the metric version Trademark Information Microsoft Windows Windows NT and Internet Explorer are registered trademarks of Microsoft Corporation of the US and other countries Windows ME and Windows XP are trademarks of Microsoft Corporation Ethernet is a registered trademark of Xerox Corporation IBM and IBM PC AT are trademarks of International Business Machines Corporation Adobe and...

Страница 3: ...elated points Symbols The U symbol indicates that the related section includes safety warnings Specific points of attention are indicated inside the symbol General warning Warning of danger of electrical shock Warning of high temperature The symbol indicates that the related section includes information on prohibited actions Specifics of the prohibited action are indicated inside the symbol Warnin...

Страница 4: ...rm the basic procedures required to operate this fax machine Section 3 Various Functions of this Fax This section contains explanations on attempting procedures that will enable more effective use of this fax by those individuals who have already become somewhat familiar with its basic operation It includes such instructions as setting the time for a transmission to begin transmitting the same doc...

Страница 5: ...propriate to how you use this fax Section 8 Optional Equipment This section contains an explanation on the addition of Optional Memory something which enables the use of the Ultra fine resolution mode and thus allows even clearer fax transmission and reception of documents Section 9 Network FAX Settings Option This section contains explanations on the setup procedure and settings to be performed o...

Страница 6: ...rectly from a Network Computer Network FAX functions option 1 13 Handling 2 Jobs Simultaneously Dual Access function 1 13 Sending Multiple Sets of Documents in One Batch Batch Transmission function 1 16 Rotating the Document Image for Transmission Rotate Transmit function 1 16 Verifying IDs With the Other Party Using F Codes F Code Based Communication 1 16 Receiving Documents Even When Paper Has R...

Страница 7: ...mber and the Keypad Chain Dial Keys 3 10 Registering New Chain Dial Keys 3 10 Modifying or Deleting Registered Information 3 12 Dialing With a Chain Dial Key 3 13 Managing Information for a Scheduled Communication Editing a Communication in Memory 3 14 Printing Out a Sample Image of Waiting Documents 3 14 Force Starting the Communication 3 15 Deleting the Communication 3 15 Modifying the Contents ...

Страница 8: ...ing 5 28 Registering the Fax Forwarding Information 5 28 Modifying Registered Fax Forwarding Information 5 29 Turning Fax Forwarding ON OFF 5 30 Dialing Multiple Destinations as a Group Group Dial Keys 5 31 Registering New Group Dial Keys 5 31 Modifying or Deleting Registered Information 5 32 Dialing With a Group Dial Key 5 34 Printing Out a Group Dial List 5 35 Saving Specific Communication Setti...

Страница 9: ...setting 7 3 Setting the Number of Rings Auto Fax Reception Number of Rings setting 7 4 Making Volume Settings Volume setting 7 5 Setting the Document Size for Scanning from the Document Processor Scan from DP setting 7 6 Setting the Default Transmission Mode TX Mode Default setting 7 7 Selecting the Automatic Reception Mode Receive Mode setting 7 8 Turning Reception Date Time Print Out ON OFF RX D...

Страница 10: ...ation 10 1 Specifications 10 1 Character Input Screens 10 2 Paper Size and Priority Feed Chart Inch version 10 3 Paper Size and Priority Feed Chart Metric version 10 4 Menu Flow Charts 10 5 Error Code Tables 10 7 Index 10 11 Contents ...

Страница 11: ... NOT leave the Document Processor open as there is a danger of personal injury Other precautions DO NOT open the front cover or left cover turn off the power switchpower switch or pull out the power plug while transmitting receiving or copying This product may only be used within the country of purchase due to the different safety and communication standards in each country International communica...

Страница 12: ...ix ...

Страница 13: ... perform fax and copy operations The touch panel will light and operation will be possible 1 3 4 5 6 7 8 9 10 11 2 3 2 4 10 8 6 5 6 7 9 11 6 1 8 31 cpm copier 26 26 cpm copier 5 Document table Set the documents you want to transmit on this table Up to 100 sheets of up to 11 x 8 1 2 A4 size paper or up to 70 sheets of 8 1 2 x 14 or 11 x 17 A3 or Folio size paper can be set at one time 6 Document in...

Страница 14: ...on 4 Fax key Fax indicator Press this key when you want to switch between the Copy Operation and Fax Operation modes The Fax indicator is lit when the machine is in the Fax Operation mode 5 Fax data indicator This indicator blinks during a fax communication When this indicator is lit there are received documents or documents to be transmitted etc stored in memory 6 Reset key Press this key when yo...

Страница 15: ...egistered to function as either a one touch key a group dial key G a program key P or a chain dial key C are displayed here 4 Address book key Press this key when you want to use the address book Refer to page 2 21 5 Abbrev key Press this key when you want to use the abbreviated number that a destination number is registered under in order to dial that number Refer to page 2 19 6 TX setting key Pr...

Страница 16: ...ry TX Dir Feed Tx key When you want to switch between the Memory Transmission mode Memory Tx and the Direct Feed Transmission mode Dir Feed Tx The mode will change each time you press this key 12 Reception mode select key Press this key when you want to select a different reception mode The display will change to the reception mode selection screen where you can select the desired reception mode b...

Страница 17: ...of the various functions of this fax machine such as polling etc 17 Register key Press this key when you want to perform one of the various registration procedures of this fax machine 18 Print Report key Press this key when you want to print out one of the various reports or lists of this fax machine 19 Status Act status key This key is displayed during a transmission reception or printout Press t...

Страница 18: ... the type of phone line you select here is correct because if the setting is incorrect fax communication will be impossible Prior to operation check the message display to make sure that the touch panel is in the initial mode for fax operation Refer to What is the Initial Mode on page 1 11 If you want to cancel the procedure part way through press the Reset key The touch panel will return to the b...

Страница 19: ...age display to make sure that the touch panel is in the initial mode for fax operation Refer to What is the Initial Mode on page 1 11 If you want to cancel the procedure part way through press the Reset key The touch panel will return to the basic copy screen Press the Default key The Default Setting screen will appear Press the FAX default key inch metric Press the T cursor key until TTI is highl...

Страница 20: ...el the procedure part way through press the Reset key Press the Register key The Registration Select screen will appear inch metric Press the Location Info key The currently registered information will be displayed inch metric To register your fax number Press the key and go to step 3 To register your station name Press the Own Name key and go directly to step 5 To register your station ID Press t...

Страница 21: ...hat you want to change Then enter the correct number as desired inch metric Press the Confirm key The message display will return to the same screen as was displayed in step 2 If you are finished making settings press the Reset key to return to the initial mode Setting the Current Date and Time Date Time setting Set the date and the time that will appear in the message display here BE SURE that th...

Страница 22: ... Use the or cursor keys to move the cursor as required inch metric Press the Time key and then use the keypad to enter the present time The time should be entered on a 24 hour basis 00 00 23 29 Press the Confirm key The message display will return to the same screen as was displayed in step 2 If you are finished making settings press the Reset key to return to the initial mode 3 4 5 6 ...

Страница 23: ...ccompanying default settings and related operational status is known as the initial mode When the fax machine is in the initial mode for fax operation Ready for fax transmission will be shown in the message display Always check the touch panel to make sure that is it is in the initial mode and displaying this basic fax screen PRIOR to performing any facsimile operation The fax machine will also re...

Страница 24: ...g the Current Settings Auto Clear function The Auto Clear function will clear all entered settings and the touch panel will return to the initial mode settings after any type of transmission or print out or if you do not press any keys within 90 seconds during any procedure If however documents are set when the Auto Clear function engages the displayed size of those documents will remain in the me...

Страница 25: ...ter The main functions are as follows z Transmission When this fax machine and a computer are connected over the same network the image data of a document created on the computer can be sent through the Scanner Kit that is installed on the fax machine and then transmitted to the other fax etc z Reception Documents sent by the other fax machine etc will be received by this fax and saved via the Sca...

Страница 26: ...screen When the Dual Access function is not available There are cases in which the Dual Access function is not available For example during a fax communication to one party you will not be able to receive a fax from another party nor can you perform setting or registration procedures during any fax transmission or reception In such cases perform the desired operation after the current communicatio...

Страница 27: ...nditions The adjoining numerals refer to the following conditions 1 The documents and or box being used in the initial operation and the additional operation are not the same 2 Faxes which are being printed out directly will be received using Memory Reception and will be printed out once printing in the Fax mode becomes possible 3 Print out will be accomplished once printing in the Printer mode be...

Страница 28: ...counter clockwise and transmitted them as 8 1 2 x 11 A4 length wise documents To enable the Rotate Transmit function for documents set in the Document Processor you must select Standard size when setting the document size for scanning from the Document Processor Refer to Setting the Document Size for Scanning from the Document Processor Scan from DP setting on page 7 6 The Rotate Transmit function...

Страница 29: ...ceived data is not possible For further information on paper orientation refer to Paper Size and Priority Feed Chart on pages 10 3 and 10 4 If the transmitting party s TTI information is set to be printed outside the border of the transmitted page received data cannot be rotated and the received image will be reduced slightly to enable the appropriate information to be printed out Backing Up Memor...

Страница 30: ...t out of an incoming fax and make copies without having to wait for that print job to end 1 Press the Interrupt key Copying is now possible 2 Once copying is completed press the Interrupt key to return to print out of the incoming fax Using a 3 Digit Number to Select the Destination Abbreviated Numbers 600 speed dial keys are available and each of these keys can be designated to function as either...

Страница 31: ...Transmission mode Transmitting from the platen This mode is ideal for transmitting books and the like that cannot be placed in the Document Processor Documents are set one at a time directly on the platen and after all the documents are scanned and entered into memory the destination fax number is then dialed In this case it is necessary after each page is scanned to select whether or not you want...

Страница 32: ...pear on the documents received by the other party In this case set the documents in a different direction and try to transmit them again 1 Adjust the document insert guides to match the width of the documents you want to transmit 2 Open the eject guide when transmitting documents of a large size such as 8 1 2 x 14 B4 or 11 x 17 A3 3 Set the documents face up on the document table If the documents ...

Страница 33: ...ndard size characters Fine For transmitting documents with relatively small characters or thin lines Super fine For transmitting documents with detailed lines and characters Ultra fine For transmitting the clearest reproduction of documents with detailed lines and characters Half tone Half tone For transmitting the clearest reproduction of documents containing both photographs as well as text The ...

Страница 34: ...ntrast 1 If you want to change the contrast press the Exposure mode key inch metric 2 Select the desired contrast from among the 3 available inch metric Indicating the document size When you set any documents that you want to transmit on the platen you will need to indicate the size of those documents This procedure is not necessary when transmitting documents from the Document Processor 1 In orde...

Страница 35: ...ing operation by pressing the Stop key in the confirmation screen that was accessed above Press the Close key to return to the previous screen inch metric Saving a document for transmission When the optional Scanner Kit is installed Perform the following procedure in order to save a document for transmission on the administrator s network computer The document can be saved as a PDF file or a TIFF ...

Страница 36: ...e platen for transmission a menu like that shown below will appear in the message display once you press the Start key and the documents have been scanned In this case perform the following procedure If you have more documents to send 1 Set the next page to be scanned on the platen The next document s may also be set in the Document Processor 2 Press the Yes key inch metric 3 Press the Start key I...

Страница 37: ...Manual Fax Reception Refer to page 3 20 Auto FAX TEL Switching Refer to page 5 1 TAD Reception Refer to page 5 3 D R D Reception Refer to page 5 5 Checking the reception mode Make sure that Auto RX is displayed inch metric z Changing the reception mode 1 Press the reception mode select key when you want to change the reception mode 2 Press the key that corresponds to the desired reception mode inc...

Страница 38: ...on It is possible to make copies even during a reception in which documents are being directly printed out whereby Imaging memory is not used to save the documents Press the Interrupt key during a reception The fax will switch to Memory Reception and copying will be possible Memory Reception When you cannot print out because paper has run out or a paper jam occurs the data for all received documen...

Страница 39: ... any documents left in the Document Processor remove them from the document table Canceling a Memory Transmission during transmission If you want to cancel a Memory Transmission in which scanning all of the documents has been completed and the dialing or transmission operation has already begun perform the following procedure Press the Status Act status key in the bottom right of the touch panel T...

Страница 40: ... the Document Processor inch metric Canceling a Reception If you want to cancel a reception perform the following procedure Press the Status Act status key in the bottom right of the touch panel The status of the communication currently in progress will appear in the message display inch metric Press the Stop key The touch panel will return to the initial mode settings If you attempt to cancel a r...

Страница 41: ...ymbols Space key Press this key when you want to enter a space and keys Press these keys when you want to move the cursor AllDel key Press this key when you want to delete all of the currently entered information Del prev key Press this key when you want to delete the character to the left of the cursor Back key Press this key when you want to return to the screen prior to character input End key ...

Страница 42: ...s and other available symbols Press the key and then the 4 key Press the End key or Next key to register the entered information z Metric version Verify that the Capital key is highlighted and press the K key Press the Letter key to switch to lowercase input Press the m key Press the Symbol 1 key to switch to input of numerals and other available symbols Press the key and then the 4 key Press the ...

Страница 43: ...ered under each one touch key print out a One Touch Key List It is recommended that you register the name of the other party as well as the fax number under each one touch key If you register the other party s name as well you will be able to use the address book to search for their fax number Prior to operation check the message display to make sure that the touch panel is in the initial mode for...

Страница 44: ...m and change the information as desired If you want to register this one touch key with the entered information as is go directly to step 20 z Making More Detailed Settings If you want to perform more detailed settings like selecting the transmission speed or designating this one touch key for F Code Based Communication or Encrypted Transmission press the Setting key and then go to the next step S...

Страница 45: ...s key for Encrypted Transmission press the Encryption TX Encryption key To use this key for Encrypted Transmission press the On key The Key Code Box Number Input screen will appear Use the keypad to enter the 2 digit Key Code 01 20 that corresponds to the Encryption Key you want to use for this one touch key inch metric Press the Encryption box key and then use the keypad to enter the number of th...

Страница 46: ...isplay will return to the same screen as was displayed in step 3 If you want to continue deleting other one touch keys repeat steps 3 through 5 If you are finished deleting one touch keys press the Reset key Modifying registered information If you want to modify the abbreviated number the displayed number of the speed dial key under which the one touch key is registered press the Abbr key If you w...

Страница 47: ...n of documents set the documents you want to transmit If you want to change the transmission conditions such as the resolution and contrast press the TX setting key If you do NOT want to change the current conditions go directly to step 5 Press the key that corresponds to the desired item and change the information as desired To change each transmission condition refer to pages 2 3 and 2 4 Once yo...

Страница 48: ...message display to make sure that the touch panel is in the initial mode for fax operation Refer to What is the Initial Mode on page 1 11 If you want to cancel the procedure part way through press the Reset key The touch panel will return to the initial mode settings Press the Print Report key The Report Select screen will appear inch metric Press the One touch key list key inch metric To print ou...

Страница 49: ...e initial mode settings Set the documents you want to transmit If you want to change the transmission conditions such as the resolution and contrast press the TX setting key If you do NOT want to change the current conditions go directly to step 5 Press the key that corresponds to the desired item and change the information as desired To change each transmission condition refer to pages 2 3 and 2 ...

Страница 50: ...on Basic Use 2 20 Press the Close key The touch panel will return to the basic fax screen and the corresponding speed dial key will be highlighted Press the Start key The transmission operation will begin automatically 7 8 ...

Страница 51: ...cal order of the abbreviated number z Search order The search order is as follows with the order of precedence shown from left to right English Alphabet A Z J Numerals 0 9 J Symbols The characters and symbols for display as well as for searching will differ depending upon the language being used Refer to Character Input Screens on page 10 2 How Do I Find a Destination in the Address Book Ex To sea...

Страница 52: ...mbol as the first character inch metric The speed dial keys that are registered with a name that starts with that first letter will be displayed inch metric Press the speed dial key under which the desired destination is registered If that key is not displayed use the T and or S cursor keys to switch to the screen that displays the key that you want Press the OK key The touch panel will return to ...

Страница 53: ...l not be printed out Prior to operation check the message display to make sure that the touch panel is in the initial mode for fax operation Refer to What is the Initial Mode on page 1 11 If you want to cancel the procedure part way through press the Reset key Press the Print Report key The Report Select screen will appear inch metric Press the Telephone direct list key inch metric To print out th...

Страница 54: ...ialing will be performed a number of times at a set interval this function is effective even if the other party s communication takes an extended period of time Automatic Redialing will not engage when documents are being transmitted in the Direct Feed Transmission mode Manual Redialing What if you try to transmit documents but the other party s fax line is busy and can t answer your call In this ...

Страница 55: ...ther various types of fax communication available in this fax The following method explains the procedure for sending duplex documents to a single destination Prior to performing Duplex Transmission you must select Standard size when setting the document size for scanning from the Document Processor Refer to Setting the Document Size for Scanning from the Document Processor Scan from DP setting on...

Страница 56: ...ric Select whether or not you want the image on the back side of the documents to be inverted during transmission to match the orientation of the front side by pressing either the On key invert rear images or the Off key do NOT invert images as appropriate If you transmit documents as shown in the illustration immediately below select On The fax will then invert the image of the rear side of each ...

Страница 57: ...ation of Standby Transmissions communications that use the timer and Interrupt Transmissions can be scheduled at one time You can also designate each of the various types of fax communication available in this fax such as Broadcast Transmission as a Standby Transmission If you want to cancel the procedure part way through press the Reset key The touch panel will return to the initial mode settings...

Страница 58: ...ons 3 4 Canceling a waiting transmission in the Direct Feed Transmission mode 1 Press the Stop key on the touch panel or press the Stop Clear key inch metric 2 If you DO want to cancel the Standby Transmission press the Yes key inch metric ...

Страница 59: ...smitted using the Memory Transmission mode even if the fax is currently in the Direct Feed Transmission mode If you want to cancel the procedure part way through press the Reset key The touch panel will return to the initial mode settings Set the documents you want to transmit in the Document Processor or on the platen When the documents are set on the platen it is necessary after each page is sca...

Страница 60: ... dial key that is registered with the one touch or group dial information that you want to use The selected key will be highlighted It is also possible to use a registered chain dial key followed by another speed dial key inch metric Press the Start key The transmission operation will begin automatically 2 3 ...

Страница 61: ...l waiting to start perform the same procedure as in Canceling a waiting transmission in the Direct Feed Transmission mode on page 3 4 If you want to cancel the procedure part way through press the Reset key The touch panel will return to the initial mode settings Press the Memory TX key until it changes to Dir Feed Tx inch metric Set the documents you want to transmit in the Document Processor or ...

Страница 62: ...unications that use the timer are scheduled to begin at the same time fundamentally each communication will be accomplished in the order that they were registered However even if it has been registered later any communication that scheduled with a single location will take priority over a communication to multiple locations It is possible to cancel or change the contents of a communication that is...

Страница 63: ...ou want to change the entered time use the and or keys to move the cursor to the desired location inch metric Press the Close key Press the Start key The documents will be scanned into memory and the transmission operation will begin when the appointed time is reached If the Delayed Communication Report print out setting is turned ON a Delayed Communication Report will be printed out Refer to page...

Страница 64: ...tion fax numbers in each of the various types of fax communication available in this fax such as Broadcast Transmission You CANNOT use chain dial keys in combination with group dial keys Registering New Chain Dial Keys You can register any number of the 600 speed dial keys for use as chain dial keys If you want to cancel the procedure part way through press the Reset key The touch panel will retur...

Страница 65: ...Press the Next key Enter the desired name for the chain dial key Maximum 20 characters In order to enter characters refer to Entering Characters on page 2 11 Check the registered information If you want to change any portion of it press the key that corresponds to the desired item and change the information as desired inch metric To register this chain dial key with the entered information as is p...

Страница 66: ...ss the Change contents key and then go directly to step 6 inch metric Deleting a chain dial key Press the Yes key The message display will return to the same screen as was displayed in step 3 If you want to continue deleting other chain dial keys repeat steps 3 through 5 If you are finished deleting chain dial keys press the Reset key Modifying registered information If you want to modify the abbr...

Страница 67: ...ll return to the initial mode settings If the operation involves the transmission of documents set the documents you want to transmit Press the desired speed dial key that was registered as a chain dial key inch metric Enter the other party s fax number You can enter the fax number using the keypad abbreviated numbers one touch keys or the address book Once the other party s fax number is entered ...

Страница 68: ...ransmission that is in memory and waiting for transmission you can print out a sample page of those documents Even if you print out a sample image of the documents the transmission will be carried out on schedule If you want to cancel the procedure part way through press the Reset key The touch panel will return to the initial mode settings Press the Application key The Application screen will app...

Страница 69: ...s on page 3 14 Press the Immediate TX key inch metric Press the Yes key The corresponding operation will begin automatically inch metric Deleting the Communication You can delete a scheduled communication that is in memory and waiting for a start time You CANNOT delete a scheduled communication that is in memory waiting to be forwarded to a destination fax If you want to cancel the procedure part ...

Страница 70: ... is slightly different depending on the type of communication involved The example in the procedure below is for a scheduled Broadcast Transmission that uses the timer If you want to modify the information relating other types of communications simply refer to this example but follow the flow of the message display in order to perform the actual procedure You CANNOT modify a scheduled communicatio...

Страница 71: ...tep 5 If you also want to modify the destination information press the key If you do NOT want to modify the information go directly to step 16 Modifying destination information The currently registered information will be displayed If you want to delete a fax number s press the corresponding speed dial key or keys and then go to the next step If you want to add a fax number s press the Add key and...

Страница 72: ...hanging fax numbers Press the Change key Enter the new destination fax number You can enter the fax number s using the keypad abbreviated numbers one touch keys group dial keys and the address book Chain dial keys can be used as well inch metric Press the Finish dest Set Dest set key The message display will return to the same screen as was displayed in step 8 You can change delete or add other fa...

Страница 73: ...e Document Processor It is not possible to set documents on the platen with this mode Pick up the telephone receiver or press the On hook key If you pressed the On hook key that key will be highlighted Dial the destination fax number Check whether or not you are connected to a fax machine If you hear a fax tone You are connected to a fax machine Press the Start key Fax transmission will begin If t...

Страница 74: ...ll comes in the separately purchased phone will ring Pick up the telephone receiver Check whether or not the call is from a fax If you hear a fax tone You are connected to a fax machine Press the Start key Fax reception will begin If the separately purchased telephone has tone dialing capabilities you can use the Remote Switching function Refer to Initiating Fax Reception From A Connected Telephon...

Страница 75: ...If the indicator IS lit indicating there ARE documents in memory print out all important documents from memory and then make sure that the Fax data indicator is out BEFORE disconnecting the power The Imaging Memory back up function of this machine will protect the contents of memory for up to 60 minutes 8 MB of optional memory must be installed even if for any reason power to the fax is disconnect...

Страница 76: ...appropriate will be printed out and an alarm will sound Check the error code that is displayed the corresponding report and then refer to Error Code Tables on page 10 7 to confirm the cause of the error It is also possible to check the error code on the regularly printed Activity Report Refer to Printing Out an Activity Report on page 6 3 Whether or not a Transmission or Reception Report is printe...

Страница 77: ...the message display load paper of that particular size ______ Add toner C M Y K There is insufficient toner left in the indicated toner cartridge C cyan M magenta Y yellow and K black Refer to the Operation Guide for your copier and replace the corresponding toner cartridge ______ Paper Misfeed Paper has jammed somewhere in the fax machine Refer to the Operation Guide for your copier and remove th...

Страница 78: ...nfirm the cause of the error 10 7 No DC Loop No Dial Tone The modular cord may not be connected properly to either the telephone or the line jack L on the fax Either that or there is a problem with the telephone line In this case contact your telephone company ______ No Response Dialing was accomplished but connection to the other party was not possible Check with the other party ______ No encrypt...

Страница 79: ...ed Perform the necessary procedure to correct the error and try to transmit the documents again 10 7 Is Password Check Transmission turned ON Turn Password Check Transmission OFF 5 47 I am not able to perform Broadcast Transmission Is the memory in your fax machine full Try the Broadcast Transmission procedure again after memory becomes available or after you create available space in memory 2 9 5...

Страница 80: ...ruction Manual for the telephone being used ______ Did you use the correct Remote Switching number Check the registered number Factory default setting 55 5 6 I was able to receive a fax but it was not printed out and the documents are not in memory Is Fax Forwarding turned ON Check the Fax Forwarding setting 5 28 I am not able to receive documents Is the modular cord connected correctly Connect th...

Страница 81: ...d Encryption Box number You CANNOT register an F Code Box subaddress that is identical to a registered Encryption Box number Select a different subaddress ______ I am not able to perform F Code Based Confidential Transmission Does the destination party s fax machine have the same F Code Based Confidential Communication capabilities as your fax machine If the destination fax machine does not have t...

Страница 82: ...possible Check with the transmitting party ______ Is there an appropriate box equal to an F Code Confidential Box registered in the transmitting party s fax Check with the transmitting party ______ Are the subaddress and the F Code password that you entered correct If you think the information you entered IS correct check with the other party ______ I am not able to enter documents into my F Code ...

Страница 83: ...elephone will ring The telephone will ring only once in the metric version models In the inch version models you can set the number of times the telephone will ring Refer to Setting the Number of Rings Auto Fax Reception Number of Rings setting on page 7 4 Automatically Switching Between the Fax and a Telephone Auto FAX TEL Switching Fax Fax Telephone If the other party is sending documents using ...

Страница 84: ...30 seconds after the ringing starts If the telephone receiver is not picked up within 30 seconds the fax machine will switch to fax reception 2 Speak with the other party At the end of the conversation fax reception can be initiated manually Refer to Initiating the Fax Connection Manually Manual Fax Reception on page 3 20 If the call is from a fax Fax reception will start automatically 2 ...

Страница 85: ...e silence detection function of this fax will be activated and the fax machine will switch to fax reception Reception flow z Preparation Make sure that Answering Machine is displayed on the basic fax screen If it is not press the reception mode select key and then press the Answering Machine key inch metric The telephone will ring a designated number of times You can set the number of times the te...

Страница 86: ...do not answer The functions of the answering machine will engage your message will be played and the caller will be able to leave a message If there is a silent pause of 9 seconds or more 6 seconds or more for metric versions the fax machine will switch to fax reception If the call is from a fax Fax reception will start automatically 2 ...

Страница 87: ... on page 7 8 and select D R D Make sure that Auto RX is displayed on the basic fax screen If it is not press the reception mode select key and then press the Auto RX key When a call comes in the telephone will ring If the telephone receiver is picked up while the telephone is still ringing the fax will deal with the call in the same manner as a standard Manual Fax Reception Refer to Initiating the...

Страница 88: ...ching Number The factory default setting for the Remote Switching Number is 55 but you can change this if you want If you want to cancel the procedure part way through press the Reset key The touch panel will return to the initial mode settings Press the Register key The Registration Select screen will appear inch metric Press the Remote SW dial key Remote Switching registration is now possible in...

Страница 89: ...ollowing procedure When a call comes in the telephone will ring Pick up the telephone receiver If you hear a fax tone use the tone signal capabilities of the telephone to enter the 2 digit Remote Switching Number The factory default setting for the Remote Switching Number is 55 The connection will switch to the fax machine and fax reception will start automatically 1 2 3 4 ...

Страница 90: ...ed to an unlimited number of receiving parties Refer to Turning the Bulletin Board ON OFF Bulletin Board setting on page 7 3 If you want to cancel the procedure part way through press the Reset key The touch panel will return to the initial mode settings Set the documents you want to transmit When the documents are set on the platen it is necessary after each page is scanned to select whether or n...

Страница 91: ...n of the documents set in that other fax machine If reception of documents from more than one transmitting fax is designated those destinations will be dialed in order and reception will be carried out from each fax It is possible for the receiving party to use the timer to have the documents received at a time convenient to them If you enter all of the transmitting fax numbers using abbreviated n...

Страница 92: ...Delayed TX key If you do NOT want to designate a time for the reception to begin go directly to step 8 Press the On key Use the keypad to enter the desired time for the reception to begin If you want to change the entered time use the and or keys to move the cursor to the desired location inch metric Press the Close key Press the Start key The reception operation will begin automatically If a time...

Страница 93: ... F Code Based Confidential Transmission and F Code Based Relay Broadcast Transmission The F Code password is used to designate the password of the desired box equal to the F Code Confidential Box or the F Code Relay Box as appropriate in this fax that is registered in the other party s fax The acceptable length of the F Code password differs depending on model and maker of the fax machine and if t...

Страница 94: ...h press the Reset key The touch panel will return to the initial mode settings Press the Register key The Registration Select screen will appear inch metric Press the Box key F Code Confidential Box registration is now possible inch metric Press the Subaddress confi box Subaddr confid box key inch metric Communicating Confidentially F Code Based Confidential Communication Caution When registering ...

Страница 95: ...s 0 9 and the symbols and If you register 0000 as the F Code password it will not be necessary to enter a password when you print out documents from that F Code Confidential Box If the optional Scanner Kit is installed and you want to use the NW FAX Reception function press the On key If the optional Scanner Kit is not installed go to the next step inch metric Press the Confirm key The message dis...

Страница 96: ... the F Code Confidential Box you want to modify or delete inch metric Enter the F Code password 4 digits for that F Code Confidential Box inch metric Press the Confirm key If you want to completely delete the F Code Confidential Box press the Delete key and go to the next step If you want to modify the information for that F Code Confidential Box press the Change contents key and go to step 7 inch...

Страница 97: ...ation in order to designate the box in the destination party s fax It can be up to 20 digits in length and can include any combination of the numerals 0 9 and the symbols and You can use the and or keys to move the cursor to a desired location and you can clear the entered number by pressing the Delete key inch metric Conditions z You the transmitting party must know in advance the number in this ...

Страница 98: ... an F Code Confidential Box Perform the following procedure to print out documents that have been received into your F Code Confidential Box If the documents are printed out correctly the data will be deleted from that box If you are using an F Code Confidential Box for F Code Based Bulletin Board Transmission and you want to delete that data simply print the documents out and the data will be del...

Страница 99: ...Confidential Box inch metric Press the Confirm key The documents that are in that F Code Confidential Box will be printed out Printing Out an F Code Confidential Box List Print out this list in order to check the information in each F Code Confidential Box as well as data regarding the existence of documents in each respective box If there are no F Code Confidential Boxes registered in this fax an...

Страница 100: ... add new documents to those currently in your F Code Confidential Box and you can also delete all of the documents currently in that box and replace them with new documents If you want to delete the data for documents stored in an F Code Confidential Box simply print out those documents Refer to Printing Out Documents from an F Code Confidential Box on page 5 16 If you want to cancel the procedure...

Страница 101: ...ocuments go to the next step If you are entering documents for this Confidential Transmission for the first time go directly to step 7 inch metric If you want to add documents press the Add key If you want to replace the documents press the Overwrite key Press the Confirm key Select any related transmission settings that you want to use If you are using duplex 2 sided documents press the Duplex TX...

Страница 102: ...However depending upon the fax machine there is a possibility that they may not be able to enter documents in their box or may not be able to perform Polling Reception so both the transmitting party and the receiving party should check in advance whether the appropriate conditions are met For example even if you are going to transmit documents with this fax and you enter documents into your F Code...

Страница 103: ...he Delete key inch metric Press the Password key If necessary use the keypad to enter the predetermined F Code password The password can be up to 20 digits in length and can include any combination of the numerals 0 9 and the symbols and This password is not required if you agree in advance with the destination party not to use one Press the Close key The message display will return to the same sc...

Страница 104: ...on page 5 25 for the procedure on acting as the initial transmitting station and sending documents through a relay station Registering New F Code Relay Boxes Perform the following procedure to register a new F Code Relay Box You can register up to 15 F Code Relay Boxes in this fax machine If you want to cancel the procedure part way through press the Reset key The touch panel will return to the in...

Страница 105: ... want to use for this F Code Relay Box The password can include any combination of the numerals 0 9 and the symbols and Press the Next key Repeat steps 1 and 2 below until all of the final destination fax numbers are registered Max 300 destinations 1 Enter the fax number of a final destination You can use the keypad abbreviated numbers one touch keys and group dial keys to enter the fax number Cha...

Страница 106: ...isplay will return to the same screen as was displayed in step 4 If you want to continue registering other F Code Relay Boxes repeat steps 4 through 15 Once you are finished registering F Code Relay Boxes press the Reset key Modifying or Deleting F Code Relay Boxes Perform the following procedure when you want to add or delete final destinations or change other information registered under any F C...

Страница 107: ...e conditions are met z The subaddress that is required when this fax is acting as the initial transmitting station can be up to 20 digits in length but the number of digits acceptable in the destination fax may differ Check with the relay station and make sure that you register a subaddress that is within the number of digits that is acceptable to the other party s fax machine Conditions z In the ...

Страница 108: ...an be up to 20 digits in length and can include any combination of the numerals 0 9 You can use the and or keys to move the cursor to a desired location and you can clear the entered number by pressing the Delete key inch metric Press the Password key If necessary use the keypad to enter the predetermined F Code password The password can be up to 20 digits in length and can include any combination...

Страница 109: ... fax an F Code Relay Box List will not be printed out If you want to cancel the procedure part way through press the Reset key The touch panel will return to the initial mode settings Press the Print Report key The Report Selection screen will appear inch metric Press the Subad rel box list key inch metric To print out an F Code Relay Box List press the Yes key An F Code Relay Box List will be pri...

Страница 110: ...st time If you want to cancel the procedure part way through press the Reset key The touch panel will return to the initial mode settings Press the Register key The Registration Select screen will appear inch metric Press the Fax Forwarding key inch metric Enter the fax number of the destination fax You can enter the fax number using the keypad abbreviated numbers or one touch keys Chain dial keys...

Страница 111: ...s the key that corresponds to any item that you want to modify Press the OK key The message display will return to the same screen as was displayed in step 2 If you are finished making settings press the Reset key Modifying Registered Fax Forwarding Information Perform the following procedure in order to modify information already registered for Fax Forwarding If you want to cancel the procedure p...

Страница 112: ... key The touch panel will return to the initial mode settings Press the Default key The Default Setting screen will appear Press the Fax default key inch metric Press the T cursor key until Fax forwarding is highlighted Press the Change key To turn Fax Forwarding ON press the ON key inch metric Press the Close key If you are finished making settings press the Reset key to return to the initial mod...

Страница 113: ... will automatically become the abbreviated number for the destination fax numbers registered under that group dial key If you register a group name for each group dial key you will be able to use the address book to search for the related fax numbers If you want to cancel the procedure part way through press the Reset key The touch panel will return to the initial mode settings Press the Register ...

Страница 114: ...y registered information and press the key that corresponds to any item that you want to modify Press the OK key The message display will return to the same screen as was displayed in step 3 If you want to continue registering other group dial keys repeat steps 3 through 9 If you are finished registering group dial keys press the Reset key Modifying or Deleting Registered Information Press the Reg...

Страница 115: ... the displayed number of the speed dial key under which the group dial key is registered press the Abbr key If you want to modify any other basic information press the key that corresponds to that information To modify information refer to the corresponding step under Registering New Group Dial Keys on page 5 31 Enter the abbreviated number of an unregistered speed dial key 001 600 Once a 3 digit ...

Страница 116: ...ange the transmission conditions such as the resolution and contrast press the TX setting key If you do NOT want to change the current conditions go directly to step 5 Press the key that corresponds to the desired item and change the information as desired To change each transmission condition refer to pages 2 3 and 2 4 Once you are finished changing transmission conditions press the One touch des...

Страница 117: ...are no group dial keys registered in this fax a Group Dial List will not be printed out If you want to cancel the procedure part way through press the Reset key The touch panel will return to the initial mode settings Press the Print Report key The Report Select screen will appear inch metric Press the Group dial List key inch metric To print out a Group Dial List press the Yes key A Group Dial Li...

Страница 118: ...nation fax numbers registered under that program key If you register a program name for each program key you will be able to use the address book to search for the related program If you want to cancel the procedure part way through press the Reset key The touch panel will return to the initial mode settings Press the Register key The Registration Select screen will appear inch metric Press the Di...

Страница 119: ...abbreviated numbers one touch keys or the address book Chain dial keys can be used as well If you want to enter multiple fax numbers with the keypad press the Next destinat Next dest key after each fax number inch metric Press the Finish dest Set Dest set key Enter a name for the program Maximum 20 characters In order to enter characters refer to Entering Characters on page 2 11 Check the currentl...

Страница 120: ...ey and then go to the next step If you want to modify the registered information press the Change contents key and then go directly to step 6 inch metric Deleting a program key Press the Yes key The message display will return to the same screen as was displayed in step 3 If you want to continue deleting other program keys repeat steps 3 through 5 If you are finished deleting program keys press th...

Страница 121: ...inished deleting program keys press the Reset key Using a Program Key If the operation involves the transmission of documents set the documents you want to transmit If it involves a polling reception go directly to step 5 If you want to change the transmission conditions such as the resolution and contrast press the TX setting key If you do NOT want to change the current conditions go directly to ...

Страница 122: ...t Print out this list in order to check the content of program keys currently registered in this fax If there are no program keys registered in this fax a Program Dial List will not be printed out If you want to cancel the procedure part way through press the Reset key The touch panel will return to the initial mode settings Press the Print Report key The Report Select screen will appear inch metr...

Страница 123: ...Section 5 Other Features of this Fax 5 41 To print out a Program Dial List press the Yes key A Program Dial List will be printed out inch metric 3 ...

Страница 124: ... initial mode settings Press the Register key The Registration Select screen will appear inch metric Press the Password check key inch metric Enabling Communication Only When Certain Passwords Match Password Check Communication Preparation You must register the desired password Permit Telephone Number and or Permit ID in your fax in advance The other party must register its self station fax number...

Страница 125: ...mit Telephone Number Maximum 20 digits You can use the and or keys to move the cursor to a desired location and you can clear the entered number by pressing the Delete key inch metric Press the OK key The message display will return to the same screen as was displayed in step 4 If you want to continue registering other Permit Telephone Numbers repeat steps 4 through 6 If you are finished registeri...

Страница 126: ... Change contents key and then go directly to step 5 inch metric Deleting a Permit Telephone Number Press the Yes key The message display will return to the same screen as was displayed in step 2 If you are finished deleting Permit Telephone Numbers press the Reset key Modifying information Press the Stop Clear key to delete the old number and then enter the new Permit Telephone Number or use the a...

Страница 127: ...he Permit ID No Permit ID nr key inch metric Press an unregistered key The information will be displayed for all keys that have already been registered inch metric Use the keypad to enter the desired 4 digit Permit ID If you want to change the entered number use the and or keys to move the cursor to the desired location inch metric Press the Confirm key The message display will return to the same ...

Страница 128: ...e registered information press the Change contents key and then go directly to step 5 inch metric Deleting a Permit ID Press the Yes key The message display will return to the same screen as was displayed in step 2 If you are finished deleting Permit IDs press the Reset key Modifying information Press the Stop Clear key to delete the old number and then enter the new Permit ID or use the and or ke...

Страница 129: ... you want to cancel the procedure part way through press the Reset key The touch panel will return to the initial mode settings Press the Default key The Default Setting screen will appear Press the Fax default key inch metric Press the T cursor key until Password Check Comm is highlighted Press the Change key To turn Password Check ON for transmissions press the ON key under Send inch metric To t...

Страница 130: ...XACT same numbers or characters as appropriate Registering New Encryption Keys The Encryption Key to be used must be selected by the transmitting party during the registration of the corresponding one touch key which is to be designated for Encrypted Transmission and by the receiving party during registration of the corresponding Encryption Box Each Encryption Key contains 16 characters that can i...

Страница 131: ...teps 4 through 6 If you are finished registering Encryption Keys press the Reset key 2 3 4 Understanding the Encryption Key and Key Code Each Encryption Key is registered under an Encryption Key Code a 2 digit number from 01 to 20 When you want to designate an Encryption Key for a certain communication it is this 2 digit number that you must enter In order to receive document successfully while it...

Страница 132: ...stered information press the Change contents key and then go directly to step 5 inch metric Deleting an Encryption Key Press the Yes key The message display will return to the same screen as was displayed in step 2 If you are finished deleting Encryption Keys press the Reset key Modifying information Press the Stop Clear key to delete the old key and then enter the new Encryption Key or use the an...

Страница 133: ...itial mode settings Press the Register key The Registration Select screen will appear inch metric Press the Box key inch metric Press the Encryption box key inch metric Press an unregistered key The box number will be displayed for all keys that have already been registered inch metric Cautions The box number that you enter during the registration of any Encryption Box CANNOT be the same number as...

Страница 134: ...ption Box Select whether or not you want documents received into this Encryption Box to be automatically printed out If you want to have received documents printed out immediately after reception select On If you want to allow print out only when the appropriate procedure is performed select Off inch metric If the optional Scanner Kit is installed and you want to use the NW FAX Reception function ...

Страница 135: ...he Delete key and then go to the next step If you want to modify the registered information press the Change contents key and then go directly to step 7 inch metric Deleting an Encryption Box Press the Yes key The message display will return to the same screen as was displayed in step 2 Once you are finished modifying and or deleting Encryption Boxes press the Reset key Modifying registered inform...

Страница 136: ...istered in this fax an error will occur and the transmission will not be completed Performing the Operation at the Receiving Fax Perform the following procedure in order to receive and print out documents under Encrypted Communication F Code Based Communication is not available for use with Encrypted Communications If you want to cancel the procedure part way through press the Reset key The touch ...

Страница 137: ...he touch panel will return to the initial mode settings Press the Application key The Application screen will appear inch metric Press the Print encr data box Encry code box output key inch metric Press the key that corresponds to the desired Encryption Box if it is highlighted If the key is not highlighted there are no documents in that box If you registered 0000 as the Box ID proceed directly to...

Страница 138: ...re are no Encryption Keys registered in this fax an Encryption Key List will not be printed out If you want to cancel the procedure part way through press the Reset key The touch panel will return to the initial mode settings Press the Print Report key The Report Selection screen will appear inch metric Press the Encryption key list key inch metric To print out an Encryption Key List press the Yes...

Страница 139: ...yption Boxes registered in this fax an Encryption Box List will not be printed out If you want to cancel the procedure part way through press the Reset key The touch panel will return to the initial mode settings Press the Print Report key The Report Selection screen will appear inch metric Press the Encryption box list key inch metric To print out an Encryption Box List press the Yes key An Encry...

Страница 140: ...ned ON only those sets of documents entered using the same ID code will be pooled together under the Batch Transmission function Any documents that were entered using different ID codes will be sent during different transmissions Refer to Sending Multiple Sets of Documents in One Batch Batch Transmission function on page 1 16 If Restricted Access Report print out is turned ON a Restricted Access R...

Страница 141: ...the Registration Select Screen When Restricted Access is Turned ON Refer to page 5 59 Accessing the Application Screen When Restricted Access is Turned ON Refer to page 5 60 Accessing the Report Selection Screen When Restricted Access is Turned ON Refer to page 5 61 Use the keypad to enter a viable ID code between 1 and 8 digits inch metric Press the Enter key The touch panel will return to the ba...

Страница 142: ...is Turned ON When Restricted Access is turned ON perform the following procedure in order to access the Application screen available when you press the Application key and thereby use the corresponding functions of this fax machine Use the keypad to enter a viable ID code between 1 and 8 digits inch metric Press the Enter key Press the Application key inch metric 3 1 2 3 ...

Страница 143: ...Print Reports key and thereby print out the corresponding reports The reports that are available for print out will depend on whether you enter an ID code or the registered administrator number If you enter an ID code Only the Activity Report Confirmation Report and Restricted Access Report are available If you enter the administrator number All reports are available z If you enter an ID code Use ...

Страница 144: ... you enter the administrator number Press the Print Report key inch metric Press the Admin Item key If you press the Activity report key at this point an Activity Report will be printed out Use the keypad to enter the currently registered administrator number 4 digits inch metric The Report Print Out screen will appear Print out the desired report s inch metric 4 1 2 3 4 ...

Страница 145: ...int out a report for each individual department or a report for all departments at the same time It is possible to print out a Restricted Access Report by entering an ID code however the report that is printed out will only be in relation to the information that corresponds to that particular code To print out such a Restricted Access Report for your ID code only refer to Accessing the Report Sele...

Страница 146: ...t by pressing the corresponding key to highlight it It is possible to select more than one ID code If you want to print out a report for all the ID codes at one time press the All Depart All ID codes key All of the ID code keys that are registered and have been used under Restricted Access will be highlighted inch metric Press the Close key Press the Yes key A Restricted Access Report will be prin...

Страница 147: ... performed using Network FAX functions will also appear in the Transmission Result Display If you want to cancel the procedure part way through press the Reset key The touch panel will return to the initial mode settings Press the Application key The Application screen will appear inch metric Press the TX result on LCD Tx report on display key Information for the most recent transmission will be d...

Страница 148: ...e initial mode settings Press the Application key The Application screen will appear inch metric Press the RX result on LCD Rx result display key Information for the most recent reception will be displayed inch metric Pressing the T cursor key will display the next previous reception and pressing the S cursor key will change the display back towards the most recent reception inch metric Once you h...

Страница 149: ...ults of the transmissions and receptions that were carried out on this fax Information for the 50 most recent communications will be printed on the Activity Report If no communications have taken place an Activity report will not be printed out If you want to cancel the procedure part way through press the Reset key The touch panel will return to the initial mode settings Press the Print Report ke...

Страница 150: ...cuments for Polling Transmission held in memory a Confirmation Report will not be printed out If you want to cancel the procedure part way through press the Reset key The touch panel will return to the initial mode settings Press the Print Report key The Report Selection screen will appear inch metric Press the Confirm report key inch metric To print out Confirmation Report press the Yes key A Con...

Страница 151: ...formation own name etc in this fax If you want to cancel the procedure part way through press the Reset key The touch panel will return to the initial mode settings Press the Print Report key The Report Selection screen will appear inch metric Press the User set list key inch metric To print out a User Setting List press the Yes key A User Setting List will be printed out inch metric 1 2 3 ...

Страница 152: ...Section 6 Managing Information About Your Fax Communications 6 6 ...

Страница 153: ...munication error a Broadcast Transmission and a transmission that uses the timer Reception Report Set this report to be printed out after each reception to check whether the reception was accomplished correctly or not Select Output on condition and then it is possible to set this report to be printed out only under certain condition such as a communication error a Polling Reception an Encryption R...

Страница 154: ...s press the Output on condition key In the screen for step 5 select whether or not you want the Delayed Communication Report to be automatically printed out Press the On key to have it printed automatically and the Off key to stop print out In the screen for step 5 select whether or not you want the Restricted Access Report to be automatically printed out Press the On key to have it printed automa...

Страница 155: ...efault key The Default Setting screen will appear Press the Fax default key inch metric Press the T cursor key until Bulletin Board is highlighted Press the Change key Select whether you want to turn the Bulletin Board function ON or OFF Press the Save doc after Tx key to turn it ON and the Del doc after Tx key to turn it OFF If you select Del doc after Tx the documents to be deleted from memory a...

Страница 156: ...nitial mode settings Press the Default key The Default Setting screen will appear Press the Fax default key inch metric Press the T key until of Rings is highlighted Press the Change key Use the or key to select the number of rings before an incoming call is answered in each mode the Auto Fax Reception mode the Auto FAX TEL Switching mode this setting is not available in metric models and the TAD ...

Страница 157: ... metric Select the desired monitor volume from among Large Medium Small and Off Select the desired speaker volume from among Large Medium Small and Off Press the Close key If you are finished making settings press the Reset key to return to the initial mode Making Volume Settings Volume setting Alarm Volume Sets the volume of the alarm that sounds in the event of an error or when you press an inco...

Страница 158: ...he Document Image for Transmission Rotate Transmit function on page 1 16 If you want to cancel the procedure part way through press the Reset key The touch panel will return to the initial mode settings Press the Default key The Default Setting screen will appear Press the Fax default key inch metric Press the T key until Scan from Doc P Doc P scanning is highlighted Press the Change key Select th...

Страница 159: ... panel will return to the initial mode settings Press the Default key The Default Setting screen will appear Press the Fax default setting key inch metric Press the T cursor key until TX Mode Default is highlighted Press the Change key Select the desired transmission mode setting by pressing either the Memory TX key or the Dir Feed Tx key as appropriate inch metric Press the Close key If you are f...

Страница 160: ...ess the T key until Receive Mode Reception mode is highlighted Press the Change key Select the desired reception mode by pressing either the Fax Reception Fax Rx key the Auto Fax Tel SW key or the D R D key as appropriate The D R D key will not be displayed in the metric version of this fax machine If you selected D R D go directly to step 7 inch metric If you selected Fax Reception or Auto Fax Te...

Страница 161: ...of reception at this fax will not be printed out on the documents received at the selected destination If however the forwarding operation is unsuccessful even after redialing the predetermined number of times the reception date and time information WILL be displayed on the documents that will then be automatically printed out at this fax If you want to cancel the procedure part way through press ...

Страница 162: ...ropriate If you selected Auto Select Auto sel proceed directly to step 8 If you selected Fix Size Fixed size go the next step If you selected Fixed Cassette go directly to step 7 inch metric Selecting the Paper Feed Selection Mode Fax Paper Feeding Tray setting Auto Selection mode In this mode the fax will automatically select and feed the most appropriate paper Fixed Size mode In this mode paper ...

Страница 163: ...s and Registration 7 11 Select the desired paper size and then proceed directly to step 8 Select the desired drawer Press the Close key If you are finished making settings press the Reset key to return to the initial mode 6 7 8 ...

Страница 164: ...ess of the reception mode setting and they will then be printed out at one time 2 in 1 Reception will not be available when both 2 in 1 Reception and Duplex Reception are turned ON If you want to cancel the procedure part way through press the Reset key The touch panel will return to the initial mode settings Press the Default key Press the Fax default key inch metric Use the T cursor key until Du...

Страница 165: ... Reception are turned ON If you want to cancel the procedure part way through press the Reset key The touch panel will return to the initial mode settings Press the Default key The Default Setting screen will appear Press the Fax default key inch metric Press the T cursor key until 2 in 1 RX is highlighted Press the Change key Select whether you want to turn 2 in 1 Reception ON or OFF by pressing ...

Страница 166: ...e 7 15 For further information contact your service representative an authorized service center or the place of purchase If you want to cancel the procedure part way through press the Reset key The touch panel will return to the initial mode settings Press the Default key The Default Setting screen will appear Press the Fax default key inch metric Press the T cursor key until Remote Diag Remote di...

Страница 167: ...he touch panel will return to the initial mode settings Press the Register key The Registration Select screen will appear inch metric Press the Remote Test ID key inch metric Use the keypad to enter the designated 4 digit Remote Test ID If you want to revise the entered number press the or cursor key to move the cursor to the number that you want to change inch metric Press the Confirm key The mes...

Страница 168: ...s Press the Default key The Default Setting screen will appear Press the Fax default key inch metric Press the T key until Bypass feeding is highlighted Press the Change key Select whether you want to turn the Manual Paper Feed function ON or OFF by pressing either the On or Off key as appropriate inch metric Press the Close key If you are finished making settings press the Reset key to return to ...

Страница 169: ... memory available for Bitmapping will be increased and you will thus be able to transmit and receive documents using the Ultra fine resolution mode In addition you will be able to store a greater number of documents into memory for transmission or through reception Optional Memory ...

Страница 170: ...Section 8 Optional Equipment 8 2 ...

Страница 171: ... at the computer About the On Line Manual A PDF format On Line Manual is included on the provided CD ROM This On Line Manual contains explanations on the applications required in order to use the Network FAX functions Its contents are as follows How to install the various applications How to perform Network FAX Transmission How to perform Network FAX Reception How to use the Address Book Opening t...

Страница 172: ...the On Line Manual Connect the shielded network cable 100 BASE TX or 10 BASE T to the fax machine See page 9 3 1 Connecting the fax machine and the computer 2 Procedure on the fax machine Perform the basic settings Network FAX Reception setting setting for saving the documents for transmission file type setting Network FAX registration on the fax machine See pages 9 4 9 11 3 Procedure on the compu...

Страница 173: ...ax machine OFF before connecting the network cable Insert the connector of a shielded Ethernet 10BASE T or 100BASE TX cable into the scanner interface connector on the fax machine Turn the power switch of the FAX machine ON Connecting the Fax Machine and the Computer 1 8 31 cpm copier 26 26 cpm copier 2 8 31 cpm copier 26 26 cpm copier 3 8 31 cpm copier 26 26 cpm copier ...

Страница 174: ...AX default key inch metric Use the T cursor key to select Network FAX Reception Press the Change key Select whether you want to turn Network FAX Reception ON or OFF by pressing either the On or Off key as appropriate If you selected On go to the next step If you selected Off go to step 7 inch metric Select whether you want to print out the documents received with this machine or not by pressing ei...

Страница 175: ... procedure part way through press the Reset key The touch panel will return to the initial mode settings Press the Default key The Default Setting screen will appear Press the FAX default key inch metric Use the T cursor key to select Save Tx original Press the Change key Select whether you want to save the documents or not by pressing either the On or Off key as appropriate inch metric Press the ...

Страница 176: ...an be saved as a PDF file or a TIFF file If you want to cancel the procedure part way through press the Reset key The touch panel will return to the initial mode settings Press the Default key The Default Setting screen will appear Press the FAX default key inch metric Use the T cursor key to select File Format File type Press the Change key Press the PDF or TIFF key inch metric Press the Close ke...

Страница 177: ...thorization the SMTP authorization setting must be turned ON in the scanner Refer to the Operation Guide for your scanner If no information is entered here the Activity Report and Power Failure Report will be printed out at the fax machine Save Folder Number For registering the number of the folder in which documents which have been transmitted or received using the Network FAX functions will be s...

Страница 178: ...ering Characters on page 2 11 when entering the file name inch metric Once you are finished entering the file name press the End key The message display will return to the same screen as was displayed in step 3 z Registering the IP address or host name Press the IP addr Host name key inch metric Enter the IP address numerals or the host name using the English alphabet or numerals Maximum 32 digits...

Страница 179: ... key when entering this information inch metric Once you are finished entering the administrator s e mail address press the End key The message display will return to the same screen as was displayed in step 11 Press the Account key Enter the account name using the English alphabet numerals or other available symbols Maximum 64 digits Refer to Entering Characters on page 2 11 when entering the acc...

Страница 180: ...31 digits Refer to Entering Characters on page 2 11 when entering the password inch metric Once you are finished entering the password press the End key The message display will return to the same screen as was displayed in step 11 Press the Close key The message display will return to the same screen as was displayed in step 3 z Registering the save folder number factory default setting RX001 and...

Страница 181: ...y Press this key when you want to reenter the number Stop key Press this key when you want to cancel the registration procedure and return the touch panel to the screen in step 3 Once you are finished entering the save folder number press the Enter key The message display will return to the same screen as was displayed in step 3 If you are finished making settings press the Reset key to return to ...

Страница 182: ...umber etc If you want to cancel the procedure part way through press the Reset key The touch panel will return to the initial mode settings Press the Print Report key The Report Selection screen will appear inch metric Press the NW FAX set list key inch metric To print out a Network FAX Settings List press the Yes key A Network FAX Settings List will be printed out inch metric Printing Out a Netwo...

Страница 183: ...mm x 3 85 lines mm Fine 8 dots mm x 7 7 lines mm Super fine 8 dots mm x 15 4 lines mm Ultra fine 16 dots mm x 15 4 lines mm Recording Resolution 600 dpi x 600 dpi Grayscale 128 levels Value differential diffusion Speed Dial Keys Max 600 destinations Broadcast Transmission Max 300 destinations Polling Reception Max 300 locations Installed Bitmap Memory 4 MB Installed Imaging Memory 4 MB including 1...

Страница 184: ...being used The following indicate the layouts of the keys for each screen z English Inch version Uppercase input Lowercase input Numbers Special characters input z Danish Dutch English Metric version Finnish French German Italian Spanish Portuguese Swedish and Norwegian Uppercase input Lowercase input Symbol 1 input Symbol 2 input z Polish and Czech Uppercase input Lowercase input Symbol 1 input S...

Страница 185: ...rations indicates the direction of feed for transmission or print out If the same size of paper is set in more than one location the upper drawer will have priority for paper feed If the either of the Fixed Size or Fixed Cassette modes are selected in the Paper Feed Selection Mode setting that setting will take precedent over the order indicated here 1 Indicates that the Rotate Received Data funct...

Страница 186: ...ion the upper drawer will have priority for paper feed If the either of the Fixed Size or Fixed Cassette modes are selected in the Paper Feed Selection Mode setting that setting will take precedent over the order indicated here 1 Indicates that the Rotate Received Data function will be used 2 If the received image of Folio size documents is automatically reduced to fit onto the paper it will be ac...

Страница 187: ...wn Name Your Own ID Date and Time Boxes F Code Confidential Boxes F Code Relay Boxes Encryption Boxes Password Check Communication Permit Telephone Numbers Permit IDs FAX Forwarding Remote Switching Remote Test ID Encryption Keys NW FAX File Name IP Address Host Name Administrator s E Mail Address Save Folder Number Administrator s E Mail Account SMTP Password SMTP Application key Polling Transmis...

Страница 188: ...N OFF Duplex Reception ON OFF Only available when the Duplex Unit is installed NW FAX Reception Only available when the Scanner Kit is installed TX Document Save Only available when the Scanner Kit is installed File Format Only available when the Scanner Kit is installed Remote Diagnosis ON OFF Print Report key Activity Report Confirmation Report User Setting List F Code Confidential Box List F Co...

Страница 189: ...ed because the transmitting party does not possess the necessary communication capabilities U00600 U00690 Communication was interrupted due to trouble with your unit Perform transmission or reception procedures again U00700 Communication was interrupted due to trouble with the other party s FAX unit Check with the other party U00800 U00810 Unsuccessfully transmitted page s remain Perform transmiss...

Страница 190: ...but was unsuccessful because the F Code Relay Box ID that the initial transmitting station entered did not match the one registered in your FAX Check the information registered in your FAX and have the initial transmitting station perform the transmission operation again U03000 Polling Reception was attempted but was unsuccessful because no documents had been placed in advance in the transmitting ...

Страница 191: ...ossess Encryption Communication capabilities U04400 Encryption Transmission was attempted but was unsuccessful because the Encryption Keys did not match U04401 Encryption Transmission was attempted but the other party was not dialed because the designated Encryption Key is not registered in your unit U04500 Encryption Reception was attempted but was unsuccessful because the Encryption Keys did not...

Страница 192: ...eption was attempted but was unsuccessful because your memory has become full Clear your memory of all other data and attempt reception again U19100 Transmission was attempted but was unsuccessful because the destination party s memory has become full Check with the destination party U19200 The data stored in memory is faulty Perform the necessary communication procedures again U19300 A transmissi...

Страница 193: ...Communication Result Display 6 1 Communication Using the Timer 3 8 Confirmation Report 6 4 Copy Priority Printout function 1 18 D D R D Reception 5 5 Date Time setting 1 9 Deleting the Communication 3 15 Document Number 1 12 Document Processor 1 1 2 2 Dual Access function 1 13 Duplex RX setting 7 12 Duplex Transmission 3 1 E Editing a Communication in Memory 3 14 Encrypted Communication 5 48 Encry...

Страница 194: ...ption Box 5 55 Printing Out Documents from an F Code Confidential Box 5 16 Program Dial List 5 40 Program Keys 5 36 Modifying or Deleting Registered Information 5 38 Registering New Program Keys 5 36 Using a Program Key 5 39 R Receive Mode setting 7 8 Receiving Documents from an F Code Based Bulletin Board 5 20 Redailing functions 2 24 Registering New Encryption Boxes 5 51 Registering New Encrypti...

Страница 195: ......

Страница 196: ... currents emissions for equipment input current 16A per phase EN61000 3 2 Limitation of voltage fluctuations and flicker in low voltage supply systems for equipment with rated current 16A EN61000 3 3 Safety of information technology equipment including electrical business equipment EN60950 Safety of laser products EN60825 1 The common technical regulation for the attachment requirements for connec...

Страница 197: ...E 08R00 National AN for D DE 09R00 National AN for D DE 12R00 National AN for D DE 14R00 National AN for D ES 01R01 National AN for E GR 01R00 National AN for GR GR 03R00 National AN for GR GR 04R00 National AN for GR NO 01R00 National AN for N NO 02R00 National AN for N P 03R00 National AN for P P 04R00 National AN for P P 08R00 Nationa AN for P Network Compatibility Declaration We declare that t...

Страница 198: ...ly functional switches and are not suitable for isolating the equipment from the power source VORSICHT Der Netzstecker ist die Hauptisoliervorrichtung Die anderen Schalter auf dem Gerät sind nur Funktionsschalter und können nicht verwendet werden um den Stromfluß im Gerät zu unterbrechen E1 ...

Страница 199: ......

Страница 200: ...2003 10 3HZ80130A ...

Отзывы: