background image

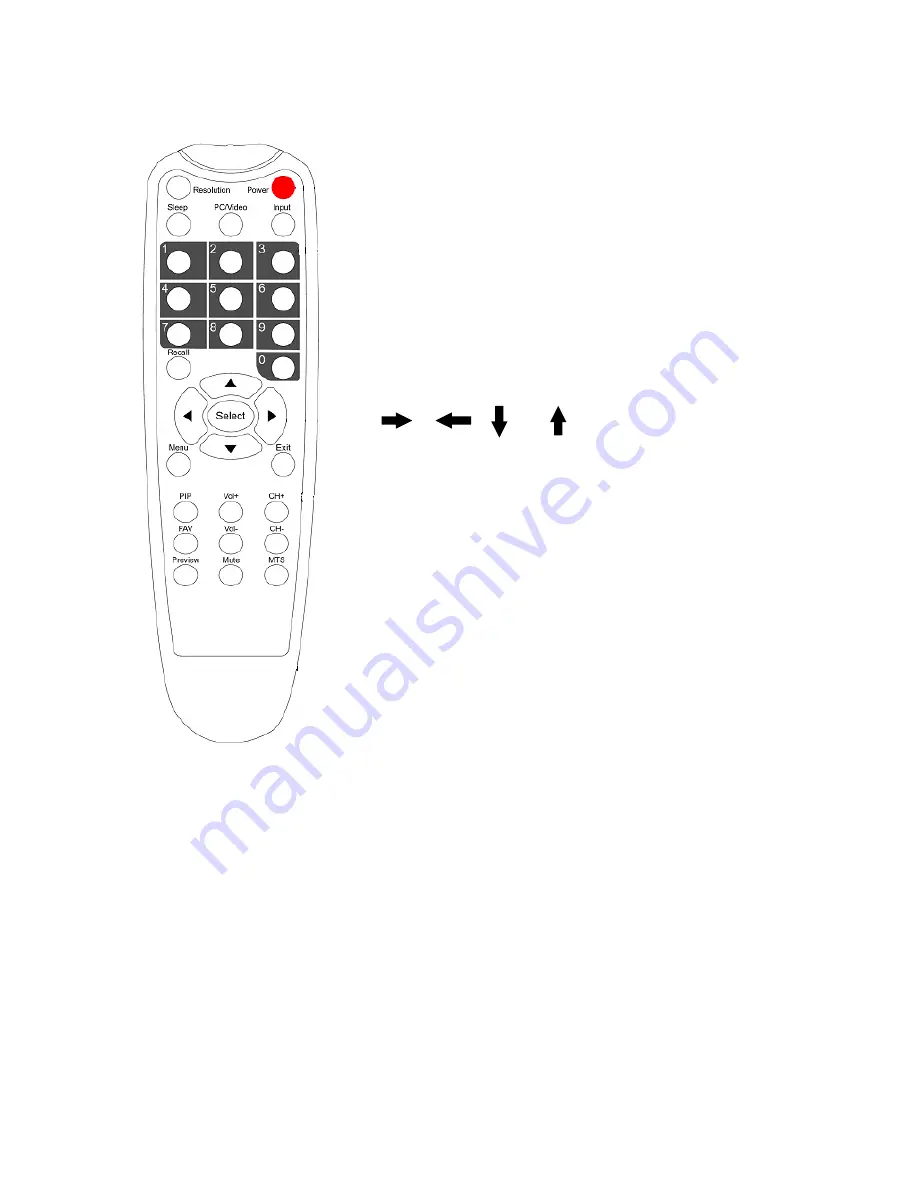
1-5.Location of Controls (Remote) 


[POWER]: 

Power button


[RESOLUTION]: 

Change the Video Resolution 


[INPUT]: 

Change Video


Source 

[PC/Video]: 

Select PC or Video 

[Sleep]:

 Sleep Time Select button 


[0~9]: 

Channel Number buttons


[Recall]: 

Channel Recall button 

[Select]:


Confirm Setting or OSD show up

.


[    ][    ][    ][    ]: 

Adjusting Picture Quality 


[EXIT]: 

Exit Select key or Menu button 

[Menu]: 

Select Item for Adjusting Function 

[VOL-]: 

Volume Down button 

[VOL+]:

 Volume Up button


[CH-]: 

Channel Down button


[CH+]:

 Channel Up button 

[PIP]: 

Activate PIP mode button (OPTION) 

[FAV]: 

Sets the current channel to “Favorite Channel”. 

[Preview]: 

Channel Preview button 

[Mute]: 

Audio Mute button 

[MTS]: 

Stereo/SAP/Mono Select button (option) 


Содержание TV BOX WS

Страница 1: ... and on the user is encouraged to try to correct the interference by one or more of the following measures Reorient or relocate the receiving antenna Increase the separation between the equipment and receiver Connect the equipment into an outlet on a circuit different from that which the receiver is connected Consult the dealer or an experienced radio television technician for help FCC Warning To ...

Страница 2: ...trols Remote 04 2 Set Up 2 1 Connecting TV Antenna Cable 05 2 2 Connecting Video Out To Monitor 05 2 3 Connecting Video Input From PC 06 2 4 Connecting Audio Line Input Output 06 2 5 Connecting Power Supply 07 2 6 Connecting Audio Video Equipment 07 3 Operation 3 1 Watching TV Programs 08 3 2 Convenient Remote Functions 09 3 3 Adjusting the Picture 12 ...

Страница 3: ... z Support SVGA 800x600 XGA 1024 x 768 SXGA 1280 x 1024 WXGA 1440 x 900 and SXGA 1400x1050 z Auto Channel memorized to set up channels automatically z Video S Video support NTSC PAL system z Connect game console V8 DV VCD DVD player for viewing on your monitor z Easy used Don t need to power on PC then you can watch TV program z Full function remote control 1 2 Specification z RF Input 75Ω coaxial...

Страница 4: ...troller z Batteries z DC 5V power adapter z User s manual 2 TV BOX WS Remote control VGA Cable Power Adaptor Stereo Audio Cable AAA Batteries Check to make sure that all the components are present and that nothing is damaged during shipping If you encounter any problems please contact your dealer ...

Страница 5: ...o Camera DVD Player Power ON OFF Input Source Change Channel Channel Volume Volume Power Adapter Power Adapter UHF VHF antenna RF input device VGA input from PC VGA output to CRT LCD Audio in from PC Audio Line output to Speaker Front Panel Rear View 3 ...

Страница 6: ...call button Select Confirm Setting or OSD show up Adjusting Picture Quality EXIT Exit Select key or Menu button Menu Select Item for Adjusting Function VOL Volume Down button VOL Volume Up button CH Channel Down button CH Channel Up button PIP Activate PIP mode button OPTION FAV Sets the current channel to Favorite Channel Preview Channel Preview button Mute Audio Mute button MTS Stereo SAP Mono S...

Страница 7: ...HF and or UHF channels You can receive Cable TV by connecting a cable supplied by your local cable company 75 ohm coaxial cable 300 ohm twin lead Antenna OR VHF UHF or Cable TV TV signal input Rear View 2 2 Connecting Video Out to Monitor 5 VGA out VGA out to LCD Monitor cable Monitor Rear View ...

Страница 8: ...2 3 Connecting Video Input from PC 6 VGA input VGA cable VGA D sub PC 2 4 Connecting Audio Line Input Output Audio in Audio out Audio Cable PC Audio Cable Line in Speaker ...

Страница 9: ...2 5 Connecting Power Supply 7 DC 5V Input AC DC Adaptor 2 6 Connecting Audio Video Equipment Video Source Input Left Audio Channel Input Right Audio Channel Input S Video Source Input Front View ...

Страница 10: ...ct channel 12 press 1 2 than Press Select To select channel 120 press 1 2 and 0 To change quickly between two channel 1 Select the first channel you want to view 2 Select the other channel with the Channel Number buttons 0 9 or CH CH button 3 Press Recall button The previous channel will return Each time you press Recall button the TV will switch back and forth between the two channels 8 Note In T...

Страница 11: ...Press POWER button to turn on into TV mode TV mode AV mode S Video mode 2When you press INPUT button each time the TV AV and S Video input source will be automatically changed by loop Switching PC AV mode 1 Press POWER button to turn on into TV mode The green LED of power lamp and mode lamp are light 2 Press PC VIDEO button to switch to PC mode The red LED of mode lamp is light Selecting PC VIDEO ...

Страница 12: ...ay on screen information 1In TV mode Press Select button to display the Channel number System MTS Volume on screen information 2In AV mode AV mode PressSelect button to display the AV on screen 3In S Video mode S Video mode PressSelect button to display the S VIDEO on screen To set the Sleep timer You can set TV or other AV mode to turn off automatically after a predetermined period of time up to ...

Страница 13: ...CH _ _ 2 CH _ _ 3 CH _ _ 4 CH _ _ 5 CH _ _ 6 CH _ _ 7 CH _ _ 8 CH _ _ 9 CH _ _ 2 Press the Select to pick a number from 1 to 9 3 When you want to watch your favorite channel Into the FAVORITE and press the number that your favorite channels Preview Function 9 Channels Preview If you want to preview the TV channel you can press this key then the TV Program will show on your screen one by one in 9 w...

Страница 14: ...lt picture settings TV Source AIR Cable Use Æ or Å buttons to change TV System PAL D K Use the Æ or Å buttons to change TV System Channel Scan Frequency Scan These 2 types of channel scan functions enable you to memorize all active channels in your area USE the Channel Scan function first If some channel missing after you play Channel Scan use Frequency Scan to searching again Finetune If the TV r...

Страница 15: ...the OSD Setting sub Menu OSD Transparency Press the Select button to choose the OSD Transparency and use Æ orÅ buttons to adjust degree LANGUAGE English 中文 Use Æ or Å buttons to change then press Select RESOLUTION USE the Æ Å buttons to choose resolution settings Information Model Name Version OSD Setting Restore all settings USE the Æ Å buttons to select Yes or No to restore all settings ...

Отзывы: