

matrixline
RS232
matrixline
RS232
matrixline
RS232
matrixline
RS232
matrixline
RS232
matrixline
RS232
matrixline
RS232
matrixline
RS232
Audio to PC
Audio to PC
Audio to PC
Audio to PC
USB to PC
USB to PC
USB to PC
USB from PC
DVI in from PC
Audio
from PC
Audio
from PC
Audio
from PC
Audio
from PC
DVI in from PC
DVI in from PC
DVI in from PC
DVI from Monitor
Audio from microphone
Audio to
speaker
USB from
keyboard and mouse
DVI to Monitor
DVI to Monitor
DVI to Monitor
power plug
12V 1A
power plug
12V 1A
power plug
12V 1A
power plug
12V 1A
power plug
12V 1A
power plug
12V 1A
power plug
12V 1A
power plug
12V 1A
Network cable CAT 5e/6/7 up to 150m/492ft
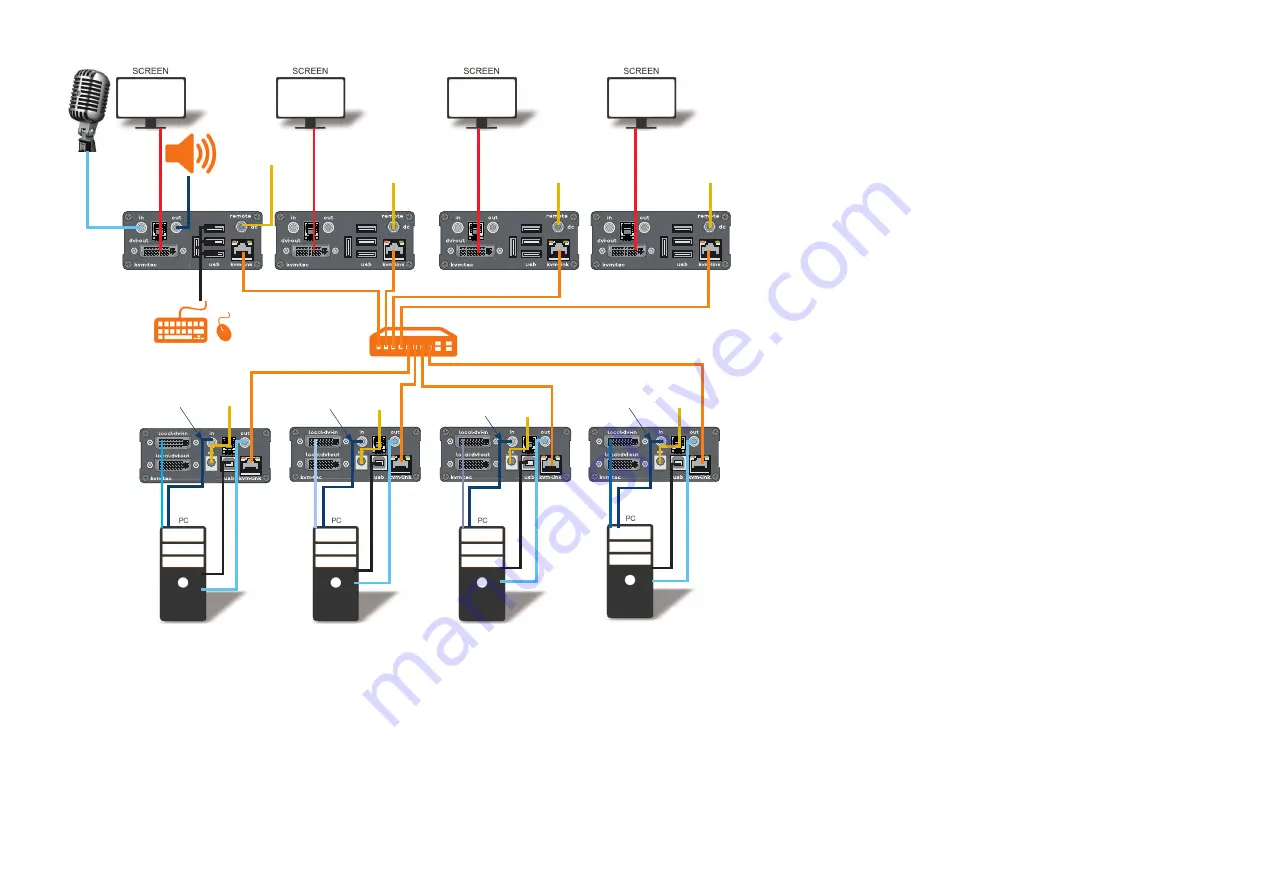
Quick Installation
mouse glide&switch
local / CPU – remote/ CON
1. Connect the MX CON/Remote and MX Local Units to the supplied 12V 1A power supply.
2. Now connect the USB cables to a USB jack on your PCs and connect the other ends of the USB
cables to the CPU/Local Units Connect the Keyboards and mouse to the CON/Remote Units.
3. Connect the MX CPU/Local and the CON/Remote Unit with several network cables to the
switch.
4. Connect the DVI cables from the PCs to the DVI/in jacks of the MX Local devices and connect
the MX Remote devices to the DVI cables of the monitors.
5. Then connect to the PCs audio-out with multiple audio cables to Local Audio in. Then connect
the speaker via the audio cables Remote Audio/out
6. Almost there! Now use multiple audio cables to connect Local Audio/out to PC´s Audio/in and
Remote Audio/into the audio cables to the microphones.
MUCH FUN - your mouse glide&switch is now ready and you can now work quite smoothly!