

Congratulations!
You have purchased the most
reliable satellite TV antenna system available today.
Refer to this handy guide for basic operation and
troubleshooting information.
TracVision Serial Number
LF, In-motion
SF, Stationary
(use only when parked)
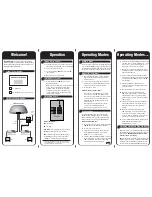
Satellite Receiver 1
RF2
TV 1
Data/Power
Vehicle
Power
12 VDC
Switchplate
Satellite Receiver 2
TV 2
TracVision Antenna
RF1
Low-speed Data
(optional)
(DIRECTV
®
only)
1.
Park your vehicle in an area with a clear view of
the southern sky, away from trees or tall buildings.
2.
Turn on your receiver and TV.
3.
Set the switchplate’s POWER switch to the ON
(up) position.
4.
Wait 1 minute for system startup.
1.
Set the switchplate’s POWER switch to the
OFF (down) position.
Note:
If you are parked, have a good satellite TV
picture, and do not need to switch between
satellites,* you may turn off the TracVision
antenna to conserve power. As long as the
vehicle remains parked, the antenna willl stay
locked onto the satellite.
Status Light
OFF
- Initializing
ON
- Tracking
Slow Flash
- Searching
(1-2 times per second)
Fast Flash
- Error
(3-4 times per second)
Note:
The Status light and SAT SELECT button
are disabled when the system is connected to
a DIRECTV
®
receiver’s low-speed data port.
Status Light Indicators
ON
OFF
If your system is connected to the low-speed data port
of a compatible DIRECTV receiver, the antenna will find
the DIRECTV 101 satellite automatically. Simply wait
for the selected channel to appear on the TV screen.
1.
When the antenna finds a satellite, the Status
light stops flashing and stays on. Check for a
picture on the TV.
2.
If no picture appears, press the SAT SELECT
button once. The Status light flashes while the
antenna searches for a different satellite.
3.
Repeat steps 1 and 2.
When Should I Use Manual Mode?
• When you’re using a DIRECTV receiver that
doesn’t have an enabled low-speed data port.
•
When you’re using a DIRECTV receiver, but want
to receive channels on a satellite other than
DIRECTV 101
(low-speed data port must be
disconnected).
•
When you’re using a DISH receiver, but the
system is not set to DISH 500 mode
•
When you’re using an ExpressVu receiver
5.
Return to the “Point Dish/Signal Strength” screen
and, from there, go to the “Check Switch” screen.
Select “Test” to run the Check Switch test. The
test will take a few minutes to complete.
6.
Once the test is complete, return to the “Point
Dish/Signal Strength” screen and select satellite
119 and transponder 11.
7.
Press and hold the switchplate’s SAT SELECT
button (up) as you turn on the TracVision system
(set the switchplate’s POWER switch to the ON
(up) position).
8.
Continue holding SAT SELECT for 10-15
seconds, or until the Status light flashes, then
release the button.
9.
Wait one minute for the antenna to initialize.
10.
When the switchplate’s Status Light fully
illuminates (stops flashing), check the signal
strength meter on the TV. If the meter turns
green and shows “Locked - Echostar 119 West”,
skip to step 13.
11.
If the meter is still red, press the switchplate’s
SAT SELECT button for 1 second. When you
release the button, the Status Light starts
flashing.
12.
When the switchplate’s Status Light fully
illuminates again, check the signal strength
meter. If the meter turns green and shows
“Locked - Echostar 119 West”, proceed to step
13. If the meter stays red, repeat step 11.
13.
Press and hold the SAT SELECT button until the
Status Light flashes quickly 5 times
(approximately 5 seconds).
The DISH 500 mode allows you to use the SAT
SELECT button to switch between the two DISH
Network satellites (119 and 110). Follow the steps
below to set up your system for DISH 500 mode.
Setting Up DISH 500 Mode:
1.
Turn off the TracVision system (set the switchplate’s
POWER switch to the OFF (down) position).
2.
Turn on your receiver and TV.
3.
Using the receiver’s remote control, go to the
“Point Dish/Signal Strength” screen
(press
MENU, 6, 1, 1 – on most models).
4.
From the “Point Dish/Signal Strength” screen, go
to the “Peak Angles” screen and select the “DISH
300” or “Alternate” dish system. This setting
will not affect your TV programming.
When the system is set to DISH 500 mode, press the
SAT SELECT button to switch between the 119 and
110 satellites.
IMPORTANT! Only switch satellites
when the vehicle is stationary.
Note:
If you turn off the system, move the vehicle, then
turn the system back on, the antenna may not be able
to find the correct satellite upon startup. In this case,
you will need to repeat the DISH 500 Setup process.
TracVision System Diagram
Product Serial Number
Turning On the System
Switchplate Basics
Turning Off the System
DIRECTV Mode
Manual (All Sats) Mode
Operating Modes
(
cont.)
Operating Modes
Operation
Welcome!
Switching Satellites in DISH 500 Mode
DISH 500 Mode
*
DISH 500 and DIRECTV multiple satellite setups require
switching satellites, so if you have one of these setups,
keep the antenna turned on to watch TV.
CONT.


