background image

5. 

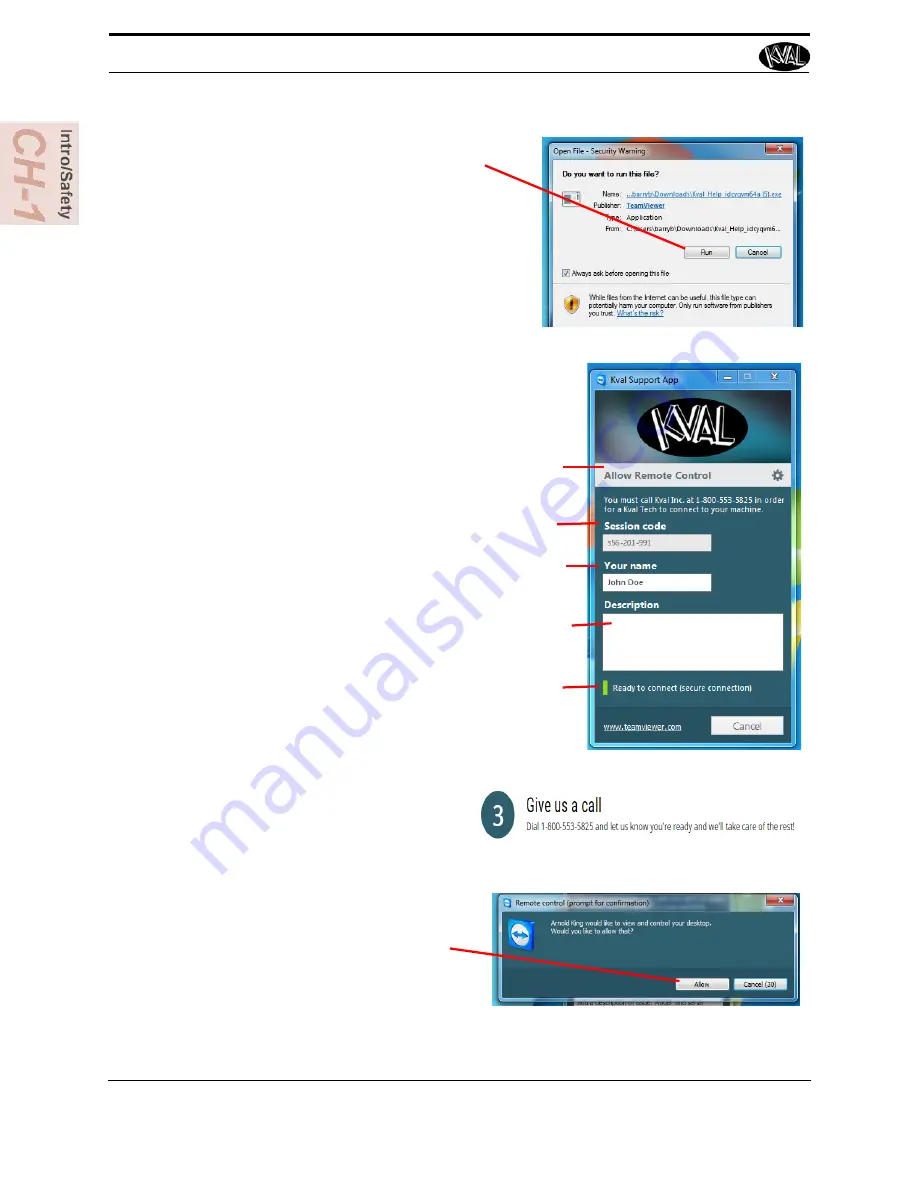
 A pop-up window is displayed. 

Accept the request to run the program.

Note: 

Security settings may differ from plant to 

plant. If issues occur, contact your IT depart-
ment.

6. 

The interface of the 

KVAL Support App

 will be dis-

played. Enter your name in the 

Your Name

 field. 

The fields are described below:

Session code: 

An internal number to track this 

machine. It is auto filled.

Allow Remote Control: 

Program is ready to allow 

technicians to access machine computer 

Your Name Field: 

Enter your name. The KVAL tech-

nician will use this field to identify this machine. 

Description: 

Enter machine Serial number and 

issue.

Indicator: 

Green indicates there is a good connec-

tion to the service center. If red, there could be an 

issue with a LAN connection. Check the connections 

in the plant. 

7. 

After the 

KVAL Support App 

is 

loaded and completed, call the 
KVAL service center(1-800-553-
5825) and have the technician con-
nect to the machine computer.

8. 

Click the 

Allow

 button to give the 

KVAL service technician permis-
sion to access the operator station. 

We are now ready to troubleshoot.

How to Download the Service Application

KVAL 990-H Service Manual

1-18

Содержание 990-H

Страница 1: ...Innovation Quality Honesty Service Manual Published 6 6 16 990 H Pre Hanging Door System 990 H Service Manual ...

Страница 2: ...dows CE is a registered trademark of Microsoft Corporation All other products are trademarks or registered trademarks of their respective holders all rights reserved Reference to these products is not intended to imply affiliation with or sponsorship of Kval Incorporated Contacting KVAL Customer Service For further information about this manual or other Kval Incorpo rated products contact the Cust...

Страница 3: ...ience with our product that is the manual the machinery the software etc What was easy or difficult to use or to learn If you could change something about the design what would it be Please email your comments and suggestions for improve ment to userexperience kvalinc com NOTE This is not a customer support email link For that please refer to the Customer Service contact information above Thank yo...

Страница 4: ...KVAL 990 H Service Manual ...

Страница 5: ...out rule of thumb 1 10 Lockout Tagout Procedure 1 11 Pre Steps Before Lockout Tagout 1 11 Lockout Tagout Power 1 11 Lockout Tagout Air Supply 1 12 Start Maintenance 1 12 Post Maintenance Steps 1 12 Zero Energy to Start Up 1 13 Getting Help from KVAL 1 15 On Line Help 1 15 Product Return Procedure 1 15 How to Download the Service Application 1 17 Download Application 1 17 Safety Sign Off Sheet 1 20...

Страница 6: ... 7 Inspect Feed Belts 3 7 Inspect Screw Drop Tubes on Six Shooter 3 7 Inspect all Photo Eyes 3 7 Inspect Limit Switches 3 8 Inspect Screw Receiver Parts 3 8 Inspect Airlines 3 9 Refill Lubricators 3 9 Grease Ball Screw Bearings 3 10 Clean Bearing Shafts 3 10 12 000 Cycle Maintenance Steps 3 11 Inspect Chains for Proper Tension 3 11 Inspect Air Cylinders 3 11 Inspect Hydraulic Lines 3 11 Inspect Ba...

Страница 7: ...oling in the Front Section 3 25 Replacing Bits in the Front Section 3 25 How to Access to Bit Assemblies 3 26 Remove and Replace the Router or Pre Drill Bits 3 26 Remove and Replace the Chisels 3 28 Remove and Replace the Screwdriver Bits 3 28 Replacing Tooling in the Back Section 3 30 Changing the Bore Drill 3 30 Changing the Bolt Drill 3 31 Collet Torque Values 3 32 Types of Torque Tool Heads 3 ...

Страница 8: ... 16 Adjusting Cylinder Extend Speed 4 17 Adjusting Cylinder Retraction Speed 4 17 Using Sensors to Trouble Shoot 4 18 Location of Sensors on 990 H 4 18 Troubleshooting Electrical Problems 4 19 If the Power Stops During Normal Operation 4 19 Troubleshooting with the Status Light Panel 4 21 Network System Overview 4 25 Connections to Servo Drives 4 26 High Frequency Panel Node Connections 4 27 Frame...

Страница 9: ...ion page 1 6 Lockout Tagout IMPORTANT Procedure to Lockout Tagout equipment when it is being serviced page 1 11 Zero Energy to Start Up Procedure to power up your machine for the first time page 1 13 Getting Help from KVAL This section describes the method to contact the KVAL service center for help The section includes how to get information from the specification plate tor provide to KVAL servic...

Страница 10: ...be mounted without pins Pre drills two or three hinge pockets in both door and jamb Applies two or three hinges to door and jamb with the hinge separated Number 1 2 3 hinge router assemblies are movable on THK linear ball rail to accommo date 2040mm 80 31 2240mm 88 188 2340mm 92 126 doors The assemblies will be cylinder operated and will index with 4 position stop turrets that will be manually rev...

Страница 11: ...nd bottom for drilling differ ent diameter holes Tooling to be provided by customer 50mm 1 968 35mm 1 39 22mm 866 Tooling shank will be diameter Bolt plate router will be a 1hp 3ph Hi Frequency motor 230 380v Bolt drill will be 3hp 3phase Air Blow Off on out feed end Feed direction will be left to right looking from operator s side Machine will be capable of routing hinge pockets in the door and j...

Страница 12: ...d to the center screw driving head to tem porarily over ride automatic door out feed Allows screws to be added or replaced with a hand held screwdriver Programmable Hinge Loca tions This option upgrades the standard air cylinder shift system for hinge positions along the door edge The cylinders and three position limit is replaced with servo motors ball screws and software to adjust the outer hing...

Страница 13: ...ut ing sequence and fastening of square hinges Price includes replacing x y z motion air cylinders on each of the hinge router head with ball screws and AC servo motor 9 total as well as corner square chisel assemblies The servo motor sequencing will add approximately 3 4 seconds to all hinge sequences including standard radius hinges Adding corner squaring will add approxi mately 6 seconds more 1...

Страница 14: ...f Labels In addition to the nameplate KVAL machines may have other warning labels or decals that pro vide safety information to operators Safety labels should be clearly visible to the operator and must be replaced if missing damaged or illegible There are three types of warning labels or decals DANGER means if the danger is not avoided it will cause death or serious injury WARNING means if the wa...

Страница 15: ...ne is at zero state Never clean the machine while it is running Never walk away from the machine while it is running When the Machine is ON The compressed air system connected to this machine should have a three way air valve for shut off and pressure relief All cylinders on machine are under high pressure and can be very dangerous when activated Before performing any mainte nance or repairs on th...

Страница 16: ...any repairs or mainte nance lockout and tagout must be installed at all locations All maintenance and repairs to electrical circuitry should only be per formed by a qualified electrician Still has power in OFF position Electrical Prior to performing any maintenance repairs cleaning or when clearing jammed debris you must disconnect tag out or lock out the electrical and air pressure systems This s...

Страница 17: ...s machine is in violation of any health or safety regulation STOP pro duction It is your responsibility to immediately protect your employees against any such hazard Additional detailed safety guidelines are included in the operating instructions of this manual KVAL will be pleased to review with you any questions you may have regarding the safe operation of this machine Follow Your Company s Safe...

Страница 18: ...nd tag on each disconnect Only each operator may remove their own lock and tag Important When many people are all working on the same machine you will need a multiple lockout device such as the one shown here Follow the P R O P E R lockout rule of thumb P Process shutdown R Recognize energy type electrical pneumatic mechanical etc O OFF Shut off all power sources and isolating devices P Place lock...

Страница 19: ...ring tension weight shifts etc 2 Inform all affected personnel of the eminent shutdown and the duration of the shutdown 3 Obtain locks keys and tags from your employer s lockout center Lockout Tagout Power 4 Turn off machine See Chapter 2 for power down and power up procedures 5 Turn the disconnect switches on ALL electrical and frequency panels to the OFF position Then push the red tab to pop it ...

Страница 20: ...e or repairs may started Post Maintenance Steps 9 After maintenance is completed the person performing the work must ensure all tools spare parts test equipment etc are completely removed and that all guards and safety devices are installed 10 Before removing the locks and tags the person who attached them shall inspect the equipment to ensure that the machine will not be put in an unsafe conditio...

Страница 21: ...when energy is restored Remove Locks Each operator must remove his or her own lock and tag This will ensure that all oper ators are in a safe place when the equipment is started Perform Visual Checks If the equipment is too large to see all around it station personnel around the area and sound the personnel alarm before starting the equipment If your operation is more complex your company s compre...

Страница 22: ...ey to your lock Proper lockout tagout can save lives limbs and money Help make your work environment safe for you and your fellow workers Be sure to follow the P R O P E R lockout tagout procedures and that those around you do also Close the Cage Gate Verify all cage gates are securely closed Ensure all safety protocols are in effect ...

Страница 23: ...hursday 6 30 AM to 1 30 PM Pacific Standard Time Friday On Line Help On machines with a Beckhoff PLC and an internet connection our service team are able to con nect run and troubleshoot your machine Ask about this procedure when calling are service team Product Return Procedure If you ve contacted Kval for help and it is determined that a return is necessary use the procedure below to return the ...

Страница 24: ...dified and how With what equipment is the unit interfaced What was the application What was the system environment temperature spacing contaminants etc 3 Call Kval customer support for a Return Material Authorization RMA When you call Have the packing slip or invoice numbers available Have the documented reason for return available 4 Send the merchandise back to Kval Make sure the item s you are r...

Страница 25: ...2 At the KVAL website select the Support tab Follow the instruc tions on the Support web page 3 Click the Download button to download the application that allows the KVAL technician to have access to the operator sta tion 4 After the download is com pleted double click the program icon Note Web browsers have different methods of downloading programs Below are samples of i e Explorer and Google web...

Страница 26: ... Field Enter your name The KVAL tech nician will use this field to identify this machine Description Enter machine Serial number and issue Indicator Green indicates there is a good connec tion to the service center If red there could be an issue with a LAN connection Check the connections in the plant 7 After the KVAL Support App is loaded and completed call the KVAL service center 1 800 553 5825 ...

Страница 27: ...How to Download the Service Application 1 19 KVAL 990 H Service Manual Page Intentionally Left Blank ...

Страница 28: ...w my company s safety procedures I have read and understand these guidelines Machine Safety Concerns I have been given a tour of the machine and understand all the safety labels E Stops and the actions to take in case of an emergency I will make sure all guards are in place before operation I will turn off the compressed air before loading hardware staples screws etc I will turn off the electrical...

Страница 29: ...Safety Sign Off Sheet 1 21 KVAL 990 H Service Manual ...

Страница 30: ...ne With the controller KVAL can remotely help troubleshoot your machine Chapter 2 at a Glance Section Name Summary Page IT Administration This chapter describes the basic parts of the operation of the PLC in the machine Such as About the PLC Connections on the PLC Backing up the Computer About Remote Connection to KVAL Service page 2 2 Network System Overview Describes servo drive and Node Locatio...

Страница 31: ...o contains internal main memory The computer has a removable Compact Flash card from which it boots The controller uses a Windows 7 oper ating system with TwinCAT 2 automation software to create the PLC and Motion Control method Interface modules include A smart power supply to connect to EtherCat terminals This supply contains a LCD to display system and user messages A DVI USB module to connect ...

Страница 32: ...estions occur contact our service team at 800 553 5825 or at www kvalinc com About Remote Connection to KVAL Service Remote access is a powerful tool to help fix issues that occur with the 990 H machine With the remote access our KVAL service technician is able to observe your user screen in real time read and adjust programming code For 990 H access a separate computer must have Beckhoff soft war...

Страница 33: ... The PLC is located in the Main Elec trical Panel From the PLC connections are made to coupler interfaces located near the sections they control See your machine s schematic package for detailed wiring information Tip Lights should be blinking at these locations If no light is observed there could be a bad wire or component The next sections has general information on locations of the nodes on the...

Страница 34: ...tailed wiring information see your machine s electrical drawings 24 VDC Input Ether CAT Output Ether CAT Input From PLC High Voltage Input Servo Drive 1 2 High Voltage Outputs Servo Drive 2 2 High Voltage Outputs Servo Drive 3 2 High Voltage Outputs Servo Drive 4 2 High Voltage Outputs Servo Drive 5 2 High Voltage Outputs FIGURE 2 2 Servo Drives ...

Страница 35: ...nel In summary this node contains inputs and outputs for VFD s the OK for hinge and plate routers hinge P2P and door width outputs to the stacker For detailed wiring information see your machine s electrical drawings Coupler PLC Interface 4 7 2 1 6 5 8 3 Inputs Outputs Ether CAT Output To E Stop Circuitry Ether CAT Input From Frame Node FIGURE 2 3 High Frequency Node ...

Страница 36: ...nd control of door through machine For detailed wiring information see your machine s electrical drawings Back Section Node The Back Section Node is located on the back section of the machine This node includes back section related inputs and outputs including back section servos face plate boring and door widths For detailed wiring information see your machine s electrical draw ings 24 VDC PS 1 a...

Страница 37: ...e Six Shooter assembies These nodes include Six Shooter hop per and screw driver related inputs and outputs For general information refer to Figure 2 5 For detailed wiring information see your machine s electri cal drawings Screw Driver Node 1 Screw Driver Node 2 Screw Driver Node 3 Outputs 1 1 2 1 2 3 3 2 Inputs FIGURE 2 5 Screw Driver Nodes ...

Страница 38: ...Network System Overview 2 9 KVAL 990 H Service Manual ...

Страница 39: ...chine cycle times and describes the suggested maintenance steps to perform 300 Cycles 600 Cycles 3 000 Cycles 12 000 Cycles 72 000 Cycles page 3 2 Tool Changing Schedule Describes the suggested time frame to change the tools in the machine page 3 14 Lubrication Requirements This section describes the lubrication requirements for the machine including types of lube to use This section includes Line...

Страница 40: ...o performing any maintenance repairs cleaning or when clearing jammed debris you must disconnect tagout or lockout the electrical and air pressure systems This should be done in accor dance with applicable state and or federal code requirements To view a video of the maintenance process visit the KVAL website Select the Video Tab to view videos http www kvalinc com 300 Cycles Clean Use pressured a...

Страница 41: ...th clean dry cloth 12 000 Cycles Inspect Inspect chains for proper tension or damage Inspect Inspect all air cylinders for air leaks Replace if seal is leaking Inspect Inspect hydraulic lines for loose fittings leaks and cracks Inspect Inspect ball rail shafts for pitting or abrasions Lubricate Clean and lubricate all slides and cylinder rods with dry silicone spray Lubricate Lubricate all bearing...

Страница 42: ...achine Use pressured air to blow off dust and debris on entire machine Use a clean rag to clean areas not affected by pressurized air Also blow out any dust collection units Check vertical bearings for loose screws Loose screws could cause bearing damage Front Section Underneath Car riage Heads Jamb Clamp area High Dust Accumulation Areas Lock Bore Area build up can occur and stop Bolt drill from ...

Страница 43: ... PSI located on the label Adjust only if Trained in Maintenance Inspect Air Filter Water Traps Empty trap if necessary Slide locking switch down to unlock twist trap to remove Reverse action when installing trap Inspect Tooling Inspect the Tooling for wear Drill Bits Cutting Tools Screw Driver Bits See Replacing Tooling in the Front Section on page 3 25 and see Replacing Tooling in the Back Sectio...

Страница 44: ...e the input to the screw drop hoses Provides an easier screw drop Do not over spray oil Empty Dust Collection Units Check and empty any dust collection units Clean any dust filters Dust collection systems vary from machine to machine Follow manufacturers directions to empty dust collection units Filters Dust Collection Containers FIGURE 3 6 Typical Dust Collection Unit ...

Страница 45: ...or looseness A rule of thumb is to pull belt if belt moves too freely then replace belt Belts can become slick from use lesson ing traction on door Check belts for slickness or door slippage Inspect Screw Drop Tubes on Six Shooter Inspect screw drop tubes for kinks cracks wear from rubbing Ensure tube clamps are tight Inspect all Photo Eyes Inspect all photo eyes secure and tight Check Connection ...

Страница 46: ... sound when moved to the extreme Note Depending on the model of limit switch the amount of pre travel amount of movement from the arms resting position is either 5 or 20 degrees before the limit switch actuates Inspect Screw Receiver Parts Inspect screw receiver parts on six shooters for cracks or breaks Inspect 1 Screw Receiver 2 Spring 3 Split Shell 4 Steel Ring 5 Rubber Ring 6 Steel Ring Replac...

Страница 47: ...sem blies air valves and hoses Check from source to end assembly Check Hoses for kinks and rubbing manifold connections and Air Cylinder connections Refill Lubricators Ensure Air is turned off Refill all lubricators Replace fluid if milky or discolored Use ab ISO 32 stan dard hydraulic oil KVAL PN SYS LUBEG Slide locking switch down twist bowl and remove Refill bowl Reverse action when installing ...

Страница 48: ...Grease ball screw bearings if applicable For a table of lubrication types to use Lubrication Schedule For locations to lubricate See Ball Screws If Applicable Clean Bearing Shafts Clean all bearing shafts with clean dry cloth Spray shaft with silicone oil and clean build up grime and dirt ...

Страница 49: ...ver time of use Check for chain stiffness Stiff chains do not provide a tight fit over the gears Inspect Air Cylinders Inspect all air cylinders for air leaks Replace the cylinder if seal is leaking Symptoms include a cylinder not extracting or retracting to the limits Cylinders not holding their position Inspect Hydraulic Lines Inspect hydraulic lines for loose fittings leaks and cracks Inspect h...

Страница 50: ... pitting or abrasions Example of a Pitted Ball Rail Clean and Lubricate Slides Cylinder Rods and Bearing Shafts Clean and lubricate all slides and cylinder rods with dry silicone spray Clean inside Hopper Clean inside hopper with dry sili cone oil and a 3M ScotchBrite pad or equivalent Wipe dry with a clean dry rag ...

Страница 51: ...nsition with a door feeding into and out of machine Feed door in and out to verify smooth tran sition is repeatable Electrical Check all connections in each node box and electrical panel Wires may become loose due to vibration Check contactors for wear Computer Backup Backup computer software Wash Filter and Lubricator Bowls Wash filter and lubricator bowls with soapy water Slide lock down to unlo...

Страница 52: ...ammed debris you must disconnect tagout or lockout the electrical and air pressure systems This should be done in accor dance with applicable state and or federal code requirements Hinge Router and Pre Drill Tooling Hinge Router Bit 1500 cycles Chisels Inserts 1500 cycles Chip Out Block 10 000 20 000 cycles 9 64 Pre Drill Bit 10 000 20 000 cycles 1 8 Pre Drill Bit 10 000 20 000 cycles Lock Section...

Страница 53: ...oter Tooling Screwdriver Bits 1 500 cycles Steel Rings 7 500 cycles Rubber Rings 7 500 cycles Screw Receivers 30 000 cycles Split Shells 30 000 cycles Springs 30 000 cycles Tool Changing Schedule 3 15 KVAL 990 H Service Manual ...

Страница 54: ...conditions are changed timing accuracy or damage may occur during the machine process Do not adjust air PSI above or below factory settings Do not adjust any and all flow controls from factory settings Do not remove shim stock Do not Change or Alter any safety assemblies E Stops Gate Locks etc Do not Change programs in PLC s or PC s Do not Alter Electrical Components ...

Страница 55: ...Notes ...

Страница 56: ... Grease KVAL P N Lube EP 2 Pillow Block Bearing Flange Block Bearing Ball Screw Every 80 Hours of Machine Operation Air Line Lubricator One drop of oil every 2 or 3 cycles Check the lines every week to two weeks Note Some CNC Machines drop every 5 10 cycles Either lubricant listed below is approved to use KVAL P N SYSLUBG Chevron AW Hydraulic Oil 32 G C lubricants light AW R O Mobile DTE 24 Shell ...

Страница 57: ...ems on the machine Linear Bearings Flange Bearing and Pillow Blocks If the bearing is equipped with a grease fitting Zerk Fitting it should receive 1 Gram one pump from grease gun of Dura Lith Grease KVAL P N Lube EP 2 every 250 hours of operation Note Bearings without grease fittings have been pre lubricated at the factory and do not require further lubrication Zerk Fittings Zerk Fitting Location...

Страница 58: ...points Ball Nut Ball Screw End Bearing End Bearing FIGURE 3 8 Example of a Typical Ball Screw Important Make sure to clean excess grease to avoid contact with feed belts clamping areas or the door Description of Air Input System The air input system takes in shop air and supplies clean dry air CDA and lubricated air to the machine The clean dry air is diverted to blow off nozzles The lubricator lo...

Страница 59: ...good practice to check your machine lubricator to insure that it is putting the proper dose of oil in the air lines Usually 1 drop of oil every other cycle is a good rule of thumb The approved list of oil for lubricators is as fol lows KVAL P N SYSLUBG Chevron AW Hydraulic Oil 32 G C lubricants light AW R O Mobile DTE 24 Shell Tellus32 Gulf Harmony 32 To prime the lubricator find an air line on th...

Страница 60: ...0 H 3 21 KVAL 990 H Service Manual Lubrication Points on the 990 H Feed System Lube Points Use Lube EP2 or similar to Lubricate Chains Lubricate feed sys tem hex shaft with Silicon Spray FIGURE 3 10 Feed System Lubrication Points ...

Страница 61: ...Lubrication Points on the 990 H KVAL 990 H Service Manual 3 22 Screw Driver Lube Points FIGURE 3 11 Screw Drive Lubrication Points ...

Страница 62: ...Lubrication Points on the 990 H 3 23 KVAL 990 H Service Manual Back Section Lube Points Back View Front View Back View 2 Bottom View FIGURE 3 12 ...

Страница 63: ...Lubrication Points on the 990 H KVAL 990 H Service Manual 3 24 Head Lube Points 1 1 Assemblies shown transparent Bottom Top Back FIGURE 3 13 ...

Страница 64: ...o do so can result in damage to equipment and or serious injury to person nel Caution Replacing Bits in the Front Section This section describes the steps to change the pre drill bits router bits and chisels in the heads on the front section shows the locations of the replaceable parts inside the heads Drill Motor Chisels Upperand Lower Right Router Motor Chisels Upper and Lower Left FIGURE 3 14 L...

Страница 65: ...access the bit assemblies Remove and Replace the Router or Pre Drill Bits Caution Before performing this process turn off all power to the machine Follow proper lockout tagout procedures as detailed in the safety section of Chapter 1 of this manual 1 Use a 17 mm shaft wrench and a 3 8 collet wrench to remove the bit on the pre drill or router assemblies See Figure below 3 8 Collet Wrench PN PERER1...

Страница 66: ... 5 Before tightening the collet assembly adjust the bit depth Set the router bit to 1 3 4 and the drill bit to 2 0 from the base of the collet nut to the tip of the bit If available use Bit Depth Gauge PN 432 C to set the depth 6 Lightly tighten and torque to correct value For torque values Collet Torque Values Drill Depth Set to 2 0 Router Depth Set to 1 3 4 1 3 4 2 0 Bit Depth Gauge PN432C FIGUR...

Страница 67: ...the orientation of the chisel FIGURE 3 18 Replacing the Chisels 5 Slide in the new chisels 6 Tighten bolts back and forth until the bracket is tight 7 Inspect and verify the work Clean the work area 8 If maintenance is completed replace dust cover and tighten bolts Remove and Replace the Screwdriver Bits To replace screwdriver bits on the Six Shooter heads follow the instructions below 1 Turn off ...

Страница 68: ...ver bit push the bit holder see images back toward the Six Shooter assembly and hold pull bit out of holder Slide Back Bit Holder 7 To insert screwdriver bit push bit holder back toward Six Shooter assembly and hold while inserting new bit Release holder to secure bit 8 Move Six Shooter assembly back toward machine and pull the back slide toward you then move assembly away from machine to restore ...

Страница 69: ...rench to remove the bit on the pre drill or router assemblies See photo When loosening the collet it may tighten up crack again and con tinue 3 Inspect and clean collet assembly 4 Insert the new bit into the assem bly 5 Before tightening the collet assembly adjust the bit depth Bottom out the bit and pull the bit up about 1 4 6 Lightly tighten and torque to correct value For torque values Collet T...

Страница 70: ... loosening the collet it may tighten up crack again and continue 2 Inspect and clean collet assembly 3 Insert the new bit into the assembly 4 Before tightening the collet assembly adjust the bit depth Bottom out the bit and pull the bit up about 1 4 5 Lightly tighten and torque to correct value For torque values Collet Torque Values Note Make sure the arbor is not bottomed out in the back of the m...

Страница 71: ... Torque values Collet Collet Nut Type Collet Inner Dia Over 1 16 Collet Inner Dia Under 1 16 ER16 Slotted Hex 42 ft lbs 30 ft lbs ER20 Slotted Hex 59 ft lbs 24 ft lbs ER25 Slotted 77 ft lbs 77 ft lbs ER25 Mini Nut 25 ft lbs 25 ft lbs ER32 Slotted 100 ft lbs 100 ft lbs ER40 Slotted 130 ft lbs 130 ft lbs Types of Torque Tool Heads Tip Never use a torque wrench to loosen bolts or nuts Tip Always set ...

Страница 72: ...Collet Torque Values 3 33 KVAL 990 H Service Manual ...

Страница 73: ...otion Control This section contains basic information on the operation of motion control circuits Includes dia grams of the control circuits page 4 2 Troubleshooting Basics This section includes basic troubleshooting infor mation Includes analyzing sub s to designate a starting point for troubleshooting page 4 4 About Contactor Control Describes a typical contactor control circuit page 4 7 About V...

Страница 74: ...oad from one fixed position to another fixed position at a constant speed and along one line axis X Y or Z A typical point to point would be a drill with a fixed depth The drill is either retracted or extended using a pneumatic cylinder Typically the drill s travel is limited by physical stops Incremental Incremental motion control is used when the load is required to be moved with high accuracy t...

Страница 75: ... Translates entered information into a form the positioning system can understand Listens to the machine s other subsystems waiting for the OK to move command Sends the positioning instructions to the positioning system Listens to the positioning system for position status if there is a feedback loop Tells the machine s other subsystems when the move process is completed Examples A PLC or a dedica...

Страница 76: ...f specification Note See Table 4 1 on page 4 5 for sequence and subsystem information Verify Verify or analyze the subsystem assembly that is responsible for the issue For example How is the subsystem supposed to work What is keeping the subsystem from working Note See Analyze the Sub Systems on page 4 5 for information on verifying and analyzing subsystems Before you Adjust Sometimes simple probl...

Страница 77: ... Power 4 Unclamp the Door Door Clamp 5 Move Door Out Feed System 6 Wait for Next Door Feed System Basic Troubleshooting Steps Determine Where The Sequence Step Where the Failure Occurs What was the Machine Trying to Do What Was the Machine Trying to Do Next Check the Sequences in the Table Below How is the Broken Section Suppose to Work What is Keeping the Broken Section From Working What Part of ...

Страница 78: ...tivated input is lit Some touch screens have inputs status also 3 Common Position Feedback failures Photo Eye a Bad element or bad cable b Eyes not set to correct height c Lighting from ceiling may be interfering with sensor Limit Switch Stuck or failure Wiring Broken worn insulation PLC Bad input port Bad Output Relay may be stuck Air Solenoid Valve May be stuck or not working 4 Check the Positio...

Страница 79: ...may cause personnel injury or death Troubleshooting checks must be performed by a Qualified Electrical Technician PLC Output Fuse s Line Voltage Power Contactor Control Coil Input Power Input Power Output Control Circuit Common ON Should measure Control Voltage 120 VAC here Should measure Line Voltage here Should measure Line Voltage here Line Voltage here Should measure Relay 120 VAC DC Should me...

Страница 80: ... a trigger to check the circuit See Troubleshooting with the Status Light Panel on page 4 21 1 Open the Main Electrical Cabinet to find the Contactor Thermal Overload Assem bly 2 Press each Green Reset button on the Thermal Overload An audible click will be heard on the tripped circuit Take note of tripped circuit 3 Once the overloads are reset verify LED s are on 4 Rerun the machine and verify th...

Страница 81: ...oting checks must be performed by a Qualified Electrical Technician Common Motor Drive Control PLC Output Fuse s Line Voltage Motor Power Motor Power Input Output Power Control Circuit Common ON Measure Control Voltage 24 VDC here Measure Line Voltage here Measure Line Voltage here ON Drive STF Forward RL STR Revers 2 SD COMMON OFF OFF OFF Run 300 Run Light should be ON Displays the Motor Frequenc...

Страница 82: ...iagram see Figure 4 4 on page 4 9 VFD models vary in KVAL machines depending on where it is used voltage requirements and type of PLC used This is a general view on the VFD See the machine s Electrical Print for detailed information Line Voltage IN Converted Signal OUT to Motor Operation Panel Access to manual operation VFD This panel can be used for trouble shooting purposes Fault Errors will be ...

Страница 83: ... lit To reset a VFD 1 Push lighted button to reset the indicated motor b If the button light turns off continue with production c If the button stays lit identify the motor by way of the label on the button turn off that function at the switch panel Check the corresponding output on the PLC output If the output is on it will not let the motor reset Dis connect the output wire and verify that the m...

Страница 84: ... Air Cylinder Common Control Circuit ON Measure 24 VDC here Control Voltage Should have High Pressure air here Cylinder Control Control Coil Input Air Input Air Output Valve Should have High Pressure air on Activated Output Schematic Drawing of Pneumatic Circuit Note Pre 2006 machines may not contain the 24 Volt relay 120 Vac is directly fed into the Control Coil Check the input circuitry to the C...

Страница 85: ... 24V from PLC to open a port FIGURE 4 8 Typical Pneumatic Assembly About the Coil Solenoid The Solenoids are connected to the top of the manifold Labels indicating their function and PLC connections are attached to the solenoid body Use this information to troubleshoot system if nec essary Solenoid type will vary with machine application Common controls include an operational LED and Manual operat...

Страница 86: ...delivered to port B FIGURE 4 10 Cross section of Air Cylinder How the Pneumatic System Works The Pneumatic system consists of a brain PLC an action Positioning System and a result Moving the Load For a generalized representative this section describes the process to move a router to the extend and the retract position with a double valve Extend Process If PLC determines the conditions are right to...

Страница 87: ... V Applied Router Assembly Load Position Feed Back Air In Control Valve Extend Sensor Activated Air Pressure Extends Cylinder and Router Assembly EXTENDED Retract Process If the PLC determines the conditions are right to retract the Router 1 The Control Valve directs compressed air to the retract port of the Cylinder 2 The Cylinder and Router retract deactivating the Extend Sensor 3 When the Cylin...

Страница 88: ...ice about Adjusting Cylinder Speed Do not adjust the cylinders to speed up production The air cylinder timing is part of a well tuned system of electronics programming and mechanics Adjustment of the cylinders for speed can cause unsatisfactory results in feed and out feed problems far marks in the corners of hinge pockets and flipping screws in Hoppers However sometimes machine settling mechanics...

Страница 89: ...L 990 H Service Manual Adjusting Cylinder Extend Speed Adjusting Cylinder Retraction Speed Tip If Installing a new flow control assembly shut down the flow control and back out 4 to 5 turns this position is a good starting point for kine adjust ...

Страница 90: ... 0 VDC Check the output voltages of the sensors in inactive mode The voltage should effec tively equal 24 VDC The distance from an eye to the door should be in range Typically the range should be 3 4 to 7 8 from the top of all eyes to the door Location of Sensors on 990 H Location and operation of sensors can be viewed by way of the Diagnostic Screen Press the Diagnostics and 990 H I O buttons to ...

Страница 91: ...s have signals on the computer that light up when the input or out put functions are energized respectively Computer controlled as well as non computer controlled machines have white 120V control power terminal strips This will indicate power supply from the respective circuits PLC controllers also have lights on them for the input and output functions You can easily find out which circuits are fa...

Страница 92: ...ck for Tripped Circuits 1 Remove lock and tag outs on the main power sources 2 Manually close disconnect sensors and energize the control circuit or transformer with its respective sensor Check the Status Light Panel If all lights are observed there are no overloads or emergency stops tripped Note Most electrical problems are related to mechanical malfunction e g stuck motors jammed chain blocked ...

Страница 93: ...ber 2 Overload Relay Amber 3 E Stop Amber 4 Stop Amber 5 Start Amber 6 24VDC Green If one or more lights are OFF follow the process below to isolate the cause NOTE Be sure to proceed down the table starting with the CONTROL POWER light STEP 1 Control Power Amber If light is OFF go to item A on page 4 22 STEP 2 Overload Relay Amber If light is OFF go to item B on page 4 23 STEP 3 E Stop Amber If li...

Страница 94: ...the 120 VAC Terminal Strip 7 If there is no power between 1 and 2 check the secondary side of the trans former a Check between X1 and X2 If no power is measured it is a bad transformer b If there is power at X1 and X2 check the other side of the fuse If now power replace the fuse 2 Is the Disconnect Switch on the main electrical cabinet set to ON Switch 3 Is there 208 220 440 or 575 VAC to the top...

Страница 95: ...eck if any E Stop buttons are pulled out NOTE Location and quantity of E Stop buttons varies depending on customer need Typical locations for E Stop buttons are near the Rear Access Gate and near the Tool Changer Access Gate Stop Light OFF Check for 120 VAC between 2 and 4 If there is voltage press the Start button If no voltage check the Stop button to make sure it is all the way out and not stuc...

Страница 96: ...nput side for 120 VAC If no 120 VAC check the fuse If there is 120 VAC and no 24VDC replace the 24VDC Power Supply If there is 24VDC Reconnect the V wire to the 24VDC power supply Trace the output wire to the DC terminal block Disconnect all 24V positive wires from the DC from the DC terminal block except the output wire from the 24VDC power supply Check for 24VDC at between any DC and DC terminal...

Страница 97: ...Troubleshooting with the Status Light Panel 4 25 KVAL 990 H Service Manual ...

Страница 98: ...ce schedule 17 I internet access location of connection 2 remote connection 2 RJ45 to intranet 2 intranet as a remote access 3 RJ45 connection 2 K KVAL getting help 15 L LCD display smart power supply 2 linear bearing maintenance schedule 17 lockout and tagout Guidelines 13 lockout procedure 11 N network system overview 4 25 nodes back section 7 28 frame connections 7 28 high frequency inputs outp...

Страница 99: ... your machine to KVAL Service 3 service center contacting information 15 servo drives connections location 5 26 start light description 24 status light panel description 21 use as troubleshooting key 21 T tagout procedure 11 troubleshooting using status lights 21 TwinCAT 2 software automation software 2 U USB module 2 W Windows CE operating system about 2 Z zerk fittings 18 locations 18 zero energ...

Страница 100: ...Notes ...

Страница 101: ...Notes ...

Страница 102: ...Notes ...

Страница 103: ...Notes ...

Страница 104: ...partment Kval Incorporated 825 Petaluma Boulevard South Petaluma CA 94952 Contacting KVAL Phone and Fax In the U S and Canada call 800 553 5825 or fax 707 762 0485 Outside the U S and Canada call 707 762 7367 or fax 707 762 0485 Email service kvalinc com http www kvalinc com ...

Отзывы: