

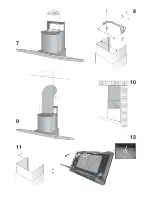

provided. Use the 2 cut-out triangles on the bracket to position it exactly along the vertical axis of the hood. Hang the
hood on the bracket (Fig. 5). Adjust the horizontal position moving the hood to the right or left so that it is aligned with
the wall units. When adjustment has been completed, without removing the hood, mark the other 4 holes to be drilled (C)
in the wall. Remove the hood and drill the holes marked (8 mm diameter). Then use the 4 screw anchors and the 4 screws
provided for final fixing.
2.
Mount the plate of the electrical system
fixing it with 2 screws (Fig. 6).
3.
Install the flange
in the device air outlet and press slightly (Fig. 7).
4.
Fixing the telescopic flues:
4a - Adjust the width of the support bracket (D) of the telescopic flue by means
of the screws (E) as shown in Fig. 8; then, by means of the screw anchors and screws (F) provided, fix the bracket to
the ceiling in such a way that it is positioned along the axis with your hood.
4b - Connect the air outlet pipe to the air vent of the hood. - Use a flexible pipe and lock it to the air vent of the hood
with a metal hose clamp - Fig. 9 (pipe and clamp are not provided). - For exhaust hoods, turn the upper flue over so that
the air exhaust grid is in the lower section (Fig. 10).
4c - Plug in the hood. Insert the extension flues setting them on the hood; extend the upper flue to the ceiling and secure
with the 2 screws (H) - Fig. 11.
INSTALLATION IN FILTERING VERSION
:
Prepare the power supply within the telescopic flues (for the electrical
connection, follow all the other instructions on the “Warning” chapter).
Fitting the charcoal filter
:
Fig. 12: Turn the glass panel gripping it from the front part of the hood. Remove the grease filter Push the catch
and turn the filter outwards Then fit the charcoal filter (Fig. 13) by inserting the two charcoal filter clips in the slots
and turning the filter towards the inside of the hood.
Fixing to the wall:
for fixing to the wall refer to the instructions for the ducting version (see points 1, 2, 3), then continue
with the instructions below.
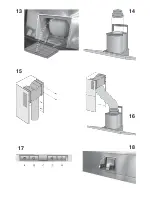
Fixing the telescopic flues:
- Adjust the width of the support bracket (D) of the telescopic flue by means of the screws
(E) as shown in Fig. 8. - Then, by means of the screw anchors and screws (F) provided, fix the bracket to the ceiling in
such a way that it is positioned along the axis with your hood. - Mount the flange on the hood in correspondence to the
air outlet point (Fig. 14). - Take the air baffle and fit a flexible pipe to it (125 mm diameter) locking it with a metal hose
clamp (pipe and clamps are not provided). Fit the air baffle to the upper flue (Fig. 15) with 4 screws.
- Connect the flexible pipe to the flange on the air vent (Fig. 16). - Plug in the hood. Insert the extension flues setting
them on the hood; extend the upper flue to the ceiling and secure with the 2 screws H (Fig. 11).
OPERATION
CONTROLS (Fig. 17)
:
Button A
= turns the lights on/off.
Button B
= turns the TIMER on/off: press once to turn the timer on, therefore, after 5 minutes, the motor cuts out (at the
same time the selected speed blinks on the display); the timer remains on if the motor speed is changed.
Display C
= - indicates the selected motor speed (from 1 to 4); - indicates Timer On when the number blinks; - indicates
Filter Alarm when the central segments is on or blinking.
Button D
= makes the motor work (at the last speed selected); pushing the button again, the speeds of the motor are
sequentially selected from 1 to 4; keeping this button pressed for about 2 seconds shuts down the motor.
Button R
= resets the grease filters or charcoal filters; when the
filter alarm
appears (i.e. when the central segment on
the display goes on), the grease filters must be cleaned (30 hours of operation); when the central segment starts blinking,
the grease filters must be cleaned and the charcoal filters replaced (120 hours of operation). Obviously, if the hood is
not a filtering model and does not have a charcoal filter, clean the grease filters both when the central segment goes on
and when it starts blinking. The filter alarm can be seen when the motor is off and for about 30 seconds. To reset the
hour counter, keep the button pressed for 2 seconds while the alarm can be seen.
Grease filters
: special attention must be given to the grease filters which must be periodically cleaned, whenever
the grease filter alarm trips. For instructions of the filter Alarm, refer to the Controls paragraph.
Wash the grease filters with neutral detergent.
Removing the grease filters :
Fig. 12: Turn the glass panel gripping it from the front part of the hood. Remove the grease filter Push the catch and
turn the filter outwards
Charcoal filters
: If using the hood in filtering version, the charcoal filters will have to be replaced periodically
when the charcoal filter alarm appears. For instructions on the filter alarm refer to the paragraph Controls.
Removing the charcoal filter :
Fig. 12: Turn the glass panel gripping it from the front part of the hood. Remove the grease filter Push the catch and
turn the filter outwards Then remove the charcoal filter (Fig. 13): Push the catch towards the inside and turn the filter
so that the 2 filter clips slip out of their seats.
Содержание KD9540.0E
Страница 6: ...1 2 3 4 5 6 ...
Страница 7: ...7 8 9 10 11 12 ...
Страница 8: ...13 16 17 14 15 18 ...


