background image

22

Technical passporT

english

steam oven rs 969

2. Dry the water tank and introduce 

it back into the slot located above the 
cavity. Clean and dry the cooking space. 

Leave the appliance door open so 

that the cooking space can cool down 
and dry completely. 

IMPORTANT NOTE: It is advisable to 

remove the water tank and empty it after a 
cooking cycle. This prevents the formation 
of bacteria and limestone inside the 
appliance. 

If the water tank has not been 

removed from the oven and a new 
cooking cycle is started, the oven 
displays the warning “DEP”. 

This warning can be cleared by 

pressing the Stop key and proceed with 
the new cooking cycle without removing 
and emptying the water tank. 

Cleaning the cooking space 

Avoid using abrasive cleaners such 

as scouring pads, steel wool, etc. as they 
can damage the surface. 

Wipe the cooking space clean using 

a damp cloth whilst the appliance is 
still warm. Finish off by drying the 
cooking space. 

For ease of cleaning, the shelf guides 

can be removed (see the following 
chapter).

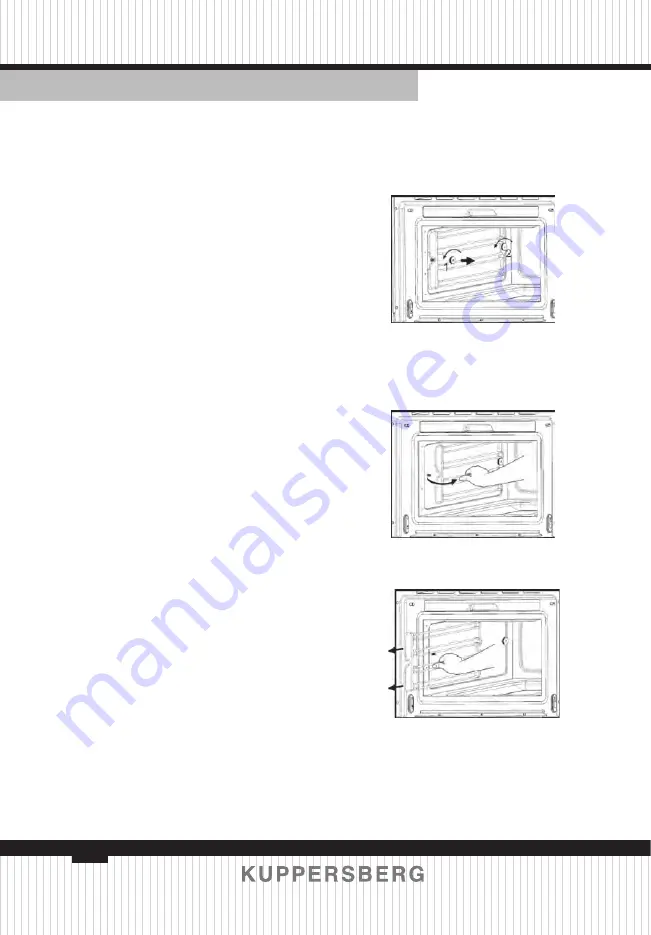
Removing the shelf guides

Unscrew and remove the knurled 

nuts 1 in the front of the shelf guides in 
an anti-clockwise direction.

Unscrew and loosen the knurled 

nuts 2 in the back of the shelf guides 

in an anti-clockwise direction. Do not 

completely remove these nuts.

Pull the shelf guides to the inside of 

the cavity and remove from the front.

To put them back, insert the shelf 

guides into the knurled nuts 2 in the 
back and position on the screws in the 
front. Screw the knurled nuts 1 and 2 in 
a clockwise direction till tight.

Содержание RS 969

Страница 1: ...Technical passporT STEAM OVENS RS 969...

Страница 2: ...6 MAINTENANCE AND INSTALLATION MANUAL 5 6 1 SAFE INSTALLATION 5 6 2 INSTALLING THE APPLIANCE 6 6 3 ELECTRICAL CONNECTION 6 6 4 TECHNICAL CHARACTERISTICS AND DRAWINGS 7 7 CONTROLLER TYPES AND USE 10 7...

Страница 3: ...dge if they are supervised by an adult or a person who is responsible for their safety Do not let children play with the appliance Keep all packaging away from children WARNING Keep children away from...

Страница 4: ...ven The cable insulation may melt Danger of short circuiting Do not lean or sit on the open oven door This may damage the oven especially in the hinge zone The door can bear a maximum weight of 8 kg T...

Страница 5: ...to human health and the environment The symbol of a rubbish container superimposed by a diagonal cross should be put on all such products to remind people of their obligation to have such items colle...

Страница 6: ...dbook Put the oven on a flat and stable surface The oven must not be installed close to any sources of heat radios or televisions During installation make sure that the power cable does not come into...

Страница 7: ...emptied and reinserted Special functions Water level A1 A5 Time setting Special functions with predefined temperatures and times C1 C5 d1 d5 Heating up Water level Time setting Special functions with...

Страница 8: ...ort English Steam oven RS 969 Specifications AC Voltage see characteristics plate Power required 1500 W Exterior dimensions W H D 595 455 472 mm Interior dimensions W H D 420 210 390 mm Oven capacity...

Страница 9: ...hnical passporT steam oven rs 969 1 Push oven completely into the cabinet and centre it 2 Open door and fasten the appliance to the cabinet using the four screws provided Insert the screws through the...

Страница 10: ...value proceed as described in the following chapters Setting the clock To set the clock proceed as follows 1 Press the Clock key The hour numbers will start to flash not necessary if your Steam oven i...

Страница 11: ...to 35 9 to 20 2 Hard water 501 to 500 26 to 35 36 to 50 21 to 28 3 Timer The timer functions like an egg timer It can be used at any time and independently of all other functions To set the Timer pro...

Страница 12: ...the oven operates at 100 C 3 To change the Temperature press the and keys 4 Press the Duration key to change the operating time The respective light will start to flash This setting is optional Please...

Страница 13: ...n cook the fish types described in the table below 1 Press the Cooking Fish function key The function key lights up 2 Press the Food group key selection key to change the food type The respective ligh...

Страница 14: ...d 3 Napkin dumpling 100 C 30 d 4 Rice 100 C 35 d 5 Lentils 100 C 40 8 WHEN THE OVEN IS WORKING Interrupting a cooking cycle You can stop the cooking process at any time by pressing the Stop key once...

Страница 15: ...und 3 minutes and during it the display shows the word VAP At the end of this process you will hear three beeps and the display will show the word End Warning When opening the door during or upon comp...

Страница 16: ...steam sensitive foods e g compotes and dumplings The rack is used when cooking with small containers as for example dessert bowls and to regenerate plate dishes For more precise information refer to...

Страница 17: ...ted 1 2 Cod filet 1000 1200 g 80 20 25 Perforated 2 Blue mussel 1000 1200 g 100 15 25 Perforated 2 Lake trout 4 x 250 g 80 25 30 Perforated 2 Haddock 1000 1200 g 80 20 25 Perforated 2 Tuna filet 500 1...

Страница 18: ...e head 100 40 45 Perforated 1 Peas 100 30 35 Perforated 2 Fennel in stripes 100 15 20 Perforated 2 Fennel cut in half 100 20 30 Perforated 2 Potatoes with skin whole very small 100 20 25 Perforated 2...

Страница 19: ...rt 40 4 6 hrs Rack bowl 2 Stewed peaches 500 1500 g 100 15 20 Not perforated 2 Fruit Sterilising Boiling down Fruit Quantity Temperature C Time min Container Level Pears 4 6 1l glasses 100 30 35 Rack...

Страница 20: ...top This way the usual vessels of porcelain Jena glass or of stainless steel can be put inside the oven The container of cooking perforated or not will be inserted in the 1st level from the bottom It...

Страница 21: ...g Only fill the water tank up to a maximum of 0 5 litres to ensure that the water does not overflow when it is pumped back to the water tank RISK OF OVERFLOW Water tank message When the water tank is...

Страница 22: ...e water tank Cleaning the cooking space Avoid using abrasive cleaners such as scouring pads steel wool etc as they can damage the surface Wipe the cooking space clean using a damp cloth whilst the app...

Страница 23: ...utes per week the appliance must be descaled depending on water hardness roughly as follows Water hardness Descale after about Very soft 18 months Medium 9 months Very hard 6 months IfonceagaintheDesc...

Страница 24: ...ows again 1 0L flashing and the oven emits a new beep remove and empty the water tank 10 Fill the water tank with 1 0 litres of cold water and put the water tank back 11 Press the Start key The second...

Страница 25: ...machine 11 TROUBLESHOOTING 11 1 Problem solving WARNING Any type of repair must only be done by a specialised technician Any repair done by a person not authorised by the manufacturer is dangerous You...

Страница 26: ...itch itself off The oven switches on but the interior light does not go on If all the functions work properly it is probable that the lamp has blown You can keep on using the oven Replacing the light...

Отзывы: