background image

SETUP INSTRUCTIONS

2014

125 EXC EU

125 EXC SIX DAYS EU

200 EXC EU

200 EXC AUS

200 XC

W USA

250 EXC EU

250 EXC AUS

250 EXC SIX DAYS EU

250 XC

W USA

300 EXC EU

300 EXC AUS

300 EXC SIX DAYS EU

300 XC

W USA

300 XC

W SIX DAYS USA

Art. no. 3213130en

Содержание 125 EXC EU 2014

Страница 1: ...014 125 EXC EU 125 EXC SIX DAYS EU 200 EXC EU 200 EXC AUS 200 XC W USA 250 EXC EU 250 EXC AUS 250 EXC SIX DAYS EU 250 XC W USA 300 EXC EU 300 EXC AUS 300 EXC SIX DAYS EU 300 XC W USA 300 XC W SIX DAYS USA Art no 3213130en ...

Страница 2: ......

Страница 3: ...the right to modify or delete technical specifica tions prices colors forms materials services designs equipment etc without prior notice and without specifying reasons to adapt these to local conditions as well as to stop production of a particular model without prior notice KTM accepts no liability for delivery options deviations from illustrations and descriptions as well as misprints and other...

Страница 4: ...page reference more information is provided on the specified page Indicates information with more details or tips Indicates the result of a testing step Denotes a voltage measurement Denotes a current measurement Denotes a resistance measurement 1 2 Formats used The typographical formats used in this document are explained below Proprietary name Identifies a proprietary name Name Identifies a prot...

Страница 5: ... over To avoid damaging the motorcycle during the setup leave the protective film on the vehicle until you have finished Remove the separate enclosure and unpack it Check that the scope of supply is complete on the basis of the enclosed packing list Have a lift stand available Lift stand 54829055000 Together with an assistant take the vehicle off the palette Position the vehicle on a lift stand Ch...

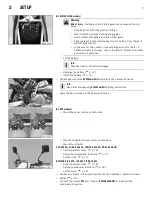
Страница 6: ... screws 2 Take off the handlebar supports Place the handlebar supports in the required position Mount and tighten screws 2 Guideline Screw handlebar support M10 40 Nm 29 5 lbf ft Loctite 243 Info Position the left and right handlebar supports evenly 600824 10 Position the handlebar Info Make sure the cables and wiring are positioned correctly Position the handlebar clamps Mount and tighten the scr...

Страница 7: ...on from the main wiring harness and connect the turn signal wiring harness Install the fuel tank p 10 B01753 01 Insert the black and violet cables of bulb included in the separate enclosure into the socket and position it in the turn signal indicator lamp Position the turn signal on each side and mount and tighten nuts Connect plug in connection of the right turn signal using the black and brown c...

Страница 8: ...ount the handlebar cushion 800042 10 Mount the footrests with the springs and pins Secure the pins using the washers and cotter pins Pliers for footrest spring 58429083000 B00908 01 All EXC models Mount the license plate holder with the license plate lamp turn signals and reflector Connect the electrical components Connect plug in connection of the right turn signal using the black and brown cable...

Страница 9: ...tall the battery p 13 B00097 01 Unpack and mount the KTM PowerParts included in the delivery optional Info Read the accompanying KTM PowerParts fitting instructions Apply the label included in the delivery optional 101037 01 All EXC models Mount the mirror clamps on both sides B00909 01 Mount and tighten the rear mirror on both sides Mount the reflector 125 EXC EU all 200 models 250 300 EXC EU XC ...

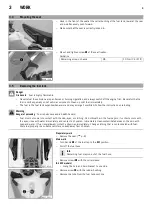
Страница 10: ...st falling over 3 2 Removing the motorcycle from the lift stand Note Danger of damage The parked vehicle may roll away or fall over Always place the vehicle on a firm and even surface 602731 10 All 125 200 models Remove the motorcycle from the lift stand Remove the lift stand To park the motorcycle press side stand 1 to the ground with your foot and lean the motorcycle on it Info When you are ridi...

Страница 11: ...nstructions on refueling Warning Danger of poisoning Fuel is poisonous and a health hazard Fuel must not come into contact with the skin eyes or clothing Do not breathe in the fuel vapors If contact occurs with the eyes rinse with water immediately and contact a physician Immediately clean contaminated areas on the skin with soap and water If fuel is swallowed contact a physician immediately Chang...

Страница 12: ...he in the fuel vapors If contact occurs with the eyes rinse with water immediately and contact a physician Immediately clean contaminated areas on the skin with soap and water If fuel is swallowed contact a physician immediately Change clothing that is contaminated with fuel 602721 01 Main work Check the routing of the throttle cable Position the fuel tank and fit the two spoilers to the sides of ...

Страница 13: ... Screw top shock absorber M12 80 Nm 59 lbf ft Loctite 2701 Mount and tighten screw 3 Guideline Screw bottom shock absorber M12 80 Nm 59 lbf ft Loctite 2701 Info The heim joint for the shock absorber at the swing arm is Teflon coated It must not be lubricated with grease or with other lubricants Lubricants dissolve the Teflon coating thereby drastically reducing the service life Finishing work Remo...

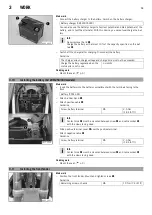
Страница 14: ...Do not discard batteries with the household waste Dispose of faulty batteries in an environmentally compatible manner Give the battery to your authorized KTM dealer or dispose of it at a collection point for used batteries Warning Environmental hazard Hazardous substances cause environmental damage Oil grease filters fuel cleaners brake fluid etc should be disposed of as stipulated in applicable r...

Страница 15: ...hing work Mount the seat p 9 3 10 Installing the battery All 200 250 300 models 101712 10 Main work Insert the battery into the battery compartment with the terminals facing to the front Battery YTX4L BS Attach rubber band 1 Attach positive cable 2 Guideline Screw battery terminal M5 2 5 Nm 1 84 lbf ft Info Contact disk A must be mounted between screw 4 and cable socket 5 with the claws facing dow...

Страница 16: ...tighten screw 3 Finishing work Check the headlight setting p 14 3 13 Checking the headlight setting 400726 10 Position the vehicle upright on a horizontal surface in front of a light wall and make a mark at the height of the center of the low beam headlight Make another mark a distance B under the first mark Guideline Distance B 5 cm 2 in Position the vehicle vertically a distance A away from the ...

Страница 17: ...arm and may emerge if overfilled Follow the instructions on refueling Warning Danger of poisoning Fuel is poisonous and a health hazard Fuel must not come into contact with the skin eyes or clothing Do not breathe in the fuel vapors If contact occurs with the eyes rinse with water immediately and contact a physician Immediately clean contaminated areas on the skin with soap and water If fuel is sw...

Страница 18: ...ne Open the filler cap p 15 400382 10 Fill the fuel tank with fuel up to measurement A Guideline Measurement of A 35 mm 1 38 in Total fuel tank capacity approx EXC EU EXC SIX DAYS 9 5 l 2 51 US gal Super unleaded gasoline 95 octane mixed with 2 stroke engine oil 1 60 p 22 Total fuel tank capacity approx EXC AUS XC W XC W SIX DAYS 10 l 2 6 US gal Super unleaded gasoline 95 octane mixed with 2 strok...

Страница 19: ...xt function All desired functions are activated or deactivated accordingly Press the button for 3 5 seconds The settings are stored and the Setup menu is closed Info If no button is pressed for 20 seconds or if no impulse comes from the wheel speed sensor the settings are automatically saved and the Setup menu is closed 3 18 3 Setting the clock Condition The motorcycle is stationary 400330 01 Pres...

Страница 20: ...closed 3 19 2 Setting the speedometer functions Info When the vehicle is delivered only the SPEED H and SPEED ODO display modes are activated Condition The motorcycle is stationary 400318 01 Repeatedly press the button briefly until H appears at the bottom right of the display Press the button for 2 3 seconds The Setup menu is displayed and the active functions are shown Info If no button is press...

Страница 21: ...utton and or button Wait 3 5 seconds The next segment of the display flashes and can be set You can set the following segments in the same way as the hours by pressing the button and the button Info The seconds can only be set to zero If no button is actuated for 15 20 seconds or there is no signal from the wheel speed sensor then the settings are automatically stored and the Setup menu is closed ...

Страница 22: ...SIX DAYS EU M8 15 Nm 11 1 lbf ft Screw chain sliding piece M8 15 Nm 11 1 lbf ft Screw engine brace M8 33 Nm 24 3 lbf ft Screw fork stub M8 15 Nm 11 1 lbf ft Screw front brake caliper M8 25 Nm 18 4 lbf ft Loctite 243 Screw handlebar clamp M8 20 Nm 14 8 lbf ft Screw side stand attachment M8 45 Nm 33 2 lbf ft Loctite 2701 Screw subframe M8 35 Nm 25 8 lbf ft Loctite 2701 Screw top steering stem 125 EX...

Страница 23: ...4 TECHNICAL DATA TIGHTENING TORQUES FOR CHASSIS 21 Screw front wheel spindle M24x1 5 45 Nm 33 2 lbf ft ...

Страница 24: ...91 Guideline Only use unleaded super fuel that matches or is equivalent to the specified fuel grade Fuel with an ethanol content of up to 10 E10 fuel is safe to use Info Do not use fuel containing methanol e g M15 M85 M100 or more than 10 ethanol e g E15 E25 E85 E100 Super unleaded gasoline 95 octane mixed with 2 stroke engine oil 1 60 According to DIN EN 228 JASO FC p 24 1 60 Mixture ratio 1 60 2...

Страница 25: ...6 AUXILIARY SUBSTANCES 23 Long life grease Guideline KTM recommends Motorex products Supplier Motorex Bike Grease 2000 ...

Страница 26: ...ification for a 2 stroke engine oil that was specifically developed for the extreme demands of racing Thanks to first rate synthetic esters and specially designed additives superb combustion is achieved even under extreme operating conditions ...

Страница 27: ... 3213130en 3213130en 08 2013 KTM Sportmotorcycle AG 5230 Mattighofen Austria http www ktm com Photo Mitterbauer KTM ...

Отзывы: