background image

31

6.

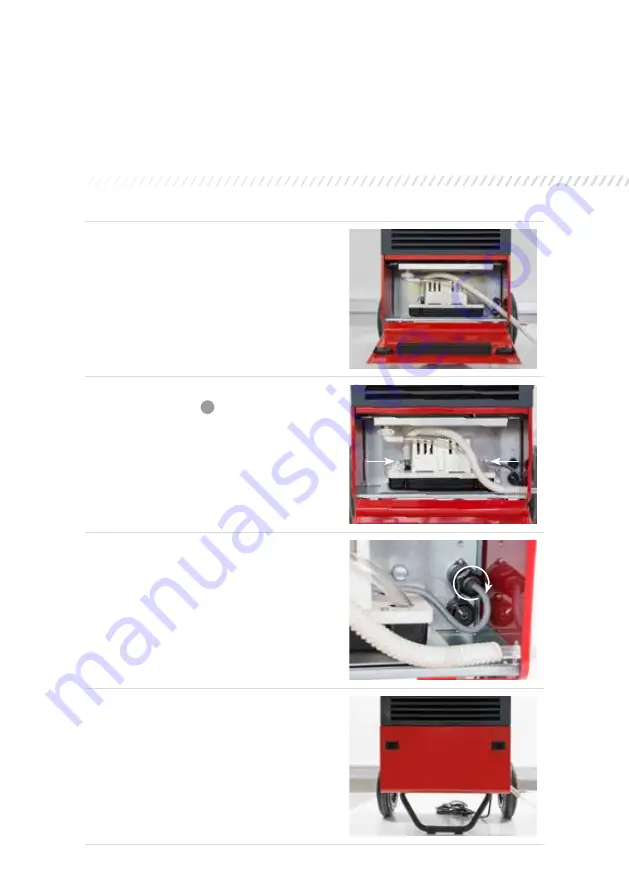
Slide the pump into the appliance.

7.

Screw the pump onto the round buffers using  
the knurled screws 

C

 supplied.

8.

Connect the pump plug to the power socket by 
turning the front part of the plug clockwise.

9.

Close the flap and reconnect the mains plug.

Содержание AreaDry 16

Страница 1: ...Deutsch Seite 2 Fran ais Page 9 Italiano Pagina 17 English Page 25 entfeuchten heizen k hlen sanieren Entfeuchten Pumpenkit AreaDry 8 16 Einbauanleitung...

Страница 2: ...2...

Страница 3: ...r schriftlichen Genehmigung der Kr ger Co AG Der Nachdruck auch auszugsweise ist verboten Diese Einbauanleitung entspricht dem technischen Stand bei Drucklegung nderungen in Technik und Ausstattung bl...

Страница 4: ...4 Lieferumfang Beschreibung Art Nr 1 Kondenswasserpumpe 300 105 2 Rundpuffer E103240 2 R ndelschraube E103241 A B C...

Страница 5: ...es Pumpenkits 1 Ziehen Sie den Netzstecker ffnen Sie das Fach mit dem Wasserbeh lter auf der Vorderseite des Ger ts 2 Entfernen Sie den Wasserbeh lter aus dem Ger t 3 Schrauben Sie die Rundpuffer B im...

Страница 6: ...ch n her an der R ckwand des Ger ts befindet im Gegenuhrzeigersinn drehen Wichtig Den Br ckenstecker aufbewahren Um das Ger t mit dem Kondenswasser Beh lter zu betreiben muss der Br ckenstecker zwinge...

Страница 7: ...den mitgelieferten R ndelschrauben C an den Rundpuffern fest 8 Schliessen Sie den Anschlussstecker der Pumpe an der Steckdose an indem Sie den vorderen Bereich des Steckers im Uhrzeigersinn drehen 9...

Страница 8: ...8...

Страница 9: ...Deutsch Seite 2 Fran ais Page 9 Italiano Pagina 17 English Page 25 d shumidifier chauffer rafra chir assainir D shumidifier Kit de pompe AreaDry 8 16 Instructions de montage...

Страница 10: ...10...

Страница 11: ...st interdite sans autorisation explicite Ces instruc tions de montage correspondent au niveau technologique au moment de l impression Sous r serve de modifications techniques et d quipement Kr ger Cie...

Страница 12: ...12 Etendue de livraison Description No article 1 pompe de relevage des condensats 300 105 2 amortisseur cylindrique E103240 2 vis molet e E103241 A B C...

Страница 13: ...kit de pompe 1 Retirez la fiche d alimentation lectrique Ouvrez le compartiment du bac eau sur la face avant de l appareil 2 Retirez le bac eau de l appareil 3 Vissez les amortisseurs cylindriques B d...

Страница 14: ...i arri re dans le sens inverse des aiguilles d une montre Important Conservez le connecteur de contact Pour faire fonctionner l appareil avec le bac condensats le connecteur de contact doit imp rative...

Страница 15: ...mortisseurs cylindriques avec les deux vis molet es C fournies 8 Raccordez la fiche de raccordement de la pompe la prise en tournant la partie avant du connecteur dans le sens des aiguilles d une mont...

Страница 16: ...16...

Страница 17: ...Deutsch Seite 2 Fran ais Page 9 Italiano Pagina 17 English Page 25 deumidificare riscaldare raffrescare risanare Deumidificare Kit pompaper AreaDry 8 16 Istruzioni di montaggio...

Страница 18: ...18...

Страница 19: ...stampa anche parziale vietata Queste istruzioni di montaggio rispecchiano lo stato dell arte al momento della stampa Restano riservate modifiche di carattere tecnico e della dotazione Kr ger Co SA Que...

Страница 20: ...20 Volume di fornitura Descrizione N articolo 1 pompa per l acqua di condensa 300 105 2 ammortizzatori in gomma E103240 2 viti zigrinate E103241 A B C...

Страница 21: ...e la spina del cavo di alimentazione Aprire lo sportello del vano del contenitore dell acqua sul lato anteriore del dispositivo 2 Rimuovere il contenitore dell acqua dal dispositivo 3 Avvitare gli amm...

Страница 22: ...te posteriore del dispositivo Importante conservare con cura la spina a ponte Per utilizzare il dispositivo con il contenitore dell acqua di condensa necessario infatti collegare la spina a ponte 5 Fa...

Страница 23: ...fornite C fissare saldamente la pompa agli ammortizzatori in gomma precedentemente avvitati nel dispositivo 8 Collegare il connettore della pompa alla presa ruotando la parte anteriore in senso orario...

Страница 24: ...24...

Страница 25: ...Deutsch Seite 2 Fran ais Page 9 Italiano Pagina 17 English Page 25 dehumidify heat cool purify Dehumidify Pump kit AreaDry 8 16 Installation manual...

Страница 26: ...26...

Страница 27: ...ission of the publisher Reprinting even in part is not permitted This installation manual corresponds to the tech nical status of the device on the date of printing We reserve the right to make change...

Страница 28: ...28 Parts delivered Description Item no 1 condensation water pump 300 105 2 round buffers E103240 2 knurled screws E103241 A B C...

Страница 29: ...pump kit 1 Pull out the mains plug of the appliance Open the compartment with the water container on the front of the appliance 2 Remove the water container from the appliance 3 Screw the round buffer...

Страница 30: ...est to the rear panel of the appliance turning it counterclockwise Important note Keep the jumper plug In order to operate the appliance with the condensation water tank the jumper plug must be plugge...

Страница 31: ...he appliance 7 Screw the pump onto the round buffers using the knurled screws C supplied 8 Connect the pump plug to the power socket by turning the front part of the plug clockwise 9 Close the flap an...

Страница 32: ...n T 041 392 00 80 gisikon krueger ch krueger ch Giubiasco TI Via Campagna 7 6512 Giubiasco T 091 735 15 85 giubiasco krueger ch krueger ch Grellingen BL Stauseeweg 2 4203 Grellingen T 061 745 98 98 gr...

Отзывы: