


6
OPERATION
64
SMARTMAC 400
www.krohne.com
07/2022 - 4008875401 - MA SMARTMAC_400 R01 en
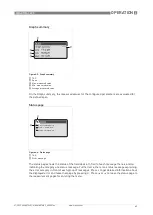
6.4.2 Number format
The function “Number format” in menu A4.5 allows to define the number format of each
measuring value. You can configure the number of digits and the decimals of PV, SV, TV, QV,
4…20 mA L1 and 4…20 mA L2.
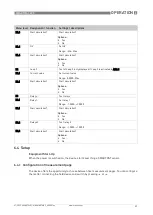
6.4.3 Configuration of loop 1
6.4.4 Configuration of loop 2
Press > to enter the main menu
Press
or
until the submenu Setup is highlighted and press > to enter the submenu.
Press
or
until the submenu I/O is highlighted and press > to enter the submenu.
Press
or
until the submenu Loop 1 is highlighted and press > to enter the submenu.
Press
or
until the submenu Loop current settings is highlighted and press > to enter the submenu.
Define the Lower range value and press
^
. Define the upper range value and press
^
to get back in the
higher level.
Press
or
until the submenu Loop monitoring is highlighted and press > to enter the submenu.
Activate the Monitoring for a comparative measurement between the measurend current and the current
transmitted by HART
®
If required, set the Max. deviation and the Reaction time.
Press
^
several times to save the configuration and to return to the measuring mode.
Press > to enter the main menu.
Press
or
until the submenu Setup is highlighted and press > to enter the submenu.
Press
or
until the submenu I/O is highlighted and press > to enter the submenu.
Press
or
until the submenu Loop 2 is highlighted and press > to enter the submenu.
Press
or
until the submenu Mode is highlighted and press > to enter the submenu.
Press
or
to choose between Current output, Power supply, Off.
Press
^
to get back in the higher level.
If Power supply is selected, you can use Loop 2 for backlight and LEDs for NAMUR NE 107 signalisation.
If Current output is selected, the following possibilities are available for selection.
Press
or
until the submenu Variable selection is highlighted and press > to enter the submenu.
Choose a variable and press
^
.
Press
or
until the submenu Lower range value is highlighted and press > to enter the submenu.
Define the lowest value and press
^
.
Press
or
until the submenu Upper range value is highlighted and press > to enter the submenu.
Define the highest value and press
^
.
Press
or
until the submenu Lower ext. range is highlighted and press > to enter the submenu.
Define the lowest value and press
^
.
Press
or
until the submenu Upper Ext. range is highlighted and press > to enter the submenu.
Define the highest value and press
^
.
Press
or
until the submenu Error function is highlighted and press > to enter the submenu.
Define the error function. If the measurement is defective or the HART
®
communication is interrupted,
the value can be hold or a high or low error current can be sent.
Press
or
until the submenu Trimming 4mA is highlighted and press > to enter the submenu.
Define the 4mA Trimming and press
^
. Press
^
to get back in the higher level.
Press
or
until the submenu Trimming 20mA is highlighted and press > to enter the submenu.
Define the 20mA Trimming and press
^
.
Press
^
several times to save the configuration and to return to the measuring mode.


