background image

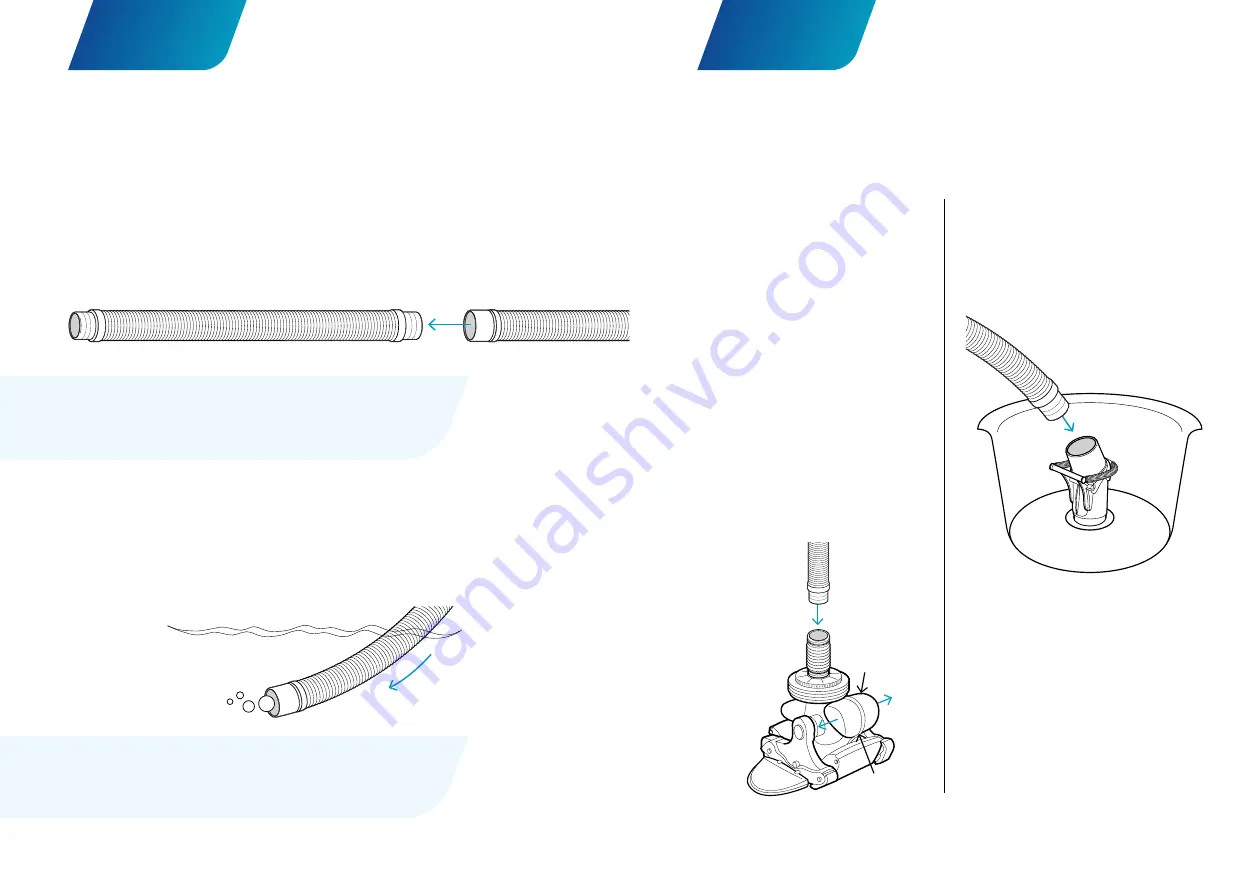
Connect the hose to Sprinta Plus

• 

Submerge the Sprinta Plus 
in your pool to expel all air


either rotate to help remove 

trapped air or release air 

from front ballast by gently 

separating the front from the 

main body seal until no air 

bubbles appear (ensure front 

ballast fits back into seal).


Then connect the submerged 

and air-free male-male hose 

end to the Flexible Hose 

Connector on your Sprinta 

Plus.

• 

Connect the other end


of the hose to the Smart-Skim     

(or Auto Skim upgrade) 

ensuring the end of the hose 

is submerged and free of air.

• 

If the angle of the Smart-Skim 
is insufficient 

and makes 

connecting the hose difficult, 

use the 90 degree connector 

between the end of the hose 

and the Smart-Skim valve.

STEP

 3

STEP

 4

TIP:


Wetting the hose ends in your pool will 

make them easier to fully connect to each other.

 Build the Ultra Flex hose

• 

Start with the male-male hose

 and twist on a female-male length.  

Keep going until the hose is long enough to reach from your  

skimmer box to the far corner of your pool. Now add one extra 

length – this will optimise the coverage of your Sprinta Plus. 

• 

 Attach your 3 hose weights.

 Position the first weight at 2m from 

the first male end, then every 1.5m after that. 

• 

Submerge the assembled hose

 in your pool. To expel all the air 

push downwards feeding the hose into the pool.

male

male

female

5

4

TIP:


When removing or storing hose sections, 

store flat and not coiled to ensure extended life 

of the hose and prevent coverage issues.

Main Body Seal

Front Ballast

Содержание SPRINTA PLUS

Страница 1: ...SPRINTA PLUS OWNER S MANUAL P R OUDLY AUST R A L I A N D E S I G N ED A ND MAD E...

Страница 2: ...tor optional x1 x9 x3 1 Congratulations Your new Sprinta Plus is designed to give you years of reliable performance Assembly is simple and we ll walk you through it step by step This booklet should an...

Страница 3: ...off and grasp from the bottom of the Smart Skim pulling up Note Not from the hose or spring Attach the Flexible Hose Connector the incredibly bendy small hose to the top opening of your Sprinta Plus T...

Страница 4: ...nector between the end of the hose and the Smart Skim valve STEP 3 STEP 4 TIP Wetting the hose ends in your pool will make them easier to fully connect to each other Build the Ultra Flex hose Start wi...

Страница 5: ...ely run your Sprinta Plus Ask your pool professional to advise There may be air in your Sprinta Plus Turn the pump off and rotate your Sprinta Plus while holding it underwater There may be a blockage...

Страница 6: ...cessary with a return line diverter If that still doesn t work you my need to purchase an Eyeball Diverter from your local Kreepy Krauly retailer Check that the hose weights are fitted as described on...

Страница 7: ...lter cycle by gently Vortex Vacuuming your pool surface Leaves are picked up by the large front and side scoops and pulled through the straight through turbine to the skimmer box The Vortex Vacuum aid...

Страница 8: ...to us as soon as possible Alternatively you can activate your 2 year Full System Warranty and 10 year Flow Turbine Warranty online at www kreepykrauly com au warranty Record Serial Number Here Lookin...

Страница 9: ...ustomerServiceDepartmenton1800777255 Monday to Friday 9am 5pm in your local area Alternatively contact your local pool shop professional www kreepykrauly com au We reserve the right to revise change o...

Отзывы: