


8
9952
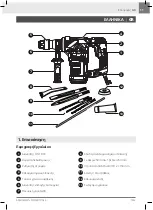
KRAUSMANN POWER TOOLS
The depth gauge is convenient for drilling holes of
uniform depth.
Depth gauge
Always
check that there is sufficient grease in the
gearbox cavity
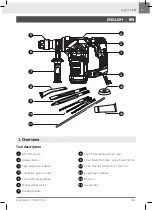
4
before using the tool. Coat the bit
shank head beforehand with a small amount of bit
grease (about 0.5 - 1 g / 0.02 - 0.04 oz). This chuck
lubrication assures smooth action and longer
service life.
Lubrication
Before any work on the tool itself, pull the mains
plug. With the SDS-Plus tool holder, simpler and
easier tool changing is possible without additional
aids.
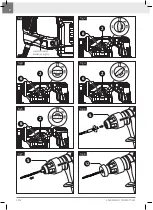
Changing the bit
Lightly grease the tail end of the bit. Push back
the locking sleeve
5
and insert the bit in a twisting
manner into the tool holder until it locks itself (fig
6).
After installing, always make sure that the bit is securely
held in place by trying to pull it out. If the bit can be
removed, repeat the above procedure.
Inserting the bit
Push back the locking sleeve
5
all the way and pull
the bit out (fig 7).
Removing the bit
The dust cup
12
prevents the entry of drilling dust into
the tool holder during operation. When inserting the
tool, take care that the dust cap
12
is not damaged.
Use the dust cup to prevent dust from falling over the
tool and on yourself when performing overhead drilling
operations.
A damaged dust protection cup should be replaced
immediately. We recommend having this carried out
by an after-sales service profes
sional.
Dust cup
First set the mode selector switch
6
and the mode
selector switch
2
to the position shown (fig 2).
P
osition the bit at the desired location for the hole,
then pull the switch trigger. Do not force the tool. Light
First set the mode selector switch
6
and the mode
selector switch
2
to the position shown (fig 3).
Hold the tool firmly with both hands. Turn the tool on
and apply slight pressure on the tool so that the tool will
not bounce around, uncontrolled. Pressing very hard
on the tool will not increase efficiency.
Chiseling operation
WARNING:
There is a tremendous and sudden twisting force exerted
on the tool / bit at the time of hole break-through, when
the hole becomes clogged with chips and particles, or
when striking reinforcing rods embedded in the concrete.
Always use the auxiliary handle and firmly hold the
tool by both auxiliary handle and switch handle during
operations. Failure to do so may result in the loss of
control of the tool and potentially severe injury.
Operation
Hammer drilling operation
pressure gives best results. Keep the tool in position and
prevent it from slipping away from the hole.
Do not apply more pressure when the hole becomes
clogged with chips or particles. Instead, run the tool
at idle, then remove the bit partially from the hole. By
repeating this several times, the hole will be cleaned out
and normal drilling may be resumed.
5. Maintenance
Correct and regular cleaning will improve the safe
-
ty and extend the lifespan of the device.
For safe and proper working, always keep the
tool and ventilation slots clean.
Τhe tool may be cleaned most effectively with
compressed dry air or with a soft cloth moistened
with soapy water.
Always wear safety goggles
when cleaning tools with compressed air.
Certain cleaning agents and solvents damage
plastic parts.
Some of these are: gasoline, carbon
tetrachloride, chlorinated cleaning solvents,
ammonia and household detergents that contain
ammonia.
The brushes and commutator in your tool have
been engineered for many hours of dependable
service. To
maintain peak efficiency of the motor,
we recommend every two to six months the
brushes be examined.
Store the tool, operating instructions and where
necessary the accessories in the original packag
-
ing. In this way you will always have all the informa
-
tion and parts ready to hand.
English |
EN