background image

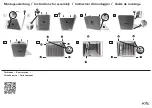
Step 4:  Connect waterlines to faucet and main valve 

Step 5:  Flush faucet

Secure hot & cold waterlines (G) to 
hot and cold valves (A & B) (Hand-
Tighten Only). Thread other end 
of waterlines to T-union (F). Attach 
3/8 in. OD x 1/2 in. IPS waterlines 
(H) to copper pipe on valves
A. Hot Side: Left
B. Cold Side: Right 
Secure other end of waterlines to 
angle stops. Tighten all ends with 
adjustable wrench until snug. Turn 
on angle stops and check for leaks 
(DO NOT TURN FAUCET ON)

Remove adjustable aerator (I) with 
aerator key (J). Turn water on for 
1 minute to remove any debris. 
Reassemble adjustable aerator (I) 

1

2

3

1 1/4-18UNF-2A

9/16”-18UNEF

27mm ~ 41.3mm

1 1/16

”  ~ 1 5/8”

7A

8B
8C

8D

8A

9/16”-18UNEF

27mm ~ 41.3mm

1 1/16

”  ~ 1 5/8”

7A

8B

8C

8D

8A

7A

8B
8C

8D

8A

4

5

H

A

D

D

A

C1
C2

C3

B

E1

E2

F

B

C

C

F

E

H

A

B

H

G

G

I

J

F

1

2

3

1 1/4-18UNF-2A

9/16”-18UNEF

27mm ~ 41.3mm

1 1/16

”  ~ 1 5/8”

7A

8B
8C

8D

8A

9/16”-18UNEF

27mm ~ 41.3mm

1 1/16

”  ~ 1 5/8”

7A

8B

8C

8D

8A

7A

8B
8C

8D

8A

4

5

H

A

D

D

A

C1
C2

C3

B

E1

E2

F

B

C

C

F

E

H

A

B

H

G

G

I

J

F

Содержание Seda FUS-1823

Страница 1: ...INSTALLATION MANUAL www kraususa com I toll free 1 800 775 0703 I 2014 2015 Kraus USA Inc Seda 8 Widespread 2 Handle Faucet FUS 1823 ...

Страница 2: ...lcome any questions or comments you may have and will be glad to assist you in the future For more information about Kraus products please visit our website at www kraususa com Please register your new Kraus product at the following web address in order to activate the warranty and receive the full benefit of customer support www kraususa com registration Sincerely Kraus Customer Service Departmen...

Страница 3: ...e old faucet to release any built up pressure Remove existing faucet Clean sink or countertop to remove any debris plumber s putty or silicone Place bucket under angle stops Turn on angle stops to flush any debris prior to installing new plumbing Shut off angle stops Max countertop thickness 1 3 8 Tools you will need Adjustable Wrench Phillips Screwdriver Safety Goggles Bucket 8 5 16 1 1 4 18UNF 2...

Страница 4: ...ot Handle Valve B Cold Handle Valve C Hot Cold Handle Mounting Hardware C1 Rubber Metal Washer C2 Mounting Nut C3 Mounting Screws D Spout E Spout Mounting Hardware E1 Rubber Metal U Washer E2 Mounting Nut F T Union G Hot Cold Waterlines H 3 8 in OD x 1 2 in IPS Waterlines I Aerator J Aerator Key K Hex Wrench ...

Страница 5: ...cet Dimensions Step 1 Remove mounting hardware and T union Remove T union F and mounting hardware E from spout D Remove mounting hardware C from hot and cold handle valves A B 1 2 1 1 4 18UNF 2A 9 16 18UNEF 27mm 41 3mm 1 1 16 1 5 8 7A 8B 8C 8D 8A 7A 8B 8C 8D 8A 7A 8B 8C 8D 8A A D D A C1 C2 C3 B E1 E2 F C C F E ...

Страница 6: ...old handle valves A B through hole in countertop or sink Attach rubber metal washer C1 and mounting nut C2 to the threaded mounting pipe From underneath the countertop or sink tighten mounting nut C2 onto valves A B with adjustable wrench until snug Secure mounting nut C2 by tightening mounting screws C3 with a Phillips head screwdriver 2 3 1 1 4 18UNF 2A 9 16 18UNEF 27mm 41 3mm 1 1 16 1 5 8 9 16 ...

Страница 7: ... A Hot Side Left B Cold Side Right Secure other end of waterlines to angle stops Tighten all ends with adjustable wrench until snug Turn on angle stops and check for leaks DO NOT TURN FAUCET ON Remove adjustable aerator I with aerator key J Turn water on for 1 minute to remove any debris Reassemble adjustable aerator I 4 5 H H A B H G G I J F 2 3 1 1 4 18UNF 2A 9 16 18UNEF 9 16 18UNEF 27mm 41 3mm ...

Страница 8: ...e 3 Set Screw 4 Cover Button 5 Hot Cartridge 6 Hot Valve 7 Rubber Metal Washer 8 Mounting Nut 9 Mounting Screw 10 Adjustable Aerator 11 Rubber Metal U Washer 12 Mounting Nut 13 T Union 14 Cold Cartridge 15 Cold Valve 16 Hot Cold Waterlines 17 3 8 in OD x 1 2 in IPS Waterlines 18 Aerator Key 19 Hex Wrench ...

Страница 9: ...ove aerator 10 and clean out debris Water will not shut off completely Hot or cold cartridge 5 or 14 may need to be adjusted or replaced Remove cover button 4 Loosen set screw 3 with hex wrench 19 Remove handle 1 or 2 Remove hot or cold cartridge 5 or 14 with adjustable wrench Check for cracks Care Maintenance To keep the product clean shining follow the steps below 1 Rinse with clean water dry wi...

Страница 10: ...se service and maintenance If Kraus is unable to provide a replacement and repair is not practical or cannot be made in timely fashion Kraus may elect to refund the purchase price in exchange for the return of the product CONDITIONS AND EXCLUSIONS Like other home fixtures Kraus products will require light maintenance to ensure proper function We provide you with complete knowledge to perform this ...

Страница 11: ...des freight costs cartridge replacement labor travel time lost profit home damages and other contingent liabilities and costs including without limitation costs associated with experts investigations analyses attorneys and other professionals and services The Kraus warranty is a comprehensive and explicit limit of liability and all items outside of it are not addressable by or the responsibility o...

Страница 12: ...www kraususa com ...

Отзывы: