background image

14

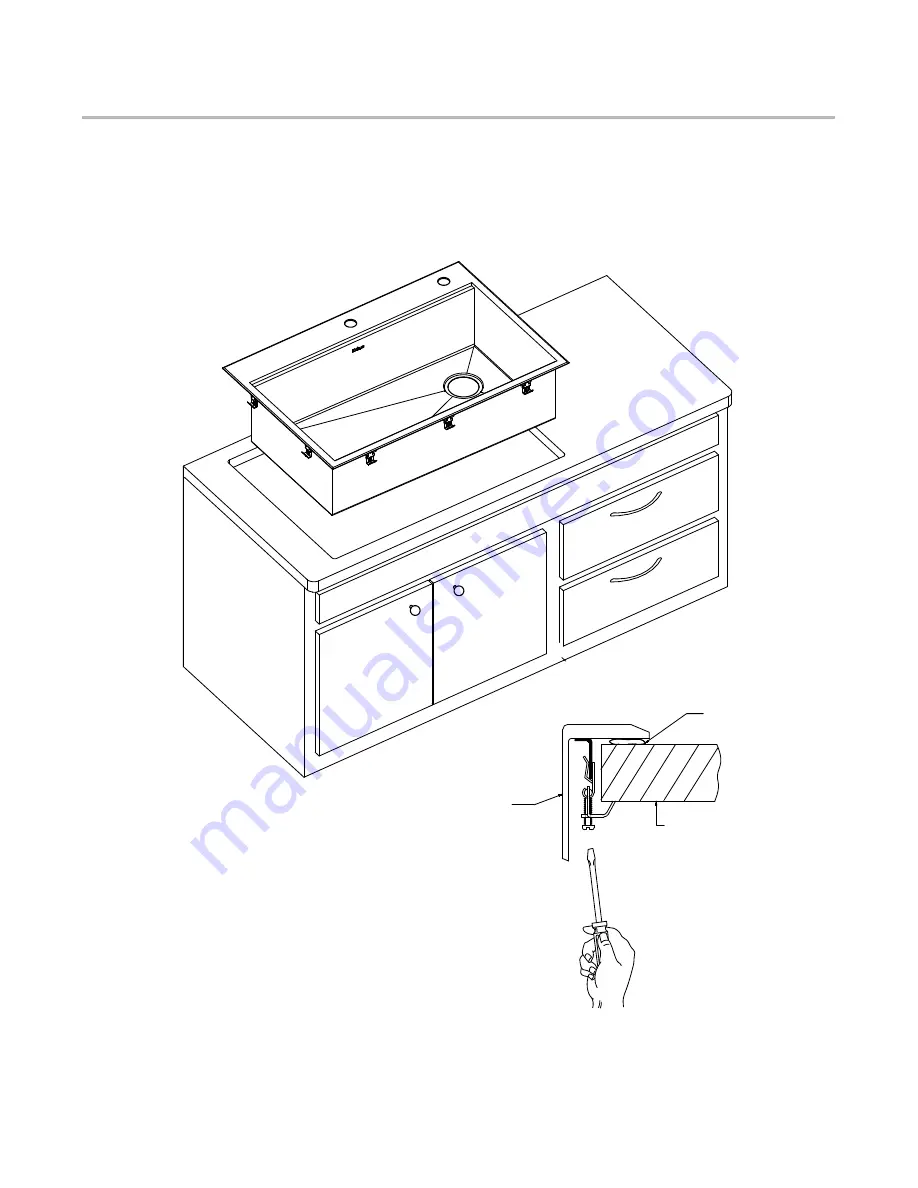
Step 6. Secure Sink to Countertop

·

Insert the sink into the opening, check the alignment of the sink to the cutout in the countertop and press firmly.

·

Tighten the screws in the front of the sink, followed by the ones in the back and on the sides of the sink.

·

Remove excess silicone-based sealant.

·

Allow sealant to set for 30-60 minutes.

Sealant or putty

Sink

Countertop

Fasten the screw

Содержание Kore KWT300-28

Страница 1: ...WT311 25 KWT311 25 5 5 KWT300 28 KWT310 28 KWT300 30 KWT302 30 KWT300 33 KWT302 33 KWT310 33 PGM KoreTM Workstation Stainless Steel Dual Mount Kitchen Sinks www kraususa com I Toll Free 1 800 775 0703...

Страница 2: ...y problems with your product 2 Please contact our Customer Service Team 1 800 775 0703 customerservice kraususa com Have the model number available and retain a copy of your receipt with purchase date...

Страница 3: ...ry or property damage and may void the warranty Prior to Installation Make sure that you have all necessary parts by checking the parts list If any part is missing or damaged please contact Kraus Cust...

Страница 4: ...nless Steel Kitchen sinks with countertop materials other than wood marble or granite Safety Goggles Silicone Adhesive Jig Saw Phillips Screwdriver Putty Knife Tape Measure Pencil Scissors Screwdriver...

Страница 5: ...KWT300 30 Cut Out Template Mounting Hardware Bottom Grid KBG UN6 30 Strainer ST 1 Drain Cap STC 2 Cutting Board KCB WS103SA Rolling Mat KRM 11BL Soap Dispenser Hole Cap Parts List KWT311 15 Cut Out T...

Страница 6: ...trainer ST 1 Drain Cap STC 2 Cutting Board KCB WS103BC Rolling Mat KRM 11LG Soap Dispenser Hole Cap KWT302 33 Cut Out Template Mounting Hardware Bottom Grid KBG UND1 33 x 2 Strainer ST 1 x 2 Drain Cap...

Страница 7: ...3 330 2mm 1 3 8 35mm 2 50 8mm 4 101 6mm 3 1 2 90mm R 0 0mm 9 229mm 9 3 8 239 1mm 11 279 4mm 15 381mm 15 381mm 13 330 2mm 12 304 8mm 1 1 2 38 1mm 3 76 2mm 3 1 2 90mm 4 1 2 114 3mm R 0 0mm 9 229mm 9 1 2...

Страница 8: ...5 127mm 5 127mm 3 1 2 89mm 22 558 8mm 5 1 2 140mm 2 50 8mm 4 101 6mm 3 1 2 90mm 1 25 4mm 1 3 8 35mm 5 1 4 134 4mm R 0 0mm 16 406 4mm 17 431 8mm 5 127mm 22 558 8mm 1 3 8 35mm 28 711 2mm 26 660 4mm 3 1...

Страница 9: ...mm 33 838mm 31 787mm 2 50 8mm 3 1 2 89mm 1 25 4mm 9 1 2 240 1mm R 0 0mm 3 1 2 90mm 1 3 8 35mm 30 762mm 28 711 2mm 16 406 4mm 17 431 8mm 5 127mm 3 1 2 89mm 2 50 8mm 1 25 4mm 4 101 6mm 22 558 8mm 13 7 8...

Страница 10: ...roper sized cut out Place the cut out template in the desired location on the countertop NOTE Make sure clearance is suitable for backsplash faucet and plumbing for the sink Step 2 Trace Template Trac...

Страница 11: ...countertop by carefully following the traced line NOTE Please use the appropriate saw that best fits your countertop material CAUTION To avoid the risk of personal injury wear safety glasses and cut r...

Страница 12: ...ach mounting hardware to the prongs protruding from the underside of the sink rim Make sure the hooked side of the mounting clip is facing away from the sink 12 NOTE Maximum countertop thickness for T...

Страница 13: ...Apply Silicone or Plumber s Putty Clean and dry the surface around the opening of the sink Turn the unit upside down to apply sealant Apply silicone based sealant not included underneath the edge of...

Страница 14: ...the sink to the cutout in the countertop and press firmly Tighten the screws in the front of the sink followed by the ones in the back and on the sides of the sink Remove excess silicone based sealan...

Страница 15: ...ep 7 Install Plumbing Fixtures Connect drain to sink Connect trap to drain Connect water supply connections to faucet according to manufacturer s instructions Run water into sink and check for leaks 1...

Страница 16: ...ve Reveal Flush Zero Reveal FLUSH ZERO REVEAL 3 8 POSITIVE CENTERLINE 16 Step 1 Determine reveal type Use scissors to cut along the line of the paper template for your desired reveal type Negative Pos...

Страница 17: ...out Place the cut out template in the desired location on the countertop Step 2 Position template Paper Template Step 3 Trace Template Trace template on countertop with a pencil Paper Template NOTE Ma...

Страница 18: ...countertop Decide location for mounting brackets Mounting holes should be 1 2 from edge of sink Step 5 Set up mounting brackets 1 2 13mm 18 NOTE Please use the appropriate saw that best fits your coun...

Страница 19: ...holes and lightly tap with a hammer until flush Step 7 Install anchors Drill 3 8 diameter x 1 2 deep hole in the countertop 3 8 1 2 19 CAUTION To avoid the risk of personal injury wear safety glasses...

Страница 20: ...ut in the countertop Place sink over cutout hole and press firmly Step 8 Secure sink to countertop Step 9 Attach mounting hardware Attach mounting hardware to secure bowl Remove excess sealant from in...

Страница 21: ...nnect drain to sink Connect trap to drain Connect water supply connections to faucet according to manufacturer s instructions Run water into sink and check for leaks Step 10 Install Plumbing Fixtures...

Страница 22: ...and Cleaning Instructions Certain cleaning products may cause damage to a Product s finish and use of the following on the Product will void this warranty Abrasive cleaners such as powders bleach amm...

Страница 23: ...cluded Limitation on Duration of Implied Warranties Please note that some states provinces including Quebec do not allow limitations on how long an implied warranty lasts so the below limitations may...

Страница 24: ...IMPORTANT R www kraususa com Register Your Kraus Product Activate Your Warranty Access Premium Customer Support Get Product Information REGISTER TODAY http www kraususa com registration R...

Отзывы: