Kratki BSL 280 Скачать руководство пользователя страница 25

25

EN

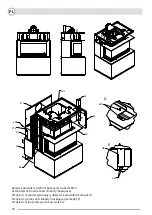
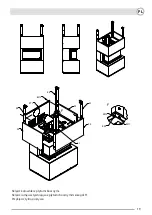
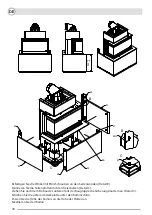
KIT ELEMENTS - FIRST UNPACKING OF THE PURCHASED HEATER 

If any damage or shortages are noticed during shipment inspection, please contact your authorized 

dealer.

Please ensure that all kit components have not been damaged in transit. Inspection should take 

place in the presence of the supplier. The purchased heater should include all components needed to 

assemble the build-out and fireplace, namely: 

- Complete, ready to use fireplace.

- Fireplace base with adjustable feet.

- Complete self-assembly including fasteners.

- Assembly and operating instructions.

Young children, infants, the infirm, and other persons requiring special attention who are in the 

equipment space should be given special supervision. These individuals may be particularly vulne-

rable to accidental contact with the equipment. If necessary, consider using guardrails to restrict 

access to the unit.

IT IS STRICTLY PROHIBITED TO Use any liquid, gaseous or other flammable fuels to fire up the 

unit!

To avoid accidents, it is not recommended that anyone unfamiliar with the operation of the machi-

ne be allowed to use it. For safety, always wear gloves and goggles when performing maintenance.

Do not strike or lean against any parts of the unit.

NOTE: No components in the unit may be substituted other than those supplied or recommended 

by the manufacturer.

Children, the elderly and others should be informed and warned of the possibility of high tempera-

tures on the appliance during and immediately after operation and should avoid contact with the 

appliance to prevent burns and ignition of clothing.

NOTE: All surfaces of the appliance and the dedicated built-in equipment, especially in the version 

with steel panels, must be treated as working surfaces! This means that during operation of the 

appliance, all visible parts of the appliance and the installation can reach very high temperatures 

and therefore it is NOT ALLOWED to touch any of the visible surfaces of the installation and the 

appliance during operation and until it has cooled down.

NOTE: The appliance and visible parts of the structure may be very hot, even for several hours after 

it has been extinguished. Any refueling or ash removal should be done with heat-resistant gloves!

INSTALLATION - INTRODUCTION

NOTES ON MOVING THE UNIT:

This appliance is designed for easy installation and assembly with the possibility of locating it virtu-

ally anywhere, i.e. wherever a chimney can be lead out in accordance with the installation require-

ments of the fireplace manual and the building law.

WARNING: DO NOT ATTEMPT TO MOVE THE UNIT DURING OPERATION!

Содержание BSL 280

Страница 1: ...kratki OBUDOWA NBC BSL P 680 280 Instrukcja instalacji i obs ugi GEH USE NBC BSL P 680 280 Installations und Bedienungsanleitung DE ENCLOSURE NBC BSL P 680 280 Installation and operating instructions...

Страница 2: ......

Страница 3: ...3 PL EN DE FI WYMIARY ZABUDOWY NBC NBC INSTALLATION DIMENSIONS NBC EINBAUMASSE...

Страница 4: ...4 PL EN DE FI 1811 860 621 5 430 446 5 481 170 250 1 9 0 360 280...

Страница 5: ...Mo liwo zamiany p yt tylnych ze wzgl du na mo liwo ci instalacji PT2 PT1 Mo liwo zmiany p yt tylnych ze wzgl dy na mo liwo ci instalacji Backplates can be changed for installation options M glichkeit...

Страница 6: ...6 PL EN DE FI Sk ad zestawu elementy zabudowy Set composition building elements Satzaufbau Bauelemente K1 2szt K2 1szt K3 1szt K4 1szt K5 1szt K8 1szt K6 1szt K7 1szt EP2 4szt BB 2szt MB 4szt K9 1szt...

Страница 7: ...7 PL EN DE FI PT1 1szt PT2 2szt RU1 1szt RU2 1szt PG 2szt BD 1szt EP1 1szt BG 1szt PT3 1szt...

Страница 8: ...8 PL EN DE FI P1 4szt P2 2szt P3 2szt P4 2szt P5 1szt...

Страница 9: ...szt SRUBA M5X10 ISO7380 2 10 9 OCYNK EM3 4szt SRUBA M8X16 DIN933 5 8 OCYNK ST 4szt STOPKA METALOWA EM4 46szt SRUBA M6X6 ISO7380 2 10 9 OCYNK EM2 2szt NAKRETKA M5 DIN934 KL5 OCYNK EM7 10szt SRUBA M6X8...

Страница 10: ...10 PL Wspieramy kampani Nie R b Dymu www nierobdymu com fb nierobdymu DLA INSTALATORA Zostawi instrukcj razem z urz dzeniem W A CICIEL KONSUMENT Zachowaj niniejsz instrukcj do przysz ego u ytku...

Страница 11: ...dzenie zosta o zaprojektowane z my l o Pa stwa bezpiecze stwie i komforcie Wyra amy pewno e b d Pa stwo zadowoleni ze swojego wyboru ze wzgl du na zaanga owanie jakie w o yli my w pra c nad projektem...

Страница 12: ...sowego prze gl du kominiarskiego Ewentualnego przegl du lub serwisu urz dzenia mo e dokonywa jedynie wykwalifikowany kominiarz serwisant posiadaj cy odpowiednie uprawnienia Nieprzestrzeganie tych zasa...

Страница 13: ...urz dzenia Dla bezpiecze stwa zawsze u ywaj r kawiczek i gogli przy pracach konserwacyjnych Nie nale y uderza ani opiera si o adne elementy urz dzenia UWAGA adne elementy w urz dzeniu nie mog by zast...

Страница 14: ...a wy cznie w zestawie z tym urz dzeniem UWAGI ODNO NIE PRZEMIESZCZANIA URZ DZENIA To urz dzenie zosta o zaprojektowane z my l o atwej instalacji i monta u z mo liwo ci umiej scowienia go praktycznie w...

Страница 15: ...ych w tym zakresie norm wymogami prawa budowlanego i obowi zuj cymi w tym zakresie normami przeciwpo arowymi Szczeg owe przepisy dotycz ce bezpiecze stwa konstrukcji bez piecze stwa po arowego oraz be...

Страница 16: ...Wypoziomowa podstaw z przykr conymi nogami Umie ci kominek na nogach bazuj c si wed ug otwor w A A Przykr ci nogi do podstawy rubami EM3 szczeg A Wypoziomowa podstaw z przykr conymi nogami Umie ci kom...

Страница 17: ...kominka Wyregulowa wysoko kominka dostosowuj c go do wysoko ci p yt Wypoziomowa kominek 452 0 1 K2 P1 P2 K7 K3 P1 K6 EM4 ST BD Skr ci k towniki z p ytami bocznymi rubami EM4 szczeg B Montowa p yty boc...

Страница 18: ...D Przykr ci g rn cz blendy maskuj cej szczeg E Przykr ci tylne pokrywy do k townik w P3 P3 RU1 BB BG MB K4 K5 PT3 PT2 EM1 EM1 EM1 Skr ci k towniki z p ytami bocznymi rubami EM4 Zamontowa boczne cz ci...

Страница 19: ...i bocznymi Skr ci ram usztywniaj c z p ytami bocznymi szczeg F Przykr ci tyln pokryw P5 P4 K8 K1 K9 PT1 P4 K1 EM2 EM1 EM7 EM1 Skr ci k towniki z p ytami bocznymi Skr ci ram usztywniaj c z p ytami bocz...

Страница 20: ...ci ramk usztywniaj c z k townikami rubami EM1 Przykr ci tyln i g rn pokryw rubami EM1 P1 P1 P2 PG PG PT1 RU2 EM1 EM1 EM1 Skr ci k towniki z p ytami bocznymi Skr ci ramk usztywniaj c z k townikami ruba...

Страница 21: ...minow nale y kierowa si w tym za o eniami instrukcji urz dzenia i jego pod czenia do czonymi do zakupionego kominka KONSERWACJA UWAGA Wszelkie prace konserwacyjne powinny by przeprowadzane na wych odz...

Страница 22: ...22 EN FOR INSTALLER Leave this manual with the appliance OWNER CONSUMER Retain this manual for future reference...

Страница 23: ...materials in production The use of the highest quality materials in production guarantees the efficient and reliable operation of the device to the final user This manual contains all information nec...

Страница 24: ...ilding elements and structural elements for any damage It should be remembered that every built in device is subject to periodic chimney sweep Any possible inspection or service of the appliance may o...

Страница 25: ...y parts of the unit NOTE No components in the unit may be substituted other than those supplied or recommended by the manufacturer Children the elderly and others should be informed and warned of the...

Страница 26: ...ed with a strip of non combustible material at least 50 cm wide The safe distance of combustible parts from the glass must be at least 150 cm 150 cm INSTALLATION RULES Installation should be carried o...

Страница 27: ...z przykr conymi nogami Umie ci kominek na nogach bazuj c si wed ug otwor w EP1 EP2 EM3 Step 1 position the fireplace stove on the base provided first positioning the base as close as possible to wher...

Страница 28: ...ulowa wysoko kominka dostosowuj c go do wysoko ci p yt Wypoziomowa kominek 452 0 1 K2 P1 P2 K7 K3 P1 K6 EM4 ST BD Fix the angles to the side plates using EM4 bolts detail B Install the side plates usi...

Страница 29: ...r ci g rn cz blendy maskuj cej szczeg E Przykr ci tylne pokrywy do k townik w P3 P3 RU1 BB BG MB K4 K5 PT3 PT2 EM1 EM1 EM1 Screw the angle brackets to the side plates with the EM4 bolts Install the si...

Страница 30: ...nymi Skr ci ram usztywniaj c z p ytami bocznymi szczeg F Przykr ci tyln pokryw P5 P4 K8 K1 K9 PT1 P4 K1 EM2 EM1 EM7 EM1 Screw the angle brackets to the side plates Screw the stiffener frame to the sid...

Страница 31: ...iaj c z k townikami rubami EM1 Przykr ci tyln i g rn pokryw rubami EM1 P1 P1 P2 PG PG PT1 RU2 EM1 EM1 EM1 Screw the angle brackets to the side plates Screw the stiffener frame to the brackets with the...

Страница 32: ...em follow the instructions for the ap pliance and its connection provided with the fireplace CONSERVATION ATTENTION All maintenance work should be carried out on a cooled unit at least 12 hours after...

Страница 33: ...33 DE F R DEN INSTALLATEUR Lassen Sie diese Anleitung beim Ger t EIGENT MER VERBRAUCHER Bewahren Sie diese Anleitung zum sp teren Nachschlagen auf...

Страница 34: ...entschieden haben das f r Ihre Sicherheit und Ihren Komfort entwickelt wurde Wir sind zuversichtlich dass Sie mit Ihrer Wahl zufrieden sein werden da wir uns bei der Entwicklung und Herstellung dieses...

Страница 35: ...Ger ts regelm ig auf Anzeichen von Sch den berpr ft werden Jegliche Inspektion oder Wartung des Ger ts darf nur von einem qualifizierten Schornsteinfeger durchgef hrt werden der ber die ent sprechende...

Страница 36: ...ut sind die Benutzung zu gestatten Tragen Sie aus Sicherheitsgr nden bei Wartungsarbeiten immer Handschuhe und eine Schutzbrille Sto en Sie nicht gegen Teile des Ger ts und lehnen Sie sich nicht dageg...

Страница 37: ...ft wenn es mit diesem Ger t geliefert wird HINWEISE ZUM TRANSPORT DES GER TS Dieses Ger t wurde f r eine einfache Installation und Montage konzipiert mit der M glichkeit es praktisch berall aufzustel...

Страница 38: ...biet geltenden Normen Bauvorschriften und Brandschutzbestimmungen erfolgen Spezifische Vorschriften f r die bauliche Sicherheit den Brandschutz und die sichere Nutzung sind in den in jedem Land gelten...

Страница 39: ...Detail A mit den geschraubten Beinen Stellen Sie den Kamin auf die Beine und folgen Sie dabei den L chern A A Przykr ci nogi do podstawy rubami EM3 szczeg A Wypoziomowa podstaw z przykr conymi nogami...

Страница 40: ...o kominka dostosowuj c go do wysoko ci p yt Wypoziomowa kominek 452 0 1 K2 P1 P2 K7 K3 P1 K6 EM4 ST BD Befestigen Sie die Winkel mit EM4 Schrauben an den Seitenw nden Detail B Montieren Sie die Seiten...

Страница 41: ...szczeg E Przykr ci tylne pokrywy do k townik w P3 P3 RU1 BB BG MB K4 K5 PT3 PT2 EM1 EM1 EM1 Befestigen Sie die Winkel mit EM4 Schrauben an den Seitenw nden Bringen Sie die Seitenteile der Abdeckplatt...

Страница 42: ...usztywniaj c z p ytami bocznymi szczeg F Przykr ci tyln pokryw P5 P4 K8 K1 K9 PT1 P4 K1 EM2 EM1 EM7 EM1 Schrauben Sie die Winkel an den Seitenw nden fest Schrauben Sie den Versteifungsrahmen an die Se...

Страница 43: ...ami EM1 Przykr ci tyln i g rn pokryw rubami EM1 P1 P1 P2 PG PG PT1 RU2 EM1 EM1 EM1 Schrauben Sie die Winkel an den Seitenw nden fest Schrauben Sie den Versteifungsrahmen mit den EM Schrauben an die Ha...

Страница 44: ...gibt befolgen Sie bitte die Anweisungen f r das Ger t und seinen Anschluss die mit dem ge kauften Kamin geliefert werden KONSERWACJA ACHTUNG Alle Wartungsarbeiten an einem gek hlten Ger t sollten mind...

Страница 45: ......

Страница 46: ...V1 AP 14 10 2021 Kratki pl Marek Bal ul Gombrowicza 4 Wsola 26 660 Jedli sk Poland tel 00 48 48 389 99 00 www kratki com www facebook com kratkipl www youtube com kratkipl www instagram com kratkipl...

Отзывы: