


EN
EN-6
NOTE:
For more information on operating the the
charger see the operating manual attached
to the charger.
NOTE:
It is possible to recharge partial.
WARNING:
- Make sure that the mains system is
equipped with an RCD (circuit breaker).
- Unwind the electric power cable com-
pletely before connecting it to the
mains socket.
- Use an electrical extension lead only
if in perfect condition; ensure that the
section is appropriate for the appliance
power rating.
- Never let the power cable run over
sharp edges and do not tread on it.
- The socket must be easily accessible.
6.1 CONTROL PANEL
(Fig. 1)
24) LEDs status of battery charge
(only for BC version)
The button (26) is illuminated when
pressed, indicating the charging status of
the battery.
- When the LED (24E) is illuminated, it
indicates that the battery charge sta-
tus is at maximum.
- When the LED (24C) is illuminated, it
indicates that the battery charge sta-
tus is at about half.
- When the LED (24A) is illuminated
(red LED), it indicates that the battery
charge status is at minimum.
With low battery (red LED (24A) on) the
machine shuts down or doesn’t start up.
The red LED “R” flashes for a few sec-
onds indicating that the battery must be
charged (not for BC Long Runversion).
section is appropriate for the appliance
power rating.
- Never let the power cable run over
sharp edges and do not tread on it.
- The socket must be easily accessible.
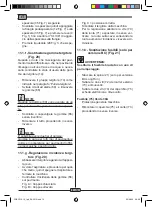
5.2 CHARGING THE
BATTERY (Fig. 9)
(for BC Long Run version
only)
DANGER:
Charge the batteries in well-ventilated ar-
eas which comply with standards in force
in the country of use.
For safety-related information, follow
what is described in chapter 1 of this
manual.
WARNING:
For information and warnings about the
battery and the battery charger, follow
what is described in the battery and bat-
tery charger manual enclosed with this
document.
- Bring the machine around the area where
is located the charger (36) supplied.
- Connect the charger (36) to mains sup-
ply.
WARNING:
Check that the mains voltage is compat-
ible with the operating voltage of the bat-
tery charger.
- Remove the plug (48) from the machine
and connect it to the socket (49) of the
charger.
- Let the batteries to charg until the green
led (50) located on the charger is light-
ning.
- Disconnect the power plug (48) and con-
nect it to the socket (51) on the machine.
FRECCIA 15_1ed_06-2013.indd 6
02/08/13 09:57
Содержание SSM 385 BC
Страница 4: ...Copertina FRECCIA 15_1ed_06 2013 indd 4 02 08 13 09 56 ...
Страница 6: ...Copertina FRECCIA 15_1ed_06 2013 indd 6 02 08 13 09 56 ...
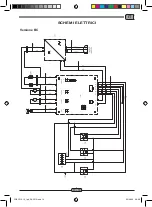
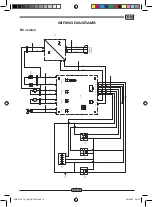
Страница 21: ...IT IT 15 SCHEMI ELETTRICI Versione BC FRECCIA 15_1ed_06 2013 indd 15 02 08 13 09 56 ...
Страница 37: ...EN EN 15 WIRING DIAGRAMS BC version FRECCIA 15_1ed_06 2013 indd 15 02 08 13 09 57 ...
Страница 53: ...FR FR 15 SCHÉMAS ÉLECTRIQUES Version BC FRECCIA 15_1ed_06 2013 indd 15 02 08 13 09 57 ...
Страница 69: ...DE DE 15 ELEKTRISCHE SCHALTPLÄNE Ausführung BC FRECCIA 15_1ed_06 2013 indd 15 02 08 13 09 57 ...
Страница 71: ...Copertina FRECCIA 15_1ed_06 2013 indd 7 02 08 13 09 56 ...


