background image

Kramer Electronics Ltd. 


VS-44H2 

– Using Embedded Webpages 

25 


Setting Auto Switching Mode 

You can set auto switching to Manual routing (the default) or auto switching, which includes 
Priority or Last Connected routing. 


In both Last Connected and Priority modes, when the input signal sync is lost (but the cable 
is not removed) there is a default delay (see 

Defining Global Settings

 on page 

18

before 

another input is automatically selected. When an input cable is removed, there is a delay 
before automatic switching takes place. 

In the Manual mode Video Lost timeouts are disabled. 

To change Auto Switching mode: 

1.  In the Navigation pane, click Routing Settings. The Switching page appears.  

2.  Open a selected HDMI Output settings window (for example, the HDMI output). 

3.  Select an output and set the switching mode to 

Manual

Priority

 or 

Last connected


In the Manual mode, the outputs are switched manually to the selected output. 
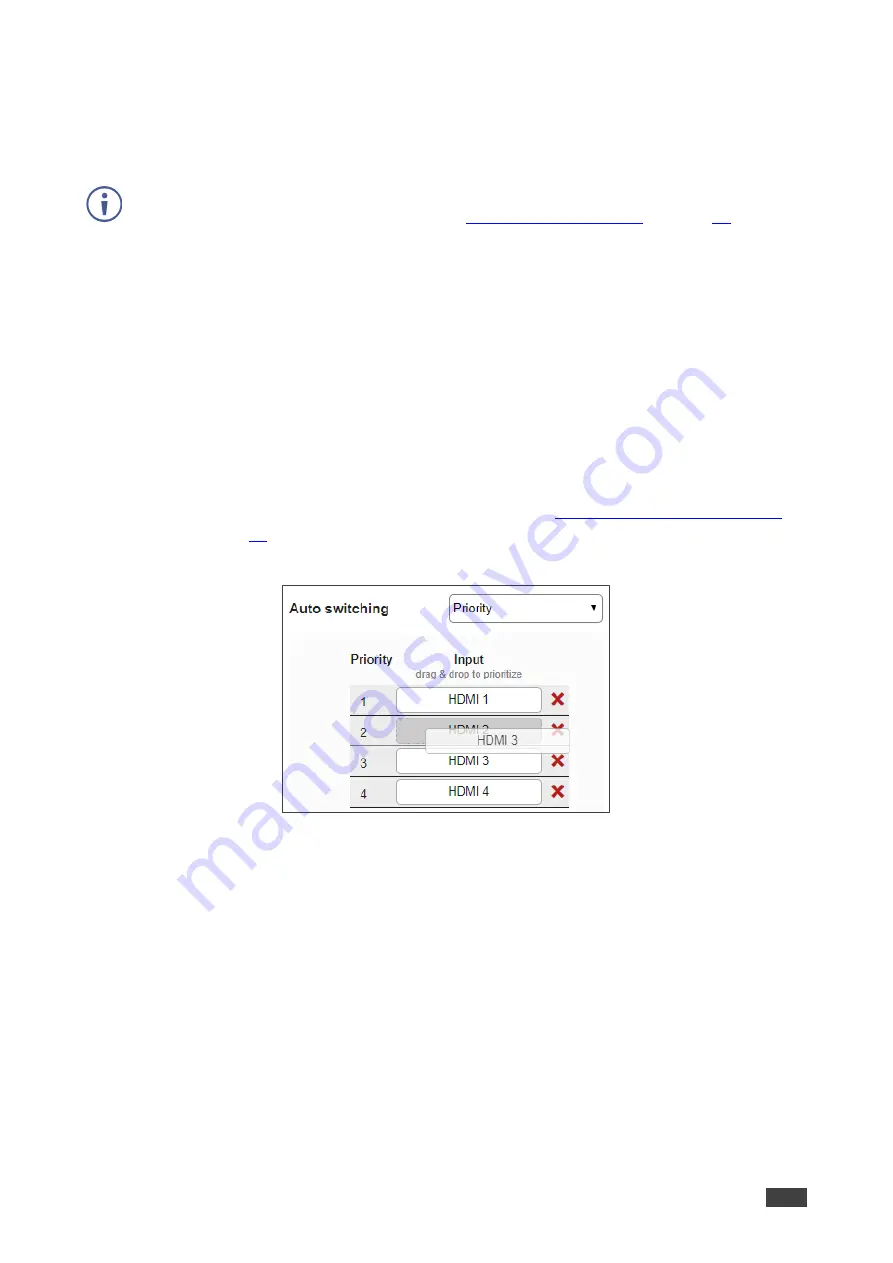
 

In the Priority mode, drag and drop the inputs from the highest to the lowest priority 
(you can remove an input from the priority list, see 

Removing and Adding an Input


on page 

27

). The inputs in the list are then switched to the selected output according 

to the set priority: 


Figure 20: Auto Switching Mode 

– Setting Auto Switching Priority 


Содержание VS-44H2

Страница 1: ...P N 2900 300654 Rev 1 www kramerAV com USER MANUAL MODEL VS 44H2 4K 4x4 Matrix Switcher ...

Страница 2: ...s 12 Operating via Ethernet 13 Using Embedded Webpages 16 Browsing VS 44H2 Webpages 17 Defining Global Settings 18 Routing Inputs to Outputs 21 Defining HDMI Input Port Parameters 23 Defining HDMI Output Parameters 24 Managing EDID 27 Configuring Device Automation 32 Restarting and Resetting to Factory Default Parameters 33 Changing Device Name 35 Setting Authentication 36 Changing the Ethernet Se...

Страница 3: ...ignal quality due to poor matching and elevated noise levels often associated with low quality cables Do not secure the cables in tight bundles or roll the slack into tight coils Avoid interference from neighboring electrical appliances that may adversely influence signal quality Position your Kramer VS 44H2 away from moisture excessive sunlight and dust Safety Instructions Caution This equipment ...

Страница 4: ... advanced and user friendly operation Exceptional Quality High Performance AV Matrix Switches four 4K 60Hz 4 4 4 HDR HDMI HDCP 2 2 1 4 compliant signals to four 4K 60Hz 4 4 4 HDR HDMI HDCP 2 2 1 4 compliant outputs at up to 18G data rate featuring Kramer re Klocking and Equalization Technology that rebuilds the digital signal to travel longer distances For optimum range and performance use recomme...

Страница 5: ...HDCP per input Cost Effective Maintenance Input selection indicators facilitate easy local maintenance and troubleshooting Firmware upgrade via Ethernet Easy Installation 19 enclosure for rack mounting in a 1U rack space with included rack ears and universal 100 240V AC power supply Typical Applications VS 44H2 is ideal for the following typical applications Control rooms with multiple displays Pr...

Страница 6: ... video on a selected output Press the selected output and then press MUTE ALL Button Press followed by an input button to connect the selected input to all outputs For example press ALL and then Input button 2 to connect input 2 to all the outputs STO Button Press STO followed by an IN or OUT 1 to 4 button to store the current switching configuration to the location corresponding to that INPUT num...

Страница 7: ... USB Port Use to charge a device PROG USB Mini Port Connect to a PC serial controller to control the device Reset Button Press and hold for about 8 seconds to reset the configuration to its default parameters ETHERNET RJ 45 Connector Connect to a PC via a LAN RS 232 9 pin D sub Connector Connect to a PC serial controller to control the device Mains Power Connector Fuse Plug in the power cord Power...

Страница 8: ...g Caution Mount VS 44H2 before connecting any cables or power Warning Ensure that the environment e g maximum ambient temperature air flow is compatible for the device Avoid uneven mechanical loading Appropriate consideration of equipment nameplate ratings should be used for avoiding overloading of the circuits Reliable earthing of rack mounted equipment should be maintained Mount VS 44H2 in a rac...

Страница 9: ...onnect VS 44H2 as illustrated in the example in Figure 3 1 Connect up to four HDMI sources for example Blu ray players and laptops to the HDMI INPUT connectors 2 Connect the HDMI OUTPUT connectors to up to four HDMI acceptors for example projectors and displays 3 Connect the power adapter to VS 44H2 and to the mains electricity not shown in Figure 3 4 Connect the ETHERNET RJ 45 port to the Network...

Страница 10: ...rminal block connector allowing the RS 232 to control VS 44H2 Connect the RS 232 terminal block on the rear panel of VS 44H2 to a PC controller as follows From the RS 232 9 pin D sub serial port connect Pin 2 to the TX pin on the VS 44H2 RS 232 terminal block Pin 3 to the RX pin on the VS 44H2 RS 232 terminal block Pin 5 to the G pin on the VS 44H2 RS 232 terminal block RS 232 Device VS 44H2 13 ...

Страница 11: ...utton operations within 15 seconds otherwise that action times out if the operation is not carried out Any switching operation is performed by selecting the output or all the outputs first and then selecting the input An illuminated input button means that a valid input is connected to that input An illuminated output button means that a display is connected to that output VS 44H2 front panel butt...

Страница 12: ...ted to output 1 In the same way you can route the same input to another output or different inputs to different outputs Switching an Input to All the Outputs VS 44H2 enables switching an input to all the outputs via the front panel buttons Pressing ALL selects all the outputs To switch an input to all the outputs 1 Press ALL The ALL button flashes as well as all the 7 segment display LEDs 2 Press ...

Страница 13: ...isplay a hyphen 2 Select the output to which the pattern is routed 3 Select the pattern 1 to 4 by pressing an input The 7 segment display returns to normal operation mode and P under the selected output number indicates that a pattern is routed to that output A pattern is routed to the selected output Storing and Recalling Presets You can store up to 8 presets Each setup includes the device config...

Страница 14: ...signing EDID to Inputs VS 44H2 enables using the EDID button to assign EDID to a selected input To copy the EDID from a connected output to a selected input 1 Press EDID on the front panel button The EDID button flashes and the 7 segment display shows the current EDID status d for default or the number of the output source 2 Press an input button for example IN 3 or press ALL for copying to all th...

Страница 15: ...nt to connect via a router and your IT system is based on IPv6 speak to your IT department for specific installation instructions Connecting Ethernet Port Directly to PC You can connect the Ethernet port of VS 44H2 directly to the Ethernet port on your PC using a crossover cable with RJ 45 connectors This type of connection is recommended for identifying VS 44H2 with the factory configured default...

Страница 16: ... 4 Highlight either Internet Protocol Version 6 TCP IPv6 or Internet Protocol Version 4 TCP IPv4 depending on the requirements of your IT system 5 Click Properties The Internet Protocol Properties window relevant to your IT system appears as shown in Figure 7 or Figure 8 Figure 7 Internet Protocol Version 4 Properties Window ...

Страница 17: ...any IP address in the range 192 168 1 1 to 192 168 1 255 excluding 192 168 1 39 that is provided by your IT department Figure 9 Internet Protocol Properties Window 7 Click OK 8 Click Close Connecting Ethernet Port via Network Hub or Switch You can connect the Ethernet port of VS 44H2 to the Ethernet port on a network hub or using a straight through cable with RJ 45 connectors Configuring Ethernet ...

Страница 18: ...ebpages on page 17 Defining Global Settings on page 18 Routing Inputs to Outputs on page 21 Defining HDMI Input Port Parameters on page 23 Defining HDMI Output Parameters on page 24 Managing EDID on page 27 Configuring Device Automation on page 32 Restarting and Resetting to Factory Default Parameters on page 33 Changing Device Name on page 35 Setting Authentication on page 36 Changing the Etherne...

Страница 19: ...curity is enabled The Login window appears to disable security see Setting Authentication on page 36 Figure 10 Embedded Webpages Login Window 2 Enter the Username default is Admin and Password default is Admin and click Sign in The Routing Settings webpage appears Figure 11 Routing Settings Page 3 Click the Navigation Pane on the left side of the screen to access the relevant webpage Click the arr...

Страница 20: ...g and Loading Presets on page 20 Setting Video Timeouts VS 44H2 enables setting the video switching timeouts To set the video timeouts 1 In the Navigation pane click Routing Settings The Routing Matrix page appears see Figure 11 2 Click Presets Settings next to Routing Matrix The Auto Switching Timeouts tab in the Global Settings window appears Figure 12 Global Settings Window Auto Switching Timeo...

Страница 21: ...ds Signal Loss timeout Output Inactivity Signal Loss timeout manual override mode inactivity Signal Gain Description When a new signal is detected delay switching for x seconds Range default 0 to 90 seconds 0 by default Conditions No conditions Input Unplug Description When the cable is unplugged delay switching for x seconds Range default 0 to 90 seconds 0 by default Conditions Input Unplug timeo...

Страница 22: ...Settings The Routing Matrix page appears 2 Click Presets Settings next to Routing Matrix The Global Settings window appears 3 Click the Presets tab The Presets tab appears Figure 13 Global Settings Window Presets Tab 4 Select a preset from 1 to 8 5 Do any of the following Click Save to save the current device configuration to a selected preset Click Load to load an existing preset Click the lock i...

Страница 23: ...deo The Routing Matrix page displays the current routing status For example in Figure 14 the HDMI 1 input is currently routed to the HDMI 1 output as indicated by the green routing button Figure 14 Routing Matrix Page Input to Output Example To route an input to an output 1 In the Navigation pane click Routing Settings The Routing Settings page appears 2 Click a white routing button within the mat...

Страница 24: ...utput signal 1 In the Navigation pane click Routing Settings The Routing Settings page appears Figure 17 Port Settings HDMI Output Port Icons 2 The HDMI Output icons enable performing the following actions Enabling audio only mode only audio is routed through the output a black pattern screen is displayed and 5V cut off is disabled Selecting a pattern to display on the output or if a pattern is se...

Страница 25: ...ded webpages To set an input port 1 In the Navigation pane click Routing Settings The Routing Settings page appears 2 Click an HDMI input for example HDMI 1 Figure 18 Routing Settings Page HDMI Input Settings 3 perform the following actions if required Enter a port label Check HDCP support Check force RGB and or Force 2LPCM 4 Click Save The HDMI input parameters are set ...

Страница 26: ...page appears 2 Click an HDMI output for example HDMI 1 Figure 19 Routing Settings Page HDMI Input Settings 3 Perform the following actions Enter a port label View the routing status Set routing to audio only Select a video pattern from the Video pattern drop down box Select the switching mode from the Auto Switching drop down box Manual routing Priority or Last Connected switching see Setting Auto...

Страница 27: ... the Manual mode Video Lost timeouts are disabled To change Auto Switching mode 1 In the Navigation pane click Routing Settings The Switching page appears 2 Open a selected HDMI Output settings window for example the HDMI output 3 Select an output and set the switching mode to Manual Priority or Last connected In the Manual mode the outputs are switched manually to the selected output In the Prior...

Страница 28: ...ing and Adding an Input on page 27 Figure 21 Auto Switching Mode Last Connected Mode 4 Click Save Priority and Last Connected settings are indicated in the Routing Settings page as follows The input priority order appears under the output see HDMI 1 Figure 22 Last Connected LC appears under output see HDMI 2 in Figure 22 Figure 22 Auto Switching Mode Priorities List Auto switch settings are comple...

Страница 29: ...ode to Priority or Last connected 4 Perform the following Remove an input by clicking X beside the input for example HDMI 1 Add an input back by opening the Add an input drop down box and select that input Figure 23 Deleting Adding HDMI 1 from the Priority List Managing EDID You can copy EDID to any of the inputs in any of the following ways Copying the EDID from an Output on page 28 Copying the E...

Страница 30: ...output To copy an EDID from an output to an input 1 In the Navigation pane click EDID Management The EDID Management page appears Figure 24 EDID Management Page 2 Select Read from Output 3 Select an output for example Output 1 Figure 25 EDID Management Page Reading EDID from an output Make sure that that output is connected to an acceptor ...

Страница 31: ...r example Input 1 and Input 2 Figure 26 EDID Management Page Select the Inputs Copy To 5 Click COPY The Output 1 EDID is copied to the selected inputs Figure 27 EDID Page EDID Copied The following message appears Figure 28 EDID Management Page EDID Copy Success 6 Click OK EDID is copied from a selected output to the selected input s ...

Страница 32: ... 1 In the Navigation pane click EDID Management The EDID Management page appears see Figure 24 2 In the Read from area select Input 3 In the Copy to area select an input as the EDID destination for example Input 1 Figure 29 Figure Caption 4 Select the input s to which the EDID is to be copied for example Input 1 and Input 3 Figure 30 EDID Management Page Select an EDID Input Read From ...

Страница 33: ...pied from a selected input to the selected input s Copying the Default EDID to an input VS 44H2 enables copying the default EDID to a selected input To read the EDID from the default EDID 1 In the Navigation pane click EDID The EDID Management page appears see Figure 24 2 Click Default 3 Select the input s or all the inputs to which the default EDID is to be copied 4 Click Copy and follow the inst...

Страница 34: ...aestro is a powerful tool that enables you to configure single trigger room element automation scenarios without the need for complicated programming To use room automation you need to define triggers that upon an event will execute scripts which include a sequence of actions commands which can appear in different scenarios that will be carried out via any defined ports Download the Kramer Maestro...

Страница 35: ...ger activates the scripts configured in the automation page For example when using the Scheduling trigger you can activate a series of actions following a preset schedule Restarting and Resetting to Factory Default Parameters Two types of reset can be performed Restart Reboots your device and keeps all your device settings including the IP address and password Factory reset Reboots your device and...

Страница 36: ...es 34 To restart VS 44H2 or reset it to its factory default parameters 1 In the Navigation pane click Settings The General tab in the Settings page appears Figure 34 Settings Page 2 Do the following To restart the device Click Restart the device restarts ...

Страница 37: ...e Click Yes and follow the online instructions Device is restarted reset Changing Device Name Customizing device name can help identify where the device is located in your installation To change the device name 1 In the Navigation pane click Settings The General tab in the Settings page appears 2 In the General tab enter the device name 3 Click Save Device name has changed ...

Страница 38: ...F next to Security The following message appears Figure 36 Authentication Disabling Authentication 3 Enter the current password and click Save The device settings page no longer shows the authentication details Figure 37 Authentication Security Deactivated Webpages are accessed without authentication To access webpages using the password 1 In the Navigation pane click Settings The General tab in t...

Страница 39: ...rnet Settings The Communication tab shows the device details such as IP Address Mask MAC address and so on and enables changing them You can perform the following actions Changing Ethernet Settings when DHCP is OFF on page 37 Changing Ethernet Settings when DHCP is ON on page 38 Changing Ethernet Settings when DHCP is OFF By default DHCP is set to OFF To define Ethernet parameters when DHCP is set...

Страница 40: ...ew IP address see below Ethernet settings are defined Changing Ethernet Settings when DHCP is ON For proper settings and before changing to DHCP consult your Network administrator To define Ethernet parameters when DHCP is set to ON 1 In the Navigation pane click Settings The General tab in the Settings page appears see Figure 34 2 Select the Communication tab see Figure 41 3 Take note of the Devi...

Страница 41: ...ade 1 In the Navigation pane click Settings The General tab in the Settings page appears see Figure 34 2 Select the Upgrade tab Figure 42 Upgrade Tab 3 Click Upgrade and select the new firmware file The following message appears Figure 43 Upgrade Tab Firmware Upgrade Message 4 Click OK Wait for completion of the upgrade process Figure 44 Upgrade Tab Firmware Upgrade Process ...

Страница 42: ...de Tab Viewing the New Firmware Version The new firmware is uploaded to the device Setting Date and Time VS 44H2 enables setting the date and time via the embedded webpages To set the time and date 1 in the Navigation Pane click Settings the General tab in the Settings page appears see Figure 34 2 Select the Time and Date tab Figure 46 Time and Date ...

Страница 43: ...te Time Zone 4 If required use time server disables setting device date and set the time server address 5 Click Save Date and time are defined Viewing General Version Information VS 44H2 About page enables viewing the webpage version and Kramer Electronics Ltd details Figure 47 About Page ...

Страница 44: ...Upgrading Firmware Use the Kramer K UPLOAD software to upgrade the firmware via the VS 44H2 Ethernet port The latest version of K UPLOAD and installation instructions can be downloaded from our website at www kramerav com support product_downloads asp 15 ...

Страница 45: ...ection mute test patterns EDID front panel lock buttons Input output LCD display Rear Panel Ports RS 232 USB and Ethernet Power Consumption 22VA Source 100 240V AC 50 60Hz Environmental Conditions Operating Temperature 0 to 40 C 32 to 104 F Storage Temperature 40 to 70 C 40 to 158 F Humidity 10 to 90 RHL non condensing Regulatory Compliance Safety CE FCC Environmental RoHs WEEE Enclosure Size 19 1...

Страница 46: ...ure date 2017 ISO week 255 Filter driver None EDID revision 1 3 Input signal type Digital Color bit depth Undefined Display type RGB color Screen size 520 x 320 mm 24 0 in Power management Standby Suspend Active off sleep Extension blocs 1 CEA CTA EXT DDC CI n a Color characteristics Default color space Non sRGB Display gamma 2 20 Red chromaticity Rx 0 674 Ry 0 319 Green chromaticity Gx 0 188 Gy 0...

Страница 47: ...1080i at 60Hz HDTV 16 9 1 1 1280 x 720p at 60Hz HDTV 16 9 1 1 720 x 480p at 60Hz EDTV 16 9 32 27 720 x 480p at 60Hz EDTV 4 3 8 9 720 x 480i at 60Hz Doublescan 16 9 32 27 720 x 576i at 50Hz Doublescan 16 9 64 45 640 x 480p at 60Hz Default 4 3 1 1 NB NTSC refresh rate Hz 1000 1001 CE vendor specific data VSDB IEEE registration number 0x000C03 CEC physical address 1 0 0 0 Maximum TMDS clock 165MHz CE...

Страница 48: ...fix nn Command Parameter CR LF Command parameters Multiple parameters must be separated by a comma In addition multiple parameters can be grouped as a single parameter using brackets and Command chain separator character Multiple commands can be chained in the same string Each command is delimited by a pipe character Parameters attributes Parameters may contain multiple attributes Attributes are i...

Страница 49: ...e input EEPROM Destination bitmap size depends on device properties for 64 inputs it is a 64 bit word Example bitmap 0x0013 means inputs 1 2 and 5 are loaded with the new EDID In certain products Safe_mode is an optional parameter See the HELP command for its availability COMMAND CPEDID edid_io src_id edid_io dest_bitmap CR or CPEDID edid_io src_id edid_io dest_bitmap safe_mode CR FEEDBACK nn CPED...

Страница 50: ...uto Get Input 2 EDID color space EDID CS 3 CR EDID DC Force removal of deep color on EDID or leaving it as in the original EDID COMMAND EDID DC in_index deep_color_state CR FEEDBACK Get nn EDID DC in_index deep_color_state CR LF in_index Number that indicates the specific input 1 Input 1 2 Input 2 3 Input 3 4 Input 4 deep_color_state 0 Don t change 1 Remove deep color Remove deep color on input 2 ...

Страница 51: ... specific input 1 Input 1 2 Input 2 3 Input 3 4 Input 4 mode HDCP mode 0 HDCP Off 3 HDCP defined according to the connected output Get the input HDCP MODE of Input 1 HDCP MOD 1 CR HDCP STAT Get HDCP signal status io_mode 1 get the HDCP signal status of the sink device connected to the specified output io_mode 0 get the HDCP signal status of the source device connected to the specified input COMMAN...

Страница 52: ...ocol permission level to Admin when the password defined in the PASS command is 33333 LOGIN admin 33333 CR LOGIN Get current protocol permission level The permission system works only if security is enabled with the SECUR command For devices that support security LOGIN allows the user to run commands with an End User or Administrator permission level In each device some connections allow logging i...

Страница 53: ...chine_name CR FEEDBACK nn NAME machine_name CR LF machine_name String of up to 15 alpha numeric chars can include hyphen not at the beginning or end Set the DNS name of the device to room 442 NAME room 442 CR NAME Get machine DNS name The machine name is not the same as the model name The machine name is used to identify a specific machine or a network in use with DNS feature on COMMAND NAME CR FE...

Страница 54: ...factory or the net ip command Enable DHCP mode for port 1 if available NET DHCP 0 1 CR NET DHCP Get DHCP mode For Backward compatibility the id parameter can be omitted In this case the Network ID by default is 0 which is the Ethernet control port COMMAND NET DHCP netw_id CR FEEDBACK nn NET DHCP netw_id dhcp_mode CR LF netw_id Network ID the device network interface if there are more than one Coun...

Страница 55: ...ECATED and is now replaced by NET CONFIG command COMMAND NET MASK net_mask CR FEEDBACK nn NET MASK net_mask CR LF net_mask Format xxx xxx xxx xxx Set the subnet mask to 255 255 0 0 NET MASK 255 255 000 000 CR NET MASK Get subnet mask For proper settings consult your network administrator Note that this command is DEPRECATED and is now replaced by NET CONFIG command COMMAND NET MASK CR FEEDBACK nn ...

Страница 56: ...AND PRST RCL preset CR FEEDBACK nn PRST RCL preset CR LF preset Preset number 1 Preset 1 2 Preset 2 3 Preset 3 4 Preset 4 5 Preset 5 6 Preset 6 7 Preset 7 8 Preset 8 Recall preset 1 PRST RCL 1 CR PRST STO Store current connections volumes and modes in preset In most units video and audio presets with the same number are stored and recalled together by commands PRST STO and PRST RCL COMMAND PRST ST...

Страница 57: ... Day Month Year COMMAND TIME CR FEEDBACK nn TIME day_of_week date data CR LF day_of_week One of SUN MON TUE WED THU FRI SA T date Format YYYY MM DD where YYYY Year MM Month DD Day data Format hh mm ss where hh hours mm minutes ss seconds Get device time and date TIME CR TIME LOC Get local time offset from UTC GMT If the time server is configured device time calculates by adding UTC_off to UTC time...

Страница 58: ...e following attributes comprise the signal ID direction_type Direction of the port o IN Input o OUT Output port_format Type of signal on the port o HDMI port_index The port number as printed on the front or rear panel 1 Input 1 2 Input 2 3 Input 3 4 Input 4 1 Output 1 2 Output 2 3 Output 3 4 Output 4 signal_type Signal ID attribute o VIDEO o AUDIO index Indicates a specific channel number when the...

Страница 59: ...d Protocol 3000 command COMMAND X LABEL direction_type port_format port_index label_txt CR FEEDBACK nn X LABEL direction_type port_format port_index label_txt CR LF The following attributes comprise the port ID direction_type Direction of the port o IN o OUT port_format Type of signal on the port o HDMI port_index The port number as printed on the front or rear panel 1 Input 1 2 Input 2 3 Input 3 ...

Страница 60: ...ecific channel number when there are multiple channels of the same type Set auto switching input signals group for Output 1 X MTX SET INPUTS out hdmi 1 vid eo 1 in hdmi 1 video 1 in hdmi 2 video 1 CR X MTX SET INPUTS Get auto switching input signals group per output The order of the inputs in the list is fixing implicitly the priority of each input in case the user choose later Priority auto switc...

Страница 61: ...ndex CR FEEDBACK nn X MUTE direction_type port_format port_index signal_type index state CR LF The following attributes comprise the signal ID direction_type Direction of the port o IN Input o OUT Output port_format Type of signal on the port o HDMI port_index The port number as printed on the front or rear panel signal_type Signal ID attribute o VIDEO o AUDIO index Indicates a specific channel nu...

Страница 62: ...pe Direction of the port o OUT Output port_format Type of signal on the port o HDMI port_index The port number as printed on the front or rear panel 1 Output 1 2 Output 2 3 Output 3 4 Output 4 signal_type Signal ID attribute o VIDEO index Indicates a specific channel number when there are multiple channels of the same type pattern_id Pattern index number 0 None 1 Color bar 2 Blue screen 3 Green sc...

Страница 63: ...eo 1 CR This is an Extended Protocol 3000 command COMMAND X ROUTE direction_type1 port_type1 port_index1 signal_type1 index1 direction_type2 port_type2 port_index2 signal_type2 index2 CR FEEDBACK nn X ROUTE direction_type1 port_type1 port_index1 signal_type1 index1 direction_type2 port_type2 port_index2 signal_type2 index2 CR LF The following attributes comprise the signal ID direction_type Direct...

Страница 64: ... enough space for data firmware FPGA ERR_FS_NOT_ENOUGH_SPACE 11 Not enough space file system ERR_FS_FILE_NOT_EXISTS 12 File does not exist ERR_FS_FILE_CANT_CREATED 13 File can t be created ERR_FS_FILE_CANT_OPEN 14 File can t open ERR_FEATURE_NOT_SUPPORTED 15 Feature is not supported ERR_RESERVED_2 16 Reserved ERR_RESERVED_3 17 Reserved ERR_RESERVED_4 18 Reserved ERR_RESERVED_5 19 Reserved ERR_RESE...

Страница 65: ...d or any other party authorized to repair Kramer Electronics products this product must be insured during shipment with the insurance and shipping charges prepaid by you If this product is returned uninsured you assume all risks of loss or damage during shipment Kramer Electronics will not be responsible for any costs related to the removal or re installation of this product from or into any insta...

Страница 66: ...and a list of Kramer distributors visit our website where updates to this user manual may be found We welcome your questions comments and feedback The terms HDMI HDMI High Definition Multimedia Interface and the HDMI Logo are trademarks or registered trademarks of HDMI Licensing Administrator Inc All brand names product names and trademarks are the property of their respective owners ...

Отзывы: