VP-778 Quick Start (P/N: 2900-300445QS REV 1)
P/N:
2900- 300445QS
Rev:
1
Scan for full manual
VP-778 Quick Start Guide
This guide helps you install and use your
VP-778
for the first time.
Go to
www.kramerav.com/downloads/VP-778
to download the latest user manual and check if firmware
upgrades are available.
Step 1: Check what’s in the box
VP-778
Presentation Matrix Switcher/Dual Scaler
1 Set of rack ears
4 Rubber feet
IR remote control transmitter with batteries
1 Power cord
1 Quick start guide
2 DVI (M) to 15-pin HD (F) (AD-DM/GF)
2 DVI-A (M) to 5 BNC (F) adapter cables (ADC-DMA/5BF-1)
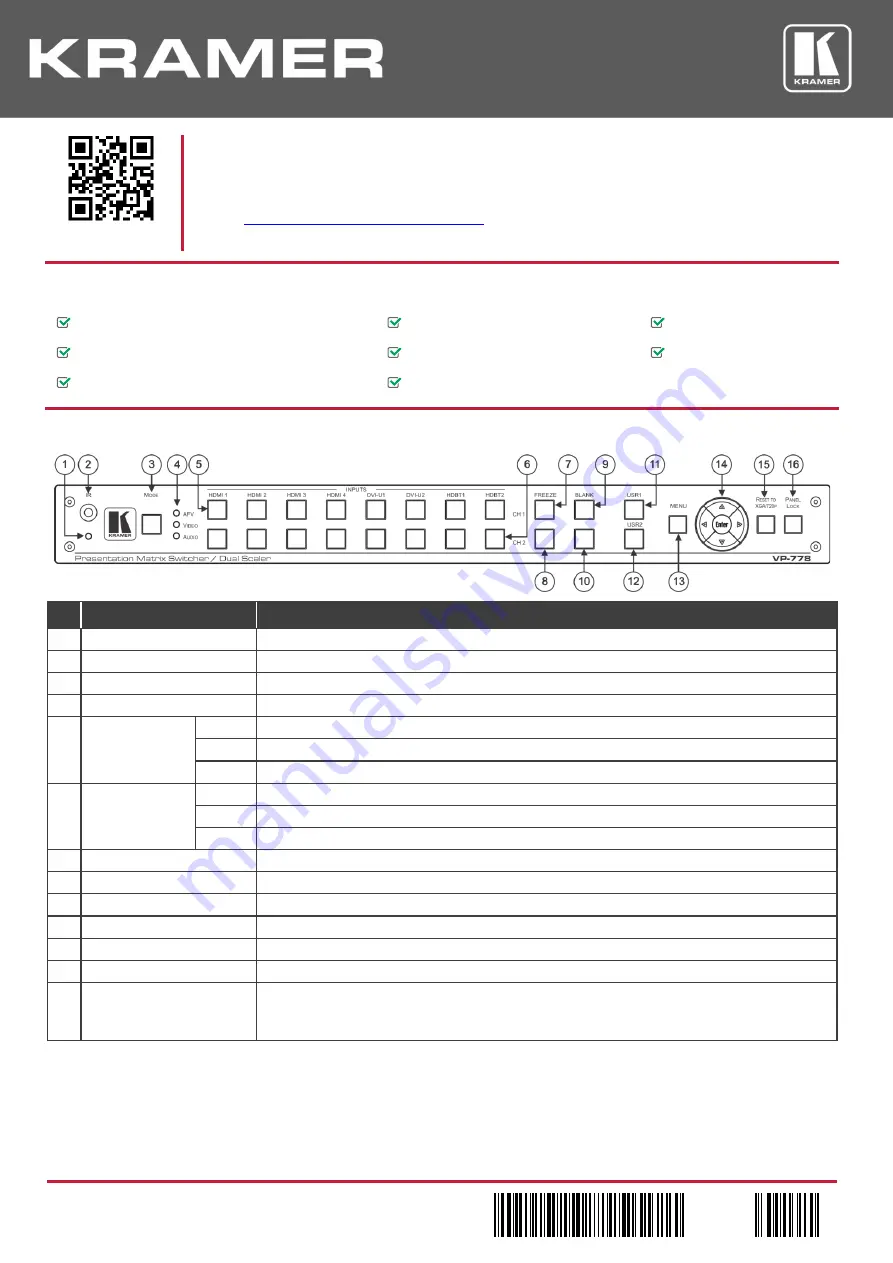
Step 2: Get to know your VP-778
#
Feature
Function
1
IR LED
Lights red when the unit accepts IR remote commands
2
IR Receiver
Accepts IR remote commands
3
MODE Button
Select the operation mode: audio follow video (AFV), Video or audio
4
Mode LED indicators
Indicate the operation mode, as selected via the MODE button
5
CH 1 INPUT
Selector Buttons
HDMI
Press to select the HDMI input (from 1 to 4)
DVI-U
Press to select the DVI universal input: HDMI, VGA, component or composite video (from 1 to 2)
HDBT
Press to select the HDBT input (from 1 to 2)
6
CH 2 INPUT
Selector Buttons
HDMI
Press to select the HDMI input (from 1 to 4)
DVI-U
Press to select the DVI universal input: HDMI, VGA, component or composite video (from 1 to 2)
HDBT
Press to select the HDBT input (from 1 to 2)
7
CH 1 FREEZE Button
Press to freeze/unfreeze the CH 1 output video image
8
CH 2 FREEZE Button
Press to freeze/unfreeze the CH 2 output video image
9
CH 1 BLANK Button
Press to toggle between a blank screen (black) and the CH 1 display
10
CH 2 BLANK Button
Press to toggle between a blank screen (black) and the CH 2 display
11
USR1 User-defined Button
can be assigned and programmed (for example, to turn a projector on and off)
12
USR2 User-defined Button
can be assigned and programmed (for example, to turn a projector on and off)
13
MENU Button
Press to access/exit the OSD menu. While browsing the CH1 OSD menu, press and hold the
MENU button to jump to the CH2 menu and vice versa. When in the MIC Effects menu, press and
hold the MENU button to toggle between MIC 1 and MIC 2


