background image


10 

VP-419xl - Controlling the VP-419xl 


5.2.1 

The MAIN MENU 

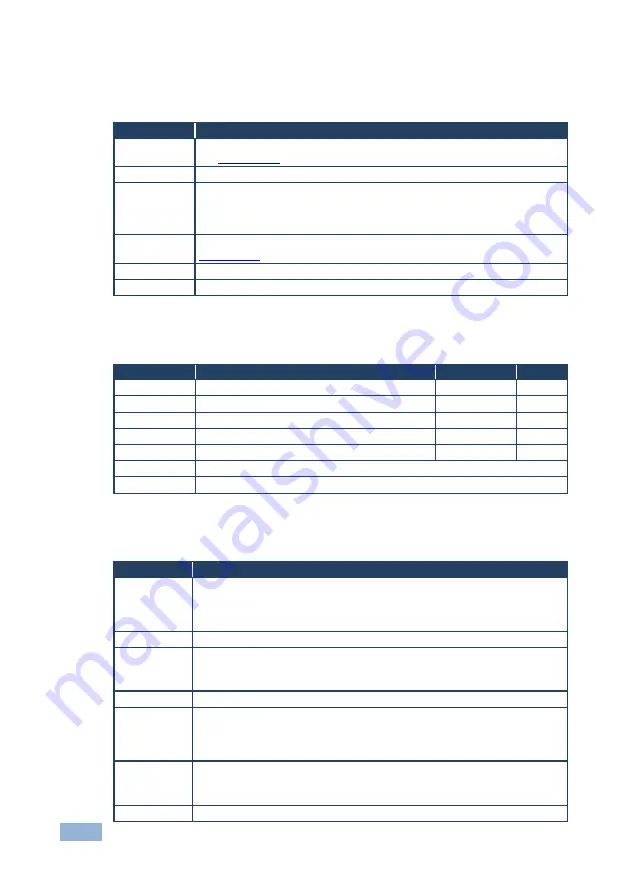
The following table defines the MAIN MENU features and functions. 

Mode 

Function 

PICTURE 

Set the picture parameters (contrast, brightness, color, hue, detail and reset), 
see 

Sectio

 5.2.2


SOURCE 

Select the desired input source: video, s-Video, Y, CB, CR or computer 

RESOLUTION 

After selecting the output type (by pressing the RGB/RESET button or via the 
OSD menu), select between the RGB output resolutions (VGA, SVGA, XGA, 
SXGA, UXGA, WXGA, WXGA+, WSXGA+) or the YPbPr output resolutions 
(480p, 576p, 720p or 1080i/p) 

SETUP 

Select the aspect, output, 3D enhance, digital NR, display and HV output (see 

Sectio

 5.2.3

) 

INFORMATION  Displays the source, resolution and software version 

EXIT 

Select to exit the menu 

5.2.2 

The PICTURE Menu  

The following table defines the PICTURE menu. 

Parameter 

Function  

Range  

Default 

CONTRAST 

Adjust the contrast 

From 0 to 63 

58 

BRIGHT 

Adjust the brightness 

From 0 to 63 

31 

COLOR  

Adjust the color 

From 0 to 63 

31 

HUE 

Adjust the hue 

From 0 to 63 

31 

DETAIL 

Adjust the sharpness 

From 0 to 63 

10 

RESET 

Select RESET and press ENTER to reset to the default parameters 

EXIT 

Select to exit to the MAIN MENU 

5.2.3 

The SETUP Menu 

The following table defines the SETUP menu. 

Parameter 

Function  

ASPECT 

Select between STANDARD, 4:3 and 16:9 

STANDARD outputs the signal in the same aspect ratio as the input aspect ratio. 
4:3 and 16:9 always outputs as 4:3 and 16:9 respectively, regardless of the input 
aspect ratio 

OUTPUT  

Select a PC (RGB) output or an HDTV (Y, Pb, Pr) output 

3D ENHANCE  Turn the 3D comb filter function ON or OFF 

When a video player or a non-standard video source is connected to the input, the 
output picture may jitter. If this occurs, turn the 3D Comb Filter to OFF. 

DIGITAL NR 

Turn the digital noise reduction function ON or OFF 

DISPLAY 

Set to ON to display the input standard and the output resolution on the screen 
all the time. Set to INFO to briefly display the input standard and the output 
resolution on the screen after a change is made 
Otherwise, set to OFF 

HV OUTPUT  

Select ON to send H and V synchronization when Y, Pb, Pr is selected for the 
output 

H and V are 

always

 sent when RGB is selected at the output 

EXIT 

Select to exit to the MAIN MENU 

Содержание VP-419XL

Страница 1: ...KRAMER ELECTRONICS LTD USER MANUAL MODEL VP 419xl Video to SXGA HD Scaler P N 2900 000201 Rev 7...

Страница 2: ......

Страница 3: ...deo to SXGA HD Scaler 5 4 Connecting the VP 419xl 7 5 Controlling the VP 419xl 9 5 1 Controlling via the Front Panel Buttons 9 5 2 Using the CONTROL Buttons 9 5 3 Using the Infra Red Remote Control Tr...

Страница 4: ...in 11 groups that are clearly defined by function GROUP 1 Distribution Amplifiers GROUP 2 Switchers and Routers GROUP 3 Control Systems GROUP 4 Format Standards Converters GROUP 5 Range Extenders and...

Страница 5: ...nce high resolution cables to avoid interference deterioration in signal quality due to poor matching and elevated noise levels often associated with low quality cables Do not secure the cables in tig...

Страница 6: ...l and Electronic Equipment WEEE Directive 2002 96 EC aims to reduce the amount of WEEE sent for disposal to landfill or incineration by requiring it to be collected and recycled To comply with the WEE...

Страница 7: ...Scaler also features Automatic detection of NTSC N4 43 PAL PAL M PAL N SECAM video standards An On Screen Display OSD for easy setup and adjustment accessible via the IR remote control and via the fr...

Страница 8: ...control transmitter 3 RGB RESET Button Illuminates when the output resolution is set to RGB Press to set output to Y Pb Pr the button no longer illuminates Press and hold for more than 3 seconds to re...

Страница 9: ...omposite video source 14 Y RCA Connector Connects to the interlaced component video source Not compatible with progressive scan Y Pb Pr or HDTV For component video connect all three connectors Y Cb Cr...

Страница 10: ...component video source for example a DVD player to the Y Cb and Cr INPUT RCA connectors 4 Connect an SXGA graphics source to the SXGA PASS INPUT 15 pin HD connector This PC input signal is not scaled...

Страница 11: ...8 VP 419xl Connecting the VP 419xl Figure 2 Connecting the VP 419xl Video to SXGA HD Scaler...

Страница 12: ...the resolution to VGA or 480p Press for 3 seconds to reset to VGA and press for 10 seconds to reset to 480p CONTROL buttons including the MENU ENTER and buttons INPUT SELECTOR buttons for selecting th...

Страница 13: ...TAIL Adjust the sharpness From 0 to 63 10 RESET Select RESET and press ENTER to reset to the default parameters EXIT Select to exit to the MAIN MENU 5 2 3 The SETUP Menu The following table defines th...

Страница 14: ...esolution to 1024x768 SXGA Set the output resolution to 1280x1024 480p Set the output resolution to 852x480p 576p Set the output resolution to 852x576p 720p Set the output resolution to 1280x720p 1080...

Страница 15: ...ter graphics resolutions 50 60Hz for HDTV resolutions PROCESSING DELAY 2 frames CONTROLS Front panel buttons and infrared remote for menu driven OSD control ADDITIONAL CONTROLS Contrast brightness col...

Страница 16: ......

Страница 17: ...list of Kramer distributors visit our Web site where updates to this user manual may be found We welcome your questions comments and feedback P N 2900 000201 Rev 7 SAFETY WARNING Disconnect the unit f...

Отзывы: