background image

Connecting the FC-32 DVI to PC/Component Converter 


5  Connecting the FC-32 DVI to PC/Component Converter 

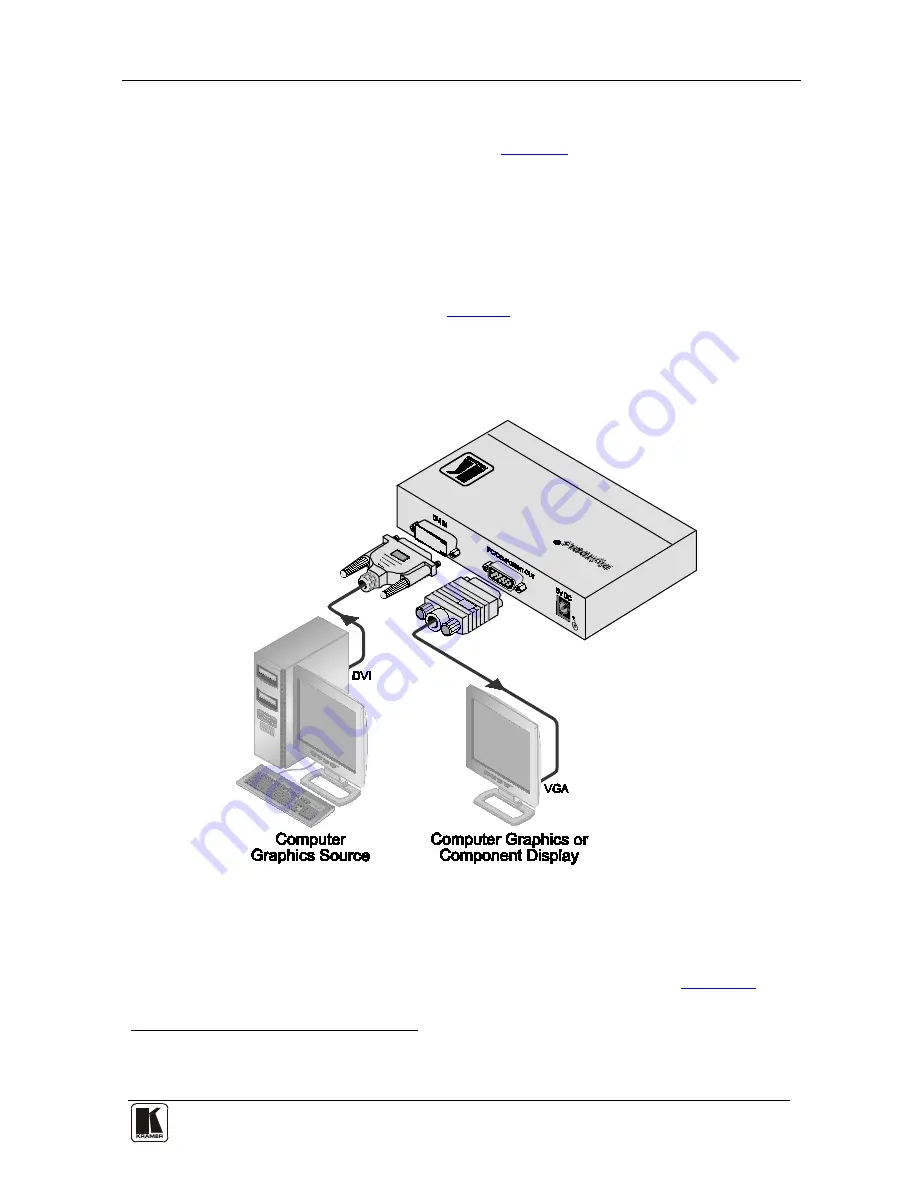
To connect the

 FC-32

, as the example in 

Figure 2

 illustrates, do the following

1

1.  Connect the digital input source (such as, a computer graphics source) to the 

24-pin Molex INPUT connector. 

2.  Connect an output acceptor (such as, a computer graphics VGA display or 

component display) to the PC/COMPONENT OUT


15-pin HD 

connector.  

3.  Set the front panel switch (see 

Figure 1

) to Y/P

B

/P

R

 for a component 

acceptor or to RGB for a computer graphics acceptor. 

4.  Connect the 5V DC power adapter to the power socket and connect the 

adapter to the mains electricity. 


Figure 2: Connecting the FC-32 DVI to PC/Component Converter 

6  EDID  

The 

FC-32

 is shipped with a fixed, factory default EDID (see 

Section  8

).  


1 Switch off the power on each device before connecting it to your FC-32. After connecting your FC-32, switch on its power 
and then switch on the power on each device 

Содержание FC-32

Страница 1: ...Kramer Electronics Ltd USER MANUAL Model FC 32 DVI to PC Component Converter ...

Страница 2: ...ing the FC 32 DVI to PC Component Converter 5 6 EDID 5 7 Technical Specifications 6 8 EDID Factory Default Data 6 Figures Figure 1 FC 32 DVI to PC Component Converter Functions 4 Figure 2 Connecting the FC 32 DVI to PC Component Converter 5 Tables Table 1 FC 32 DVI to PC Component Converter Functions 4 Table 2 FC 32 Technical Specifications 6 ...

Страница 3: ...the following items The FC 32 DVI to PC Component Converter Power adapter 5V DC Input This user manual2 2 Getting Started We recommend that you Unpack the equipment carefully and save the original box and packaging materials for possible future shipment Review the contents of this user manual Use Kramer high performance high resolution cables3 1 GROUP 1 Distribution Amplifiers GROUP 2 Switchers an...

Страница 4: ...KRAMER SIMPLE CREATIVE TECHNOLOGY Getting Started 2 2 1 Quick Start This quick start chart summarizes the basic setup and operation steps ...

Страница 5: ... connector A Y PB PR RGB selector switch1 5V DC power To achieve the best performance Use only good quality connection cables2 Avoid interference from neighboring electrical appliances that may adversely influence signal quality and position your Kramer FC 32 away from moisture excessive sunlight and dust to avoid interference deterioration in signal quality due to poor matching and elevated noise...

Страница 6: ...C Component Converter Functions Feature Function 1 DVI IN 24 pin Molex Connector Connect to digital source 2 PC COMPONENT OUT 15 pin HD Connector Connect to PC or component acceptor 3 5V DC Connector 5V DC for powering the unit 4 Y PB PR RGB Switch Slide the switch to the left for a component acceptor 1 5 slide the switch to the right for a computer graphics acceptor ON LED Illuminates green when ...

Страница 7: ...isplay to the PC COMPONENT OUT 15 pin HD connector 3 Set the front panel switch see Figure 1 to Y PB PR for a component acceptor or to RGB for a computer graphics acceptor 4 Connect the 5V DC power adapter to the power socket and connect the adapter to the mains electricity Figure 2 Connecting the FC 32 DVI to PC Component Converter 6 EDID The FC 32 is shipped with a fixed factory default EDID see...

Страница 8: ...00 00 FF FF FF FF FF FF 00 2E 4D 010 02 00 9C 03 00 00 27 14 01 03 020 78 58 32 78 EF EE 91 A3 54 4C 030 99 26 0F 50 54 A5 6F 00 D1 C0 040 B3 00 95 00 90 40 A9 40 81 00 050 81 40 81 C0 02 3A 80 18 71 38 060 2D 40 58 2C 45 00 12 2C 21 00 070 00 1E 66 21 50 B0 51 00 1B 30 080 40 70 36 00 12 2C 21 00 00 1E 090 28 3C 80 A0 70 B0 23 40 30 20 100 36 00 12 2C 21 00 00 1E 48 3F 110 40 30 62 B0 32 40 40 C0...

Страница 9: ... 60 Hz 16 10 Aspect Ratio 1400x1050 60 Hz 4 3 Aspect Ratio 1600x1200 60 Hz 4 3 Aspect Ratio 1280x800 60 Hz 16 10 Aspect Ratio 1280x960 60 Hz 4 3 Aspect Ratio 1280x720 60 Hz 16 9 Aspect Ratio 54 71 Detailed Descriptor 1 Preferred Detailed Timing 1920x1080 60Hz Pixel Clock 148 5 MHz Horizontal Image Size 530 mm Vertical Image Size 300 mm Refresh Mode Non interlaced Normal Display No Stereo Horizonta...

Страница 10: ...tical Active Time 1200 Lines Blanking Time 35 Lines Sync Offset 3 Lines Sync Pulse Width 6 Lines Border 0 Lines Digital Separate Horizontal Polarity Vertical Polarity Modeline 1920x1200 154 000 1920 1968 2000 2080 1200 1203 1209 1235 hsync vsync 108 125 Detailed Descriptor 4 Detailed Timing 1600x1200 60Hz Pixel Clock 162 MHz Horizontal Image Size 530 mm Vertical Image Size 300 mm Refresh Mode Non ...

Страница 11: ...ofnature ii Product modification orfailureto followinstructions supplied with theproduct iii Repairorattemptedrepairby anyonenot authorized byKramer iv Anyshipment oftheproduct claims must bepresentedtothe carrier v Removalorinstallationoftheproduct vi Anyothercause whichdoes not relateto aproduct defect vii Cartons equipment enclosures cables or accessoriesusedinconjunctionwiththeproduct 1 Remova...

Страница 12: ...the latest information on our products and a list of Kramer distributors visit www kramerelectronics com where updates to this user manual may be found We welcome your questions comments and feedback Caution Safety Warning Disconnect the unit from the power supply before opening servicing PN 2900 000487 Rev 3 ...

Отзывы: