Kozyard Alexander 12'x16' Скачать руководство пользователя страница 2

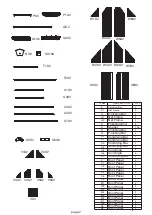
3. Wearing protective gloves is recommended.

4.You may  need a safety hat.

6.Please use a Phillips screwdriver. 

8.For ease of construction, you may need to 
    use a drill.

2.You will need one or more stepladders.

5.Use the hex keys in the box. 

2+

1.Two or more people are required for assembly.

7.Do not fully tighten screws prior to 
    complete assembly. 

Содержание Alexander 12'x16'

Страница 1: ...Assembly Manual 12 x16 Alexander hardtop gazebo with double roof Kozyard LLC Products Copyright 2016 2019 Kozyard LLC All Rights Reserved...

Страница 2: ...t 6 Please use a Phillips screwdriver 8 For ease of construction you may need to use a drill 2 You will need one or more stepladders 5 Use the hex keys in the box 2 1 Two or more people are required f...

Страница 3: ...1 B DESCRIPTION Pole 4 2 2 2 2 2 2 2 2 2 2 2 2 2 2 4 4 4 4 4 4 4 4 4 4 1 1 Beam Joint Bar Sidewall Track Beam Beam Beam Jointer Bar Jointer Bar Jointer Bar Jointer Bar Jointer Bar Union Bar Corner Cov...

Страница 4: ...r Spacer Finishing Bar Solidifying Bar Solidifying Bar Solidifying Bar Solidifying Bar Solidifying Bar Iron Angle Iron Angle Roof Panel Roof Panel Roof Panel Roof Panel Roof Panel Roof Panel Roof Pane...

Страница 5: ...anel Roof Panel Roof Panel Roof Panel Mosquito Sidewall Solid Sidewall Metal Bracket Metal Bracket Metal Bracket Metal Bracket Metal Bracket Screws Screws Screws Hook Screws Screws Screws Screws Screw...

Страница 6: ...A x4 L x4 1 x12 A L A L 1 1 1 x1 page 4 Parts Required Step 1 Set up poles Part A with stand plates Part L using screws 1 as shown in diagram X4...

Страница 7: ...E D F 1 1 1 1 page 5 Connect Part C and Part B into one beam using union bar Part F with screws 1 as shown in diagram Connect Part E and Part D into one beam using union bar Part F with screws 1 as s...

Страница 8: ...hown in diagram Replicate the same steps for parts C2 B2 attaching them to the finished beam C B using screws 1 Attach parts E1 E1a D1 D1a to finished beam E D using screws 1 Attach parts C1 B1 to fin...

Страница 9: ...2 2 2 x16 3 3 3 3 3 x16 A A A A B C B C D E D E page 7 Step 4 Parts Required Use screws 2 3 to connect poles and beams together as shown in diagram X4 X4...

Страница 10: ...J2 J2 J2 J2 J1 J1 J1 J1 1 J1 J2 J2 x4 J1 x4 1 1 1 x32 page 8 Parts Required Affix the frame with corner solidifying bars Parts J1 J2 using screws 1 as shown in diagram Step 5...

Страница 11: ...9 9 9 9 G x4 x24 H page 9 Parts Required Step 6 Finish connecting beams using corner covers Part G and screws 9 as shown in diagram Affix middle beams using joint cover Part H and screws 9 and 8 as sh...

Страница 12: ...28 4 4 H1 8 4 4 H1 H1 x7 x7 x7 x7 x9 x9 x9 x9 Step 7 Put 7 hooks to each slot of sidewall track part C2 Part B2 Put 9 hooks to each slot of sidewall track part E2 Part D2 4 After finish hooks into tra...

Страница 13: ...4 Step 8 Set up roof frame Connect the inside roof connect Part K with the corner roof bar Part M using screws 1 Attach corner roof bar Part M to main frame using screw 1 as shown in diagram Attach fi...

Страница 14: ...t P1 Q1 Q2 to finishing bars Part P Q using screws 1 11 as shown in diagram Attach roof bar Part N N1 to main frame using screw 1 11 x12 N1 x4 Q1 x2 Q2 x2 N x4 1 x32 N N N N N N N N N N N N1 N1 N1 N1...

Страница 15: ...page 13 Parts Required K1 x1 1 x3 Step 10 Connect outside roof connctor Part K1 to inside roof Part K using screw 1 as shown in diagram K1 K1 K 1 1 1...

Страница 16: ...page 14 Parts Required Step 11 Cover metal bracket Part Z Z1 Z2 to roof panels as shown in diagram...

Страница 17: ...v6 to upper roof as shown in diagram Attach finishing bar Part T1 T2 to upper roof with finish end Part R using screws 1 as shown in diagram T1 x2 1 x12 R x4 T1 T1 T2 T2 T1 T2 1 1 1 1 1 R V1 V2 V3 V4...

Страница 18: ...n diagram Attach solidifying bars Part U3 U4 U7 or Part U1 U2 together to roof bar using iron angle Part U6 and screws 1 as shown in diagram U6 x6 U5 x4 1 x32 U4 x2 U3 x2 U2 x2 U1 x2 U7 x2 U1 U2 U1 U2...

Страница 19: ...page 17 Parts Required Step 14 Cover metal bracket Part Z to roof panels as shown in diagram...

Страница 20: ...page 18 Parts Required Step 15 Cover metal bracket Part Z Z3 Z4 to roof panels as shown in diagram...

Страница 21: ...page 19 Overall roof assembly W 1 W2 W3 W4 W5 W6 W7 W8 X1 X2 X3 X4 X5 X6 X7 X8 X9 X10 X1 X2 X3 X4 X5 X6 X7 X8 X9 X10 W1 W2 W3 W4 W5 W6 W7 W8 Connect roof as below...

Страница 22: ...Step 15 Affix roof panels using screws and spacers Part S as shown in diagram Attention Put on one roof panel and fasten it accordingly before attaching second roof panel 6 x8 10 x4 S x136 5 x88 7 x36...

Страница 23: ...page 21 Parts Required Step 16 Hang up mosquito sidewalls and solid sidewalls as shown in diagram In the end check all screws are fixed tightly before using...

Страница 24: ...Copyright 2016 2019 Kozyard LLC All Rights Reserved Kozyar A Mer W...

Отзывы: