Page 32
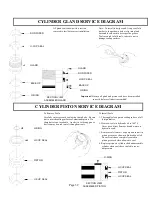
CYLINDER GLAND SERVICE DIAGRAM
CYLINDER PISTON SERVICE DIAGRAM
To Install Seals:
1. Thoroughly clean piston sealing surface of all
foreign matter.
2. Heat new seals in hydraulic oil to 160
°
F.
Never use a direct flame or heated water on
hydraulic seals.
3. Remove seals from oil, wipe dry and install in
piston grooves as shown in illustration at left.
Be sure seals have completely seated in
piston grooves before allowed to cool.
4. Replace piston on cylinder shaft and assemble
cylinder when seals have cooled to room
temperature.
To Remove Seals:
Carefully cut across each seal with a sharp knife. Be sure
not to scratch sealing surfaces of aluminum piston. If a
sharp knife is not available. An electric soldering gun or
hot iron may be used to melt throughout seals.
All gland seals shown with a section
removed to facilitate correct installation.
Note: To install rod wiper and U-cup seal, fold
similar to shape shown below, slip into gland
bore and locate each in its respective groove.
Tools are used to fold seals, take care not to
damage sealing surfaces.
Important! Be sure all gland and piston seals have been installed
correctly before cylinder is assembled!
O-RING
U-CUP SEAL
ROD WIPER
BACK UP
GLAND
SECTION VIEW
ASSEMBLED GLAND
SECTION VIEW
ASSEMBLED PISTON
U-CUP SEAL
PISTON
U-CUP SEAL
O-RING
ROD WIPER
BACK UP
GLAND
U-CUP SEAL
O-RING
O-RING
U-CUP SEAL
PISTON
U-CUP SEAL
Содержание Pro 2585
Страница 8: ...SAFETY DECALS Page 6...
Страница 19: ...HYDRAULIC SYSTEM PARTS DIAGRAM Page 17...
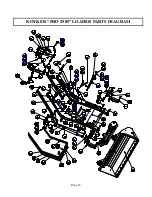
Страница 20: ...KOYKER PRO 2585 LOADER PARTS DIAGRAM Page 18...
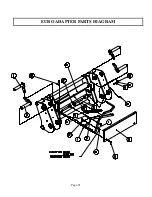
Страница 23: ...EURO ADAPTER PARTS DIAGRAM Page 21...
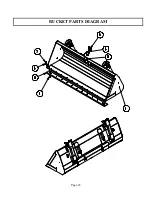
Страница 25: ...BUCKET PARTS DIAGRAM Page 23...
Страница 27: ...ACCUMULATOR KIT PARTS DIAGRAM Page 25...
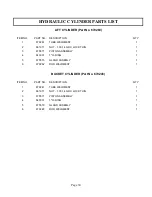
Страница 33: ...HYDRAULIC CYLINDER PARTS DIAGRAM Page 31...

