5
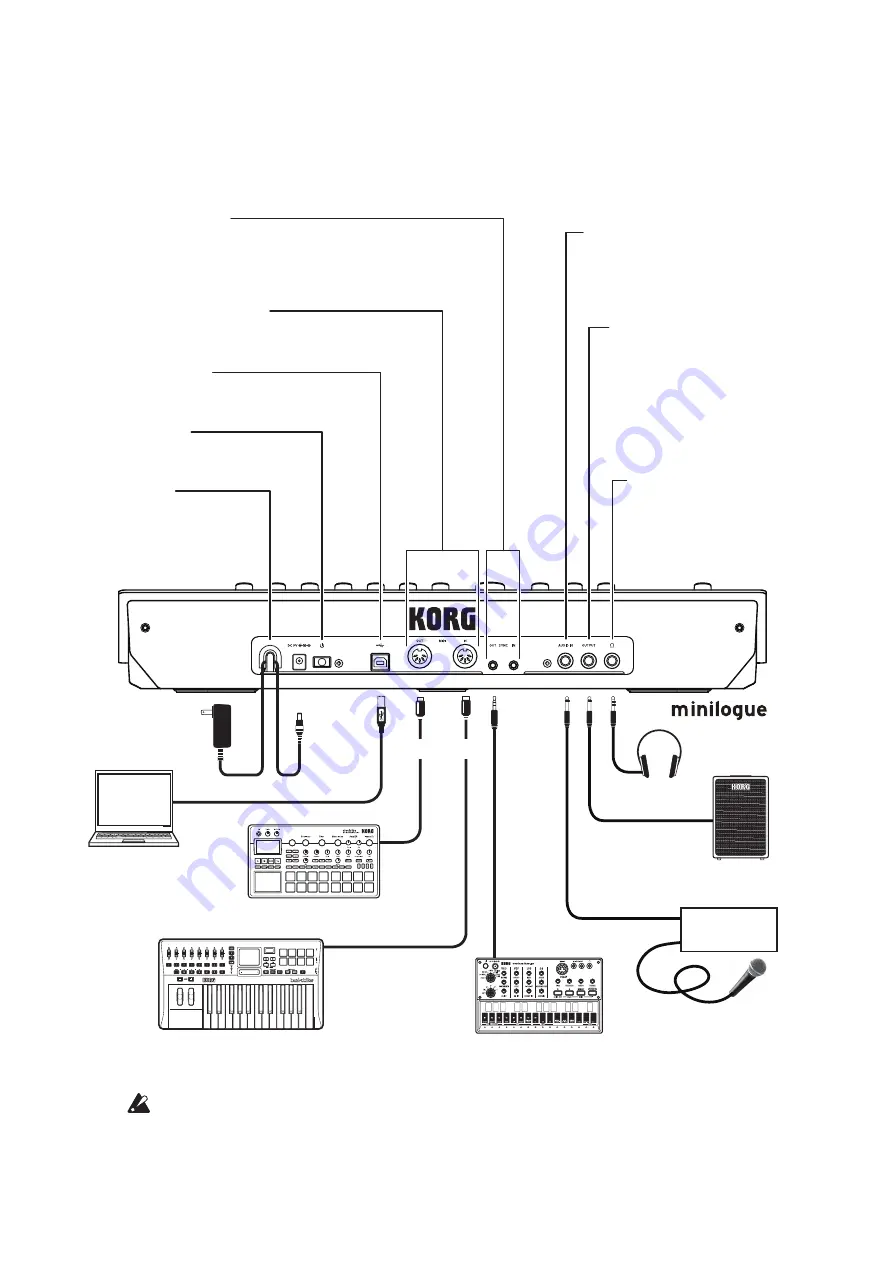
Rear Panel Connections
The illustration below shows a typical example of connections for the mini
-
logue. Connect your equipment according to the needs of your own system.
You must make connections with the minilogue turned off. Failure
to observe this precaution may cause malfunctions and/or damage to
your speaker system.
Computer
AC adapter
(included)
Mixer
DC 9V jack
Cable hook
Loop the DC Plug end of the
AC Adapter cable around
this hook to prevent the cable
from being accidentally
pulled out.
USB B connector
This connector allows the minilogue to
exchange MIDI messages with your computer.
Power switch
Hold this switch in to turn the
minilogue On or Off.
MIDI IN, OUT connectors
Connect these to an external MIDI device so that MIDI
data can be transmied or received.
SYNC IN, OUT jacks
The minilogue steps can be synchronized with other devices using
these jacks. A pulse sent from the audio output of another device or
DAW can be used by connecting it to the SYNC IN jack. Use an 1/8"
cable (mini-phone plug) to sync with Korg volca products.
AUDIO IN jack
This standard 1/4" TS jack accepts a
mono audio signal from another
synthesizer, instrument, or external
sound source.
OUTPUT jack
This standard 1/4" TS jack
sends the sound of the
minilogue to your powered
monitoring system, mixer,
recording setup, or external
amplifier. The level is
controlled by the MASTER
knob.
Headphones jack
Connect your headphones
here. This jack outputs the
same sound as the OUTPUT
jack.
Sound module, rhythm machine, etc.
MIDI keyboard, rhythm machine, etc.
Groove machine
Microphone
Monitor speakers
(with internal amp)
Headphones
MIDI cable
USB cable
MIDI OUT
MIDI IN
SYNC IN
USB port
INPUT
OUTPUT
Содержание minilogue
Страница 58: ......


